Mesh Inserts

In this section:
- Overview
- User Interface
- Mesh Inserts List
- Mesh Insert Attributes
- Adding Inserts
- Editing
- Duplicating
- Manipulating Root Object
- Finalizing
- Exporting Mesh Insert Assets
Overview
👉 Access it via menu BASHR->Mesh Inserts
Mesh Inserts allow you to rapidly and non-destructively blend-in assets to surrounding surfaces encouraging experimentation with surface details.
And, unlike booleans, Mesh Inserts are primarily designed to work with a subd workflow in mind.
User Interface
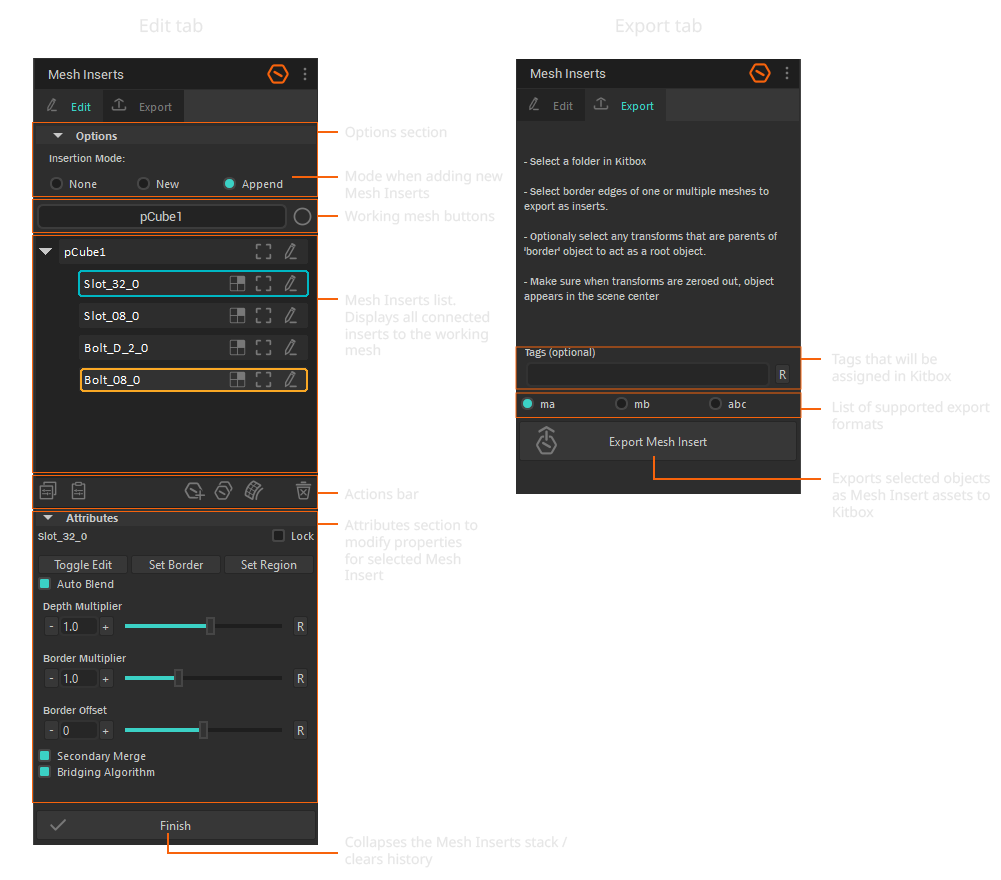
Mesh Inserts List
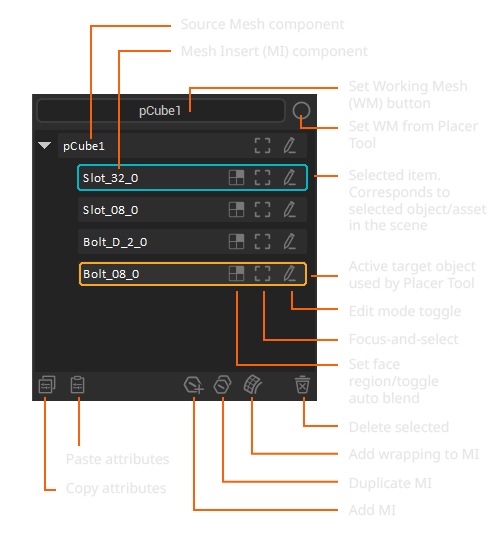
Displays the stack of MIs attached to the source object and contains various actions for working with MI components.
Select any mesh object and click Set working mesh to make it a target for Mesh Insert operations and list out its MI stack if there is any.
Selecting an item exposes attributes for the selected MI or Source Mesh components. Double-clicking a MI component will prepare the MI for manipulation with the Placer Tool (becomes indicated with an orange outline).
📘 Deleting layers is only supported from the top down.
Mesh Insert Attributes
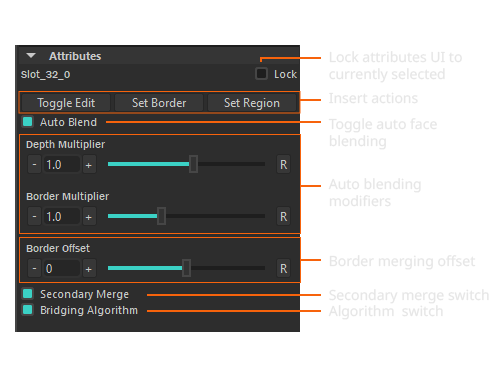
Exposes actions and properties for tweaking and editing the behavior of individual MIs.
| Action/Property | Description | Preview |
|---|---|---|
| Toggle Edit | Exposes the underlying border mesh | |
| Set Border | Sets the selected edges as blending border. See tutorial | |
| Set Region | Sets the region on source mesh as blending region. See tutorial | |
| Auto Blend | Enables/disables automatic border blending with the source object | |
| Depth Multiplier | Tells how deeply look for faces. |  |
| Border Multiplier | Expands/contracts border search radius. |  |
| Border Offset | Offsets the topology of the border edges. |  |
| Secondary Merge | Won't merge verts that didn't find their counterpart on source border (happens when vert count differs between borders). | |
| Bridging Algorithm | Switches between bridging and simplified blending algorithms. Use whichever works best under specific conditions. |
Adding Inserts
There are a few ways of adding Mesh Inserts to your mesh. See the tutorial.
- By placing any mesh on your desired working mesh. Selecting the border edge and clicking Add Mesh Insert button.
- By exporting a Mesh Insert asset and then placing it from Kitbox on any mesh in the scene.
- By selecting face islands and double-clicking on your exported MI asset in Kitbox to place it on each individual face island. This also assigns each selected face island as blending region to their respective MIs.
💡 Mesh Inserts work best with similar topology density between source and insert objects.
Insertion Modes
The Insertion Mode controls how new Mesh Insert objects will be inserted when executing Add Mesh Insert action or placing them from Kitbox.
| Mode | Description | Preview |
|---|---|---|
| None | Places as a basic asset without blending i.e. floater |  |
| New | Will insert under a new layer, this way you can stack Mesh Inserts over each other. However, performance might suffer if you need to modify inserts in the layers below. |  |
| Append | Adds Mesh Insert to the same (topmost) layer. Use this whenever possible as it is the more performant mode with the caveat that inserts need to maintain some geometry separation for they do not compete for the same faces. |  |
Editing
You can expose and edit the underlying Mesh Insert or Source Object by clicking the edit icon in the Mesh Inserts list or by clicking Toggle Edit in the attributes section. See tutorial.
⚠️ Refrain from editing the actual working mesh with an active MI stack! This will cause unwanted geometry behavior if you decide to edit its MIs afterward. It's recommended to finalize first.
Duplicating
While in Placer Tool you can rapidly duplicate the active MI by pointing to any mesh in the scene and Shift + LMB.
Alternatively, select components in the MI list and click Duplicate selected button in the actions bar. This will duplicate MI on the same mesh.
Manipulating Root Object
You're not allowed to directly move/rotate/scale the source object mesh (the one you place your inserts on) while working with MI. Therefore use the _Mover group to move the source mesh with all of its inserts.
Finalizing
Once you're done working with inserts press Finish to clean up and flatten the history stack.
Exporting Mesh Insert Assets
Navigate to Export tab, select border edges of any mesh, and click Export Mesh Insert, the mesh of the selected border will be designated as a border object AND as a root object.
If your mesh insert consists of multiple objects e.g. a bolt in a hole or you'd like to have a separate root for your asset e.g. with a different pivot, group them under a single group which will act as the asset's root, select it and then shift-select the border edges of the border mesh.
You can export multiple Mesh Insert assets at once this way too.
📘 Border object must be a child of the root.
📘 At this time you can't export mesh inserts directly from source objects.
📘 Make sure that root objects when zeroed out have their pivots at the scene origin (0, 0, 0).