
Welcome to BASHR
Welcome to the user guide for BASHR Toolkit - a set of 3d kitbashing tools designed to let artists focus on art more and chores less.
For development updates follow us on Twitter or subscribe to our Newsletter.
Don't have a BASHR Toolkit license? Grab it HERE!
Getting Started
Quick Topics
- Launching Kitbox
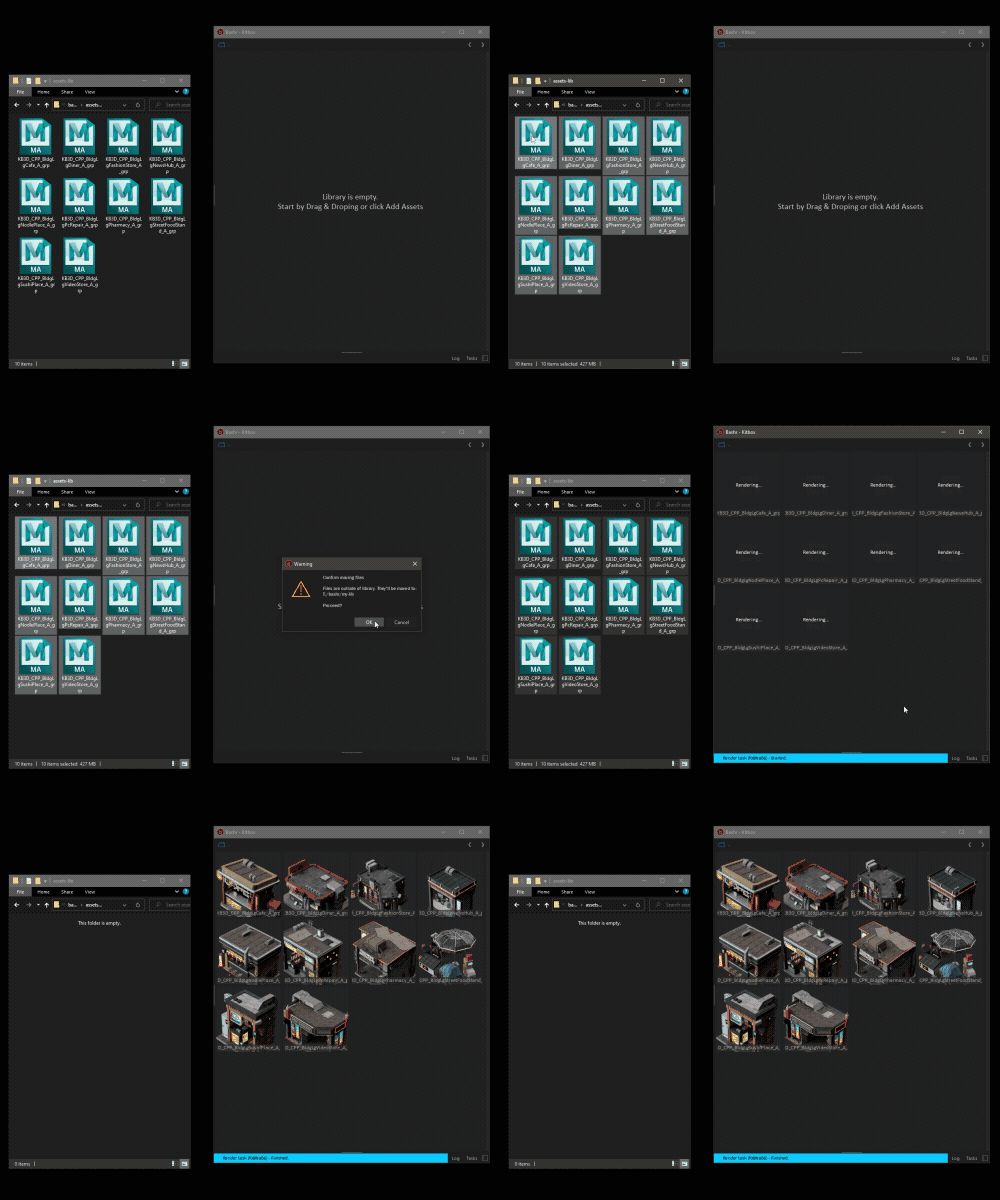
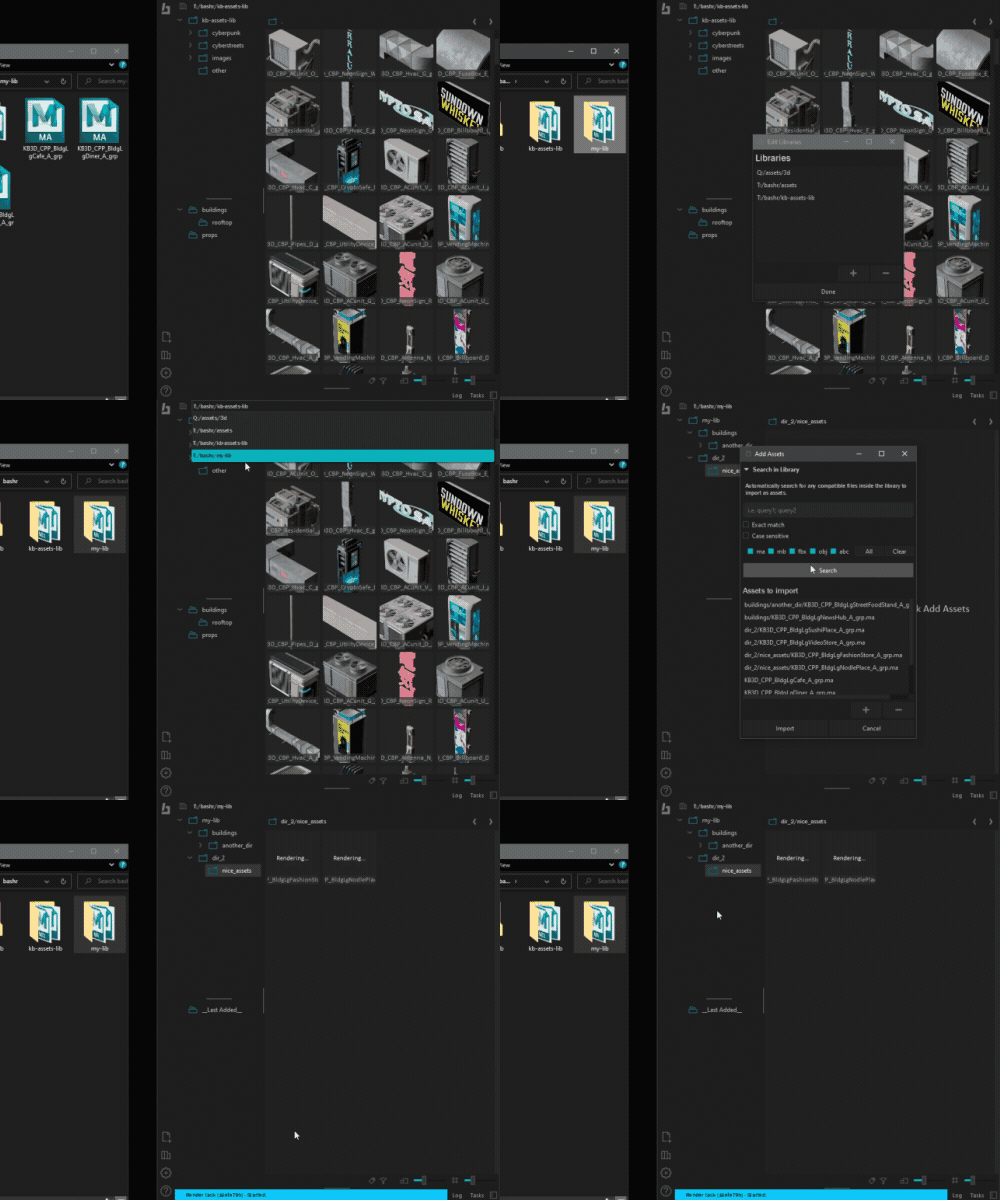
- Importing an asset library
- Exporting objects as assets
- Exporting mesh insert assets
What's New
0.10.0
This feature release comes with revamped workflows for working with Mesh Inserts and a general UI/UX overhaul of Maya Tools.
Maya UI
- Separated and exposed all available Maya Tools in BASHR menu for easy access.
Mesh Inserts
- Removed the Make Mesh Insert button and placed it in the new actions bar along with other common operations.
- Improved workflow of adding inserts from the scene. See the tutorial.
- Added an edit toggle button for individual MI components for quickly switching to edit mode. This also supports batch switching. See the tutorial.
- Added a set region button/indicator for a more streamlined way of setting or disabling blending regions for particular MIs. See the tutorial.
- Removed the delete button from individual MI list components and moved it to the actions bar. Now you have to explicitly select each Mesh Insert for deletion. Added support for batch deletion.
- Added shortcuts for wrapping and duplicate actions.
- Added a focus-and-select feature to quickly find Mesh Inserts on an object.
- Added a copy/paste action for MI attributes.
Cleanup Tools
Added scene cleanup tools for clearing out metadata nodes and scene cache. It can be accessed via BASHR->Scene Cleanup menu.
Changelog
0.10.1 (2023-08-11)
Hotfix to patch some Maya Tools UI menu issues.
Bug fixes:
- Maya Tools: UI - Fix menu issues during first startup; (BASHR-129)
0.10.0 (2023-08-09)
This release focuses on UI/UX overhaul of Maya tools. IMPORTANT: changes in this release can break some functionality in previously saved Maya scenes that include BashrCache and active Mesh Insert stacks. Use the new cleanup tools to fix.
Bug fixes:
- Maya Tools: Utils - Fixed wrapping issues with basic objects;
Modified features:
- Kitbox: Move namespace prompting to DCC apps; (BASHR-117)
- Maya Tools: UX - Expose access to individual tools in BASHR menu; (BASHR-111)
- Maya Tools: UX - Rename Assets Toolbox to Objects Toolbox for clarity;
- Maya Tools: UI - Make Mesh Inserts and Objects Toolbox into separate tools;
New features:
- Maya Tools: General - Add a menu for cleaning up BASHR scene data; (BASHR-125)
- Maya Tools: Mesh Inserts - Expose edit action for individual items in inserts list;
- Maya Tools: Mesh Inserts - Improve workflow of adding inserts from within the scene;
- Maya Tools: Mesh Inserts - Improve workflow of setting edge blending region;
- Maya Tools: Mesh Inserts - Add a focus-and-select on Mesh Inserts action; (BASHR-127)
- Maya Tools: Mesh Inserts - UI - Add copy/paste of attributes;
- Maya Tools: Objects Toolbox - Expose duplicate asset action to UI; (BASHR-107)
0.9.3 (2023-07-05)
Patch for Maya Tools.
Bug fixes:
- Maya Tools - Asset Caching - Fixed asset origin not being at scene center on import.
- Maya Tools - Mesh Inserts - Fixed bridging algo and border offseting.
- Maya Tools - UI - Fixed slider issues.
0.9.2 (2023-06-18)
Bug fixes and minor feature updates.
Bug fixes:
- Kitbox - Fixed folders not showing items when renamed.
Updated features:
- Placer Tool - Now takes into account transform pivot for placement instead of its origin.
0.9.1 (2023-06-01)
Bug fixes and minor feature updates.
Bug fixes:
- Maya Tools, Placer Tool - Fixed a crash when changing up axis in Maya 2023. BASHR-110
- Kitbox - Fixed right-click selections.
New features:
- Kitbox - Added filter by file type.
0.9.0 (2022-12-21)
Initial BETA release
Installation
Download the zipped package from the link that you received over email. Extract and install the .msi package.
Installing Maya Tools
- Open Maya
- Navigate to your BASHR Toolkit directory, by default
C:\Program Files\BashrToolkitand go to "install" folder. - Drag and drop the "install_maya.py" to your Maya window.
The BASHR menu will appear in Maya's menu bar. The toolkit will be automatically loaded each time you start Maya.
Licensing
Licenses are node-locked, meaning the license key is tied to your machine.
⚠️ If you'd like to transfer the license to another machine or you're about to swap some hardware or reinstall your OS, please deactivate your license before proceeding. In case something went wrong and you were not able to deactivate, send an email to support.
Launching license utility
License utility can be found in your install directory under "bin" folder C:\Program Files\BashrToolkit\bin\bashr-licman.exe. It also can be found under Help->Licensing in Maya's BASHR menu or under the Kitbox help icon.
Activating your license
Launch the license utility. Simply put the license key that you received via email when prompted and click activate.
⚠️ Activating licenses require an internet connection.
Deactivating your license
Launch the license utility and press deactivate.
📘 Deactivation can be performed only on the same machine where it was activated.
⚠️ Deactivating licenses require an internet connection.
Maya Tools
Overview
All available tools can be found under BASHR menu tools section.
Caching
Whenever you place new objects in the scene using the tools they will be referenced in first (only once) and placed under __Bashr Cache__ group.
Cache can be cleaned up via menu BASHR->Scene Cleanup->Clear Scene Cache
Metadata
When using BASHR Toolkit certain metadata is being written and kept in the scene necessary for tools' functionality. When shipping or publishing your scenes you can cleanup it up via menu BASHR->Scene Cleanup->Remove All Metadata in Scene.
Kitbox

In this section:
Overview
👉 Access it via menu BASHR->Launch
Kitbox is the browser of your 3d assets. Find out more about its general functionality here.
Hiding the window
Pressing X in the title bar closes the Kitbox session. To open it again you would need to relaunch Kitbox which might take time for the library to load. Instead, use the BASHR->Toggle Window menu button to toggle window visibility.
You can add this python script as a shortcut or as a shelf button to quickly toggle the window:
bashr.maya.toggle_window(at_cursor=False)
If at_cursor is set to true - places the window under the mouse cursor.
Actions
When Kitbox is launched from within Maya some extra context menu actions become available. Read more here
Objects Toolbox
In this section:
Overview
👉 Access it via menu BASHR->Objects Toolbox
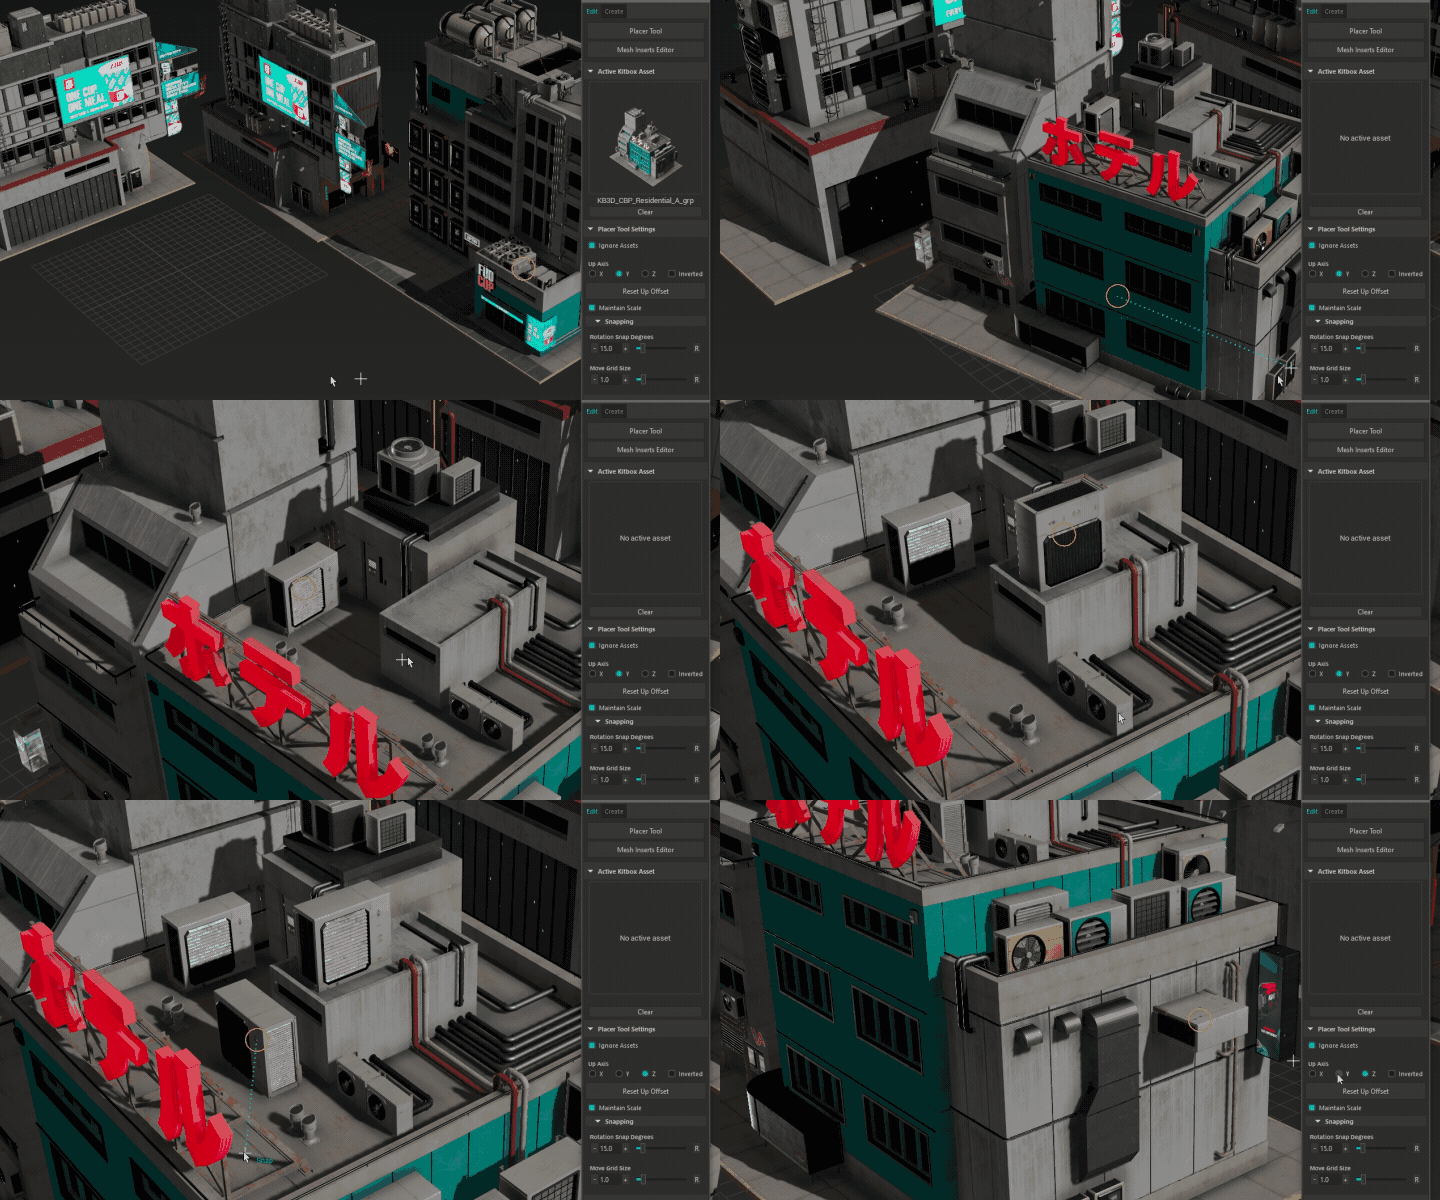
The primary toolbox for common tools and utilities when working with objects. It also exposes settings for the Placer Tool context.
User Interface
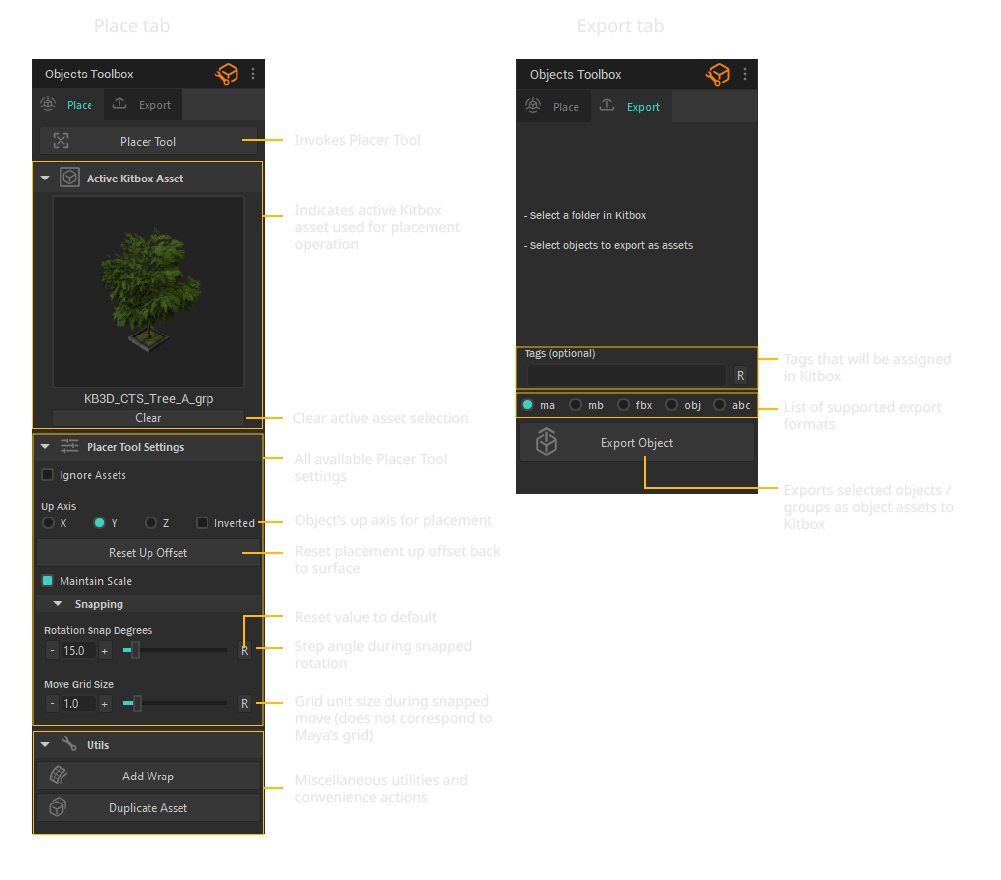
Placing Assets
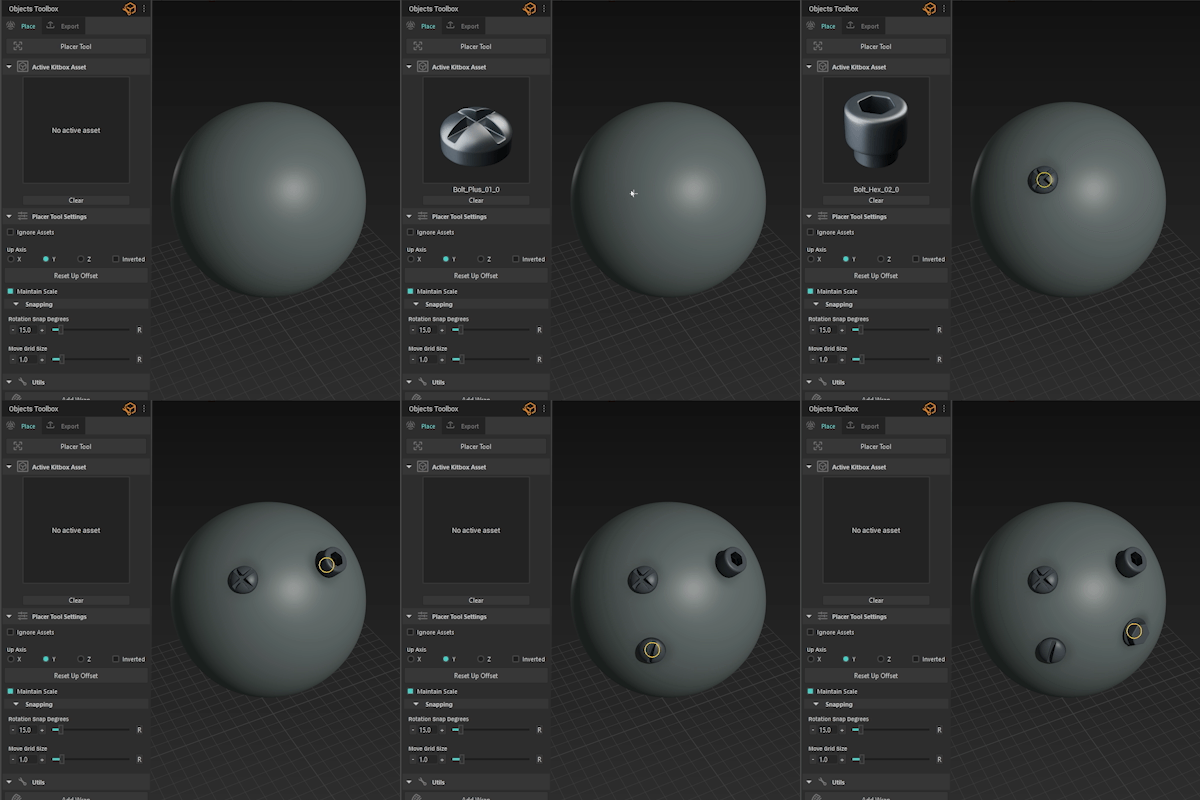
Selection of an item in Kitbox will appear under Active Kitbox Asset indicating it will be placed once you left-click in the scene while the Placer Tool is active. If you prefer to cancel the operation click Clear button.
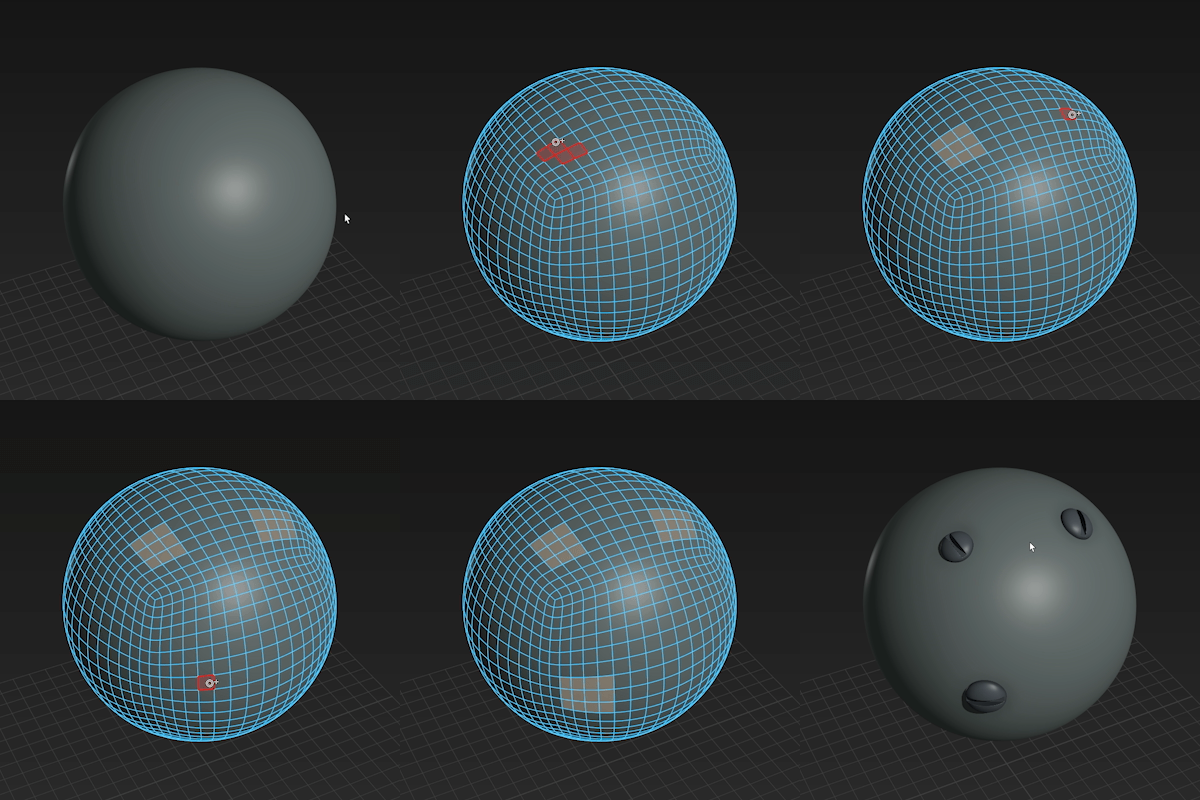
Alternatively, you can place assets by selecting faces of a mesh and double-clicking an item in Kitbox, this will automatically place and align objects on the surface for each selected face island. If you are placing a Mesh Insert it will assign each face island as a blending region.
Utilities
Various utility tools can be found under Utilities section.
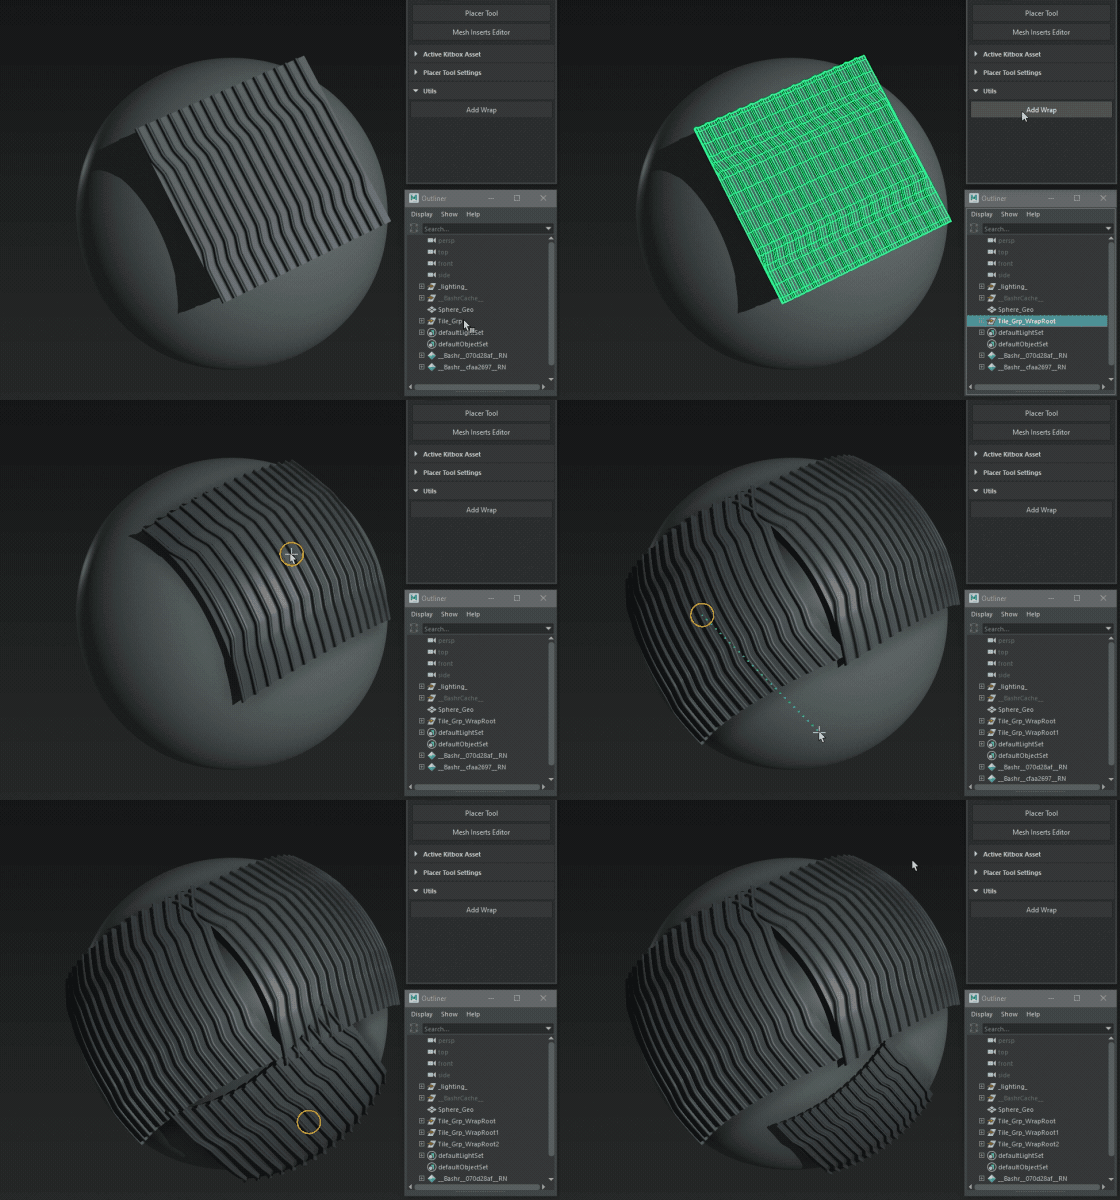
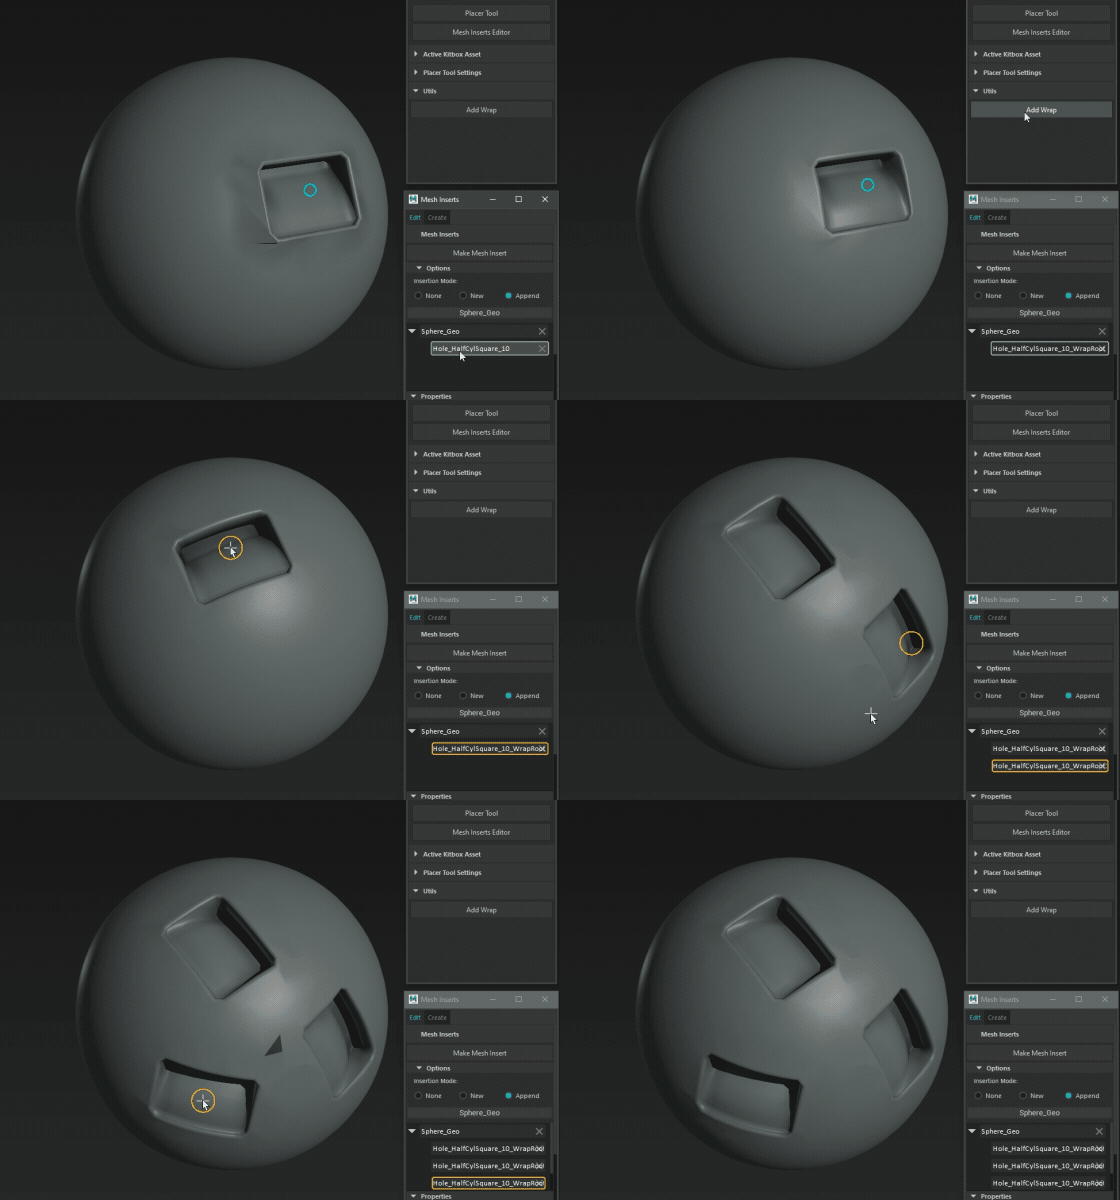
Add Wrap
Whenever you wish an object or an asset to comform to a surface:
- Select your object or a group and click Add Wrap.
- Select the newly created "_WrapRoot" transform and engage the Placer Tool.
- Point to any other mesh surface to get it shrink-wrapped.
📘 Instanced objects are not supported.
Duplicate Asset
A convenience function to duplicate an entire asset that has been placed from Kitbox.
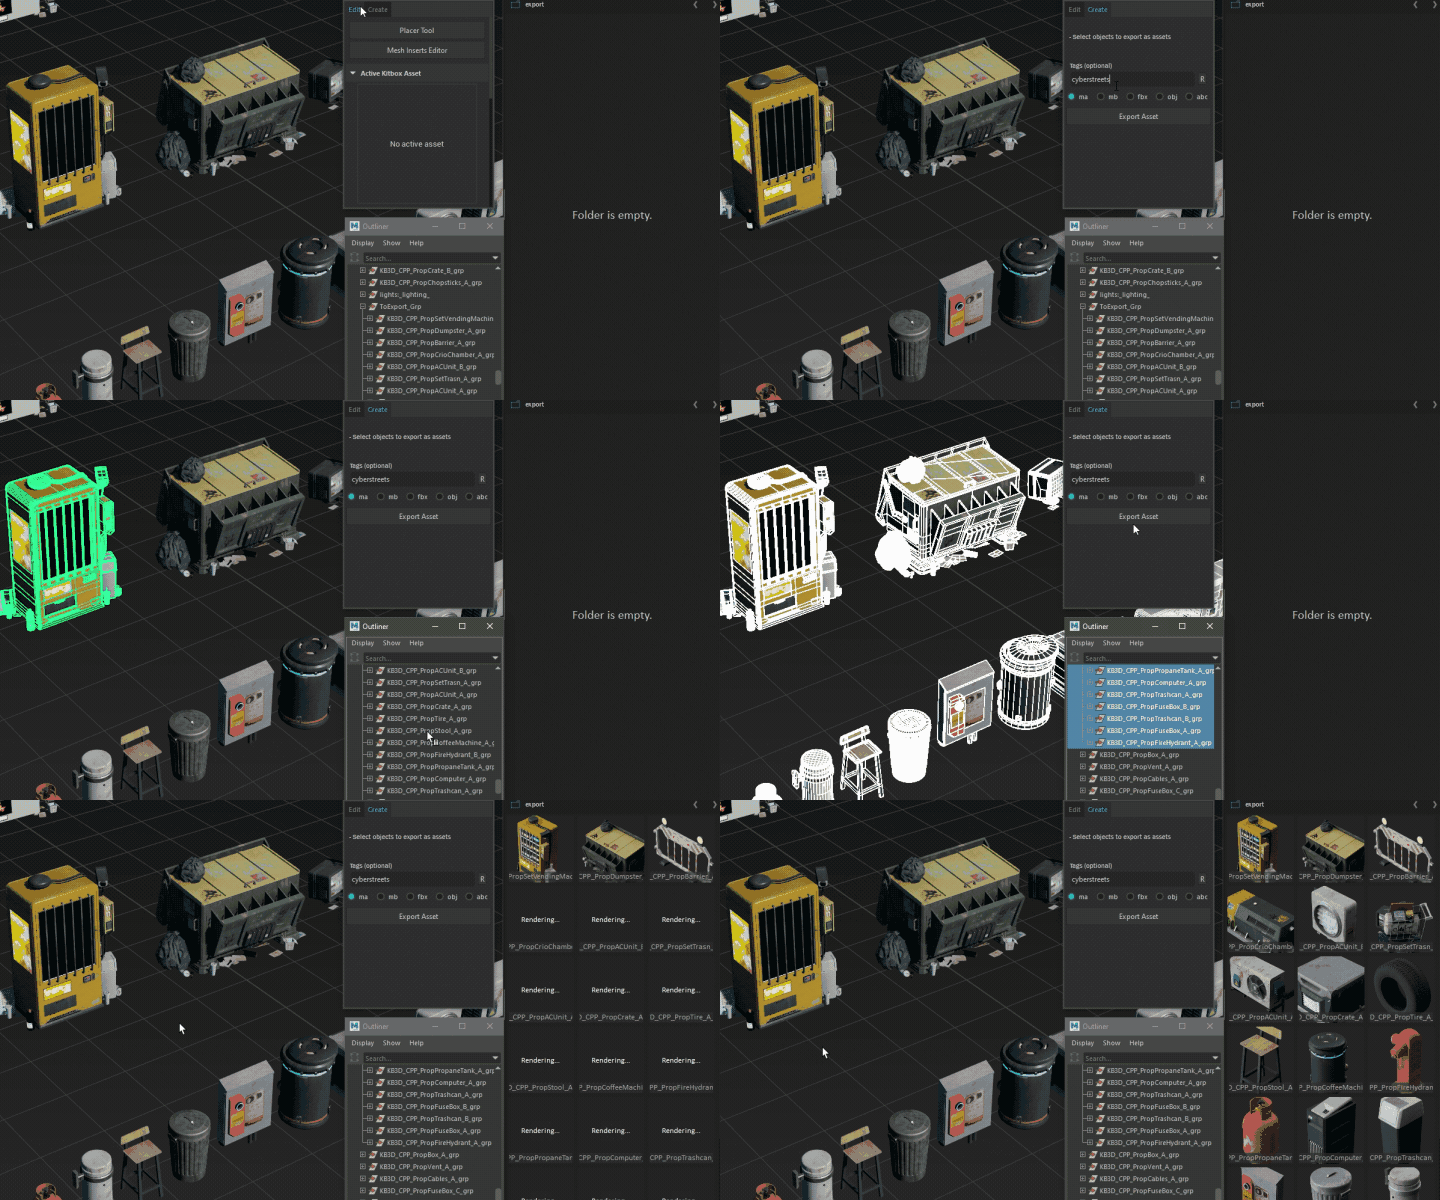
Exporting Objects as Assets
Under the Export tab you can export any number of selected objects/groups to Kitbox. Each selected object will be exported as an individual asset.
📘 Make sure you have the desired folder selected in Kitbox before exporting.
Mesh Inserts

In this section:
- Overview
- User Interface
- Mesh Inserts List
- Mesh Insert Attributes
- Adding Inserts
- Editing
- Duplicating
- Manipulating Root Object
- Finalizing
- Exporting Mesh Insert Assets
Overview
👉 Access it via menu BASHR->Mesh Inserts
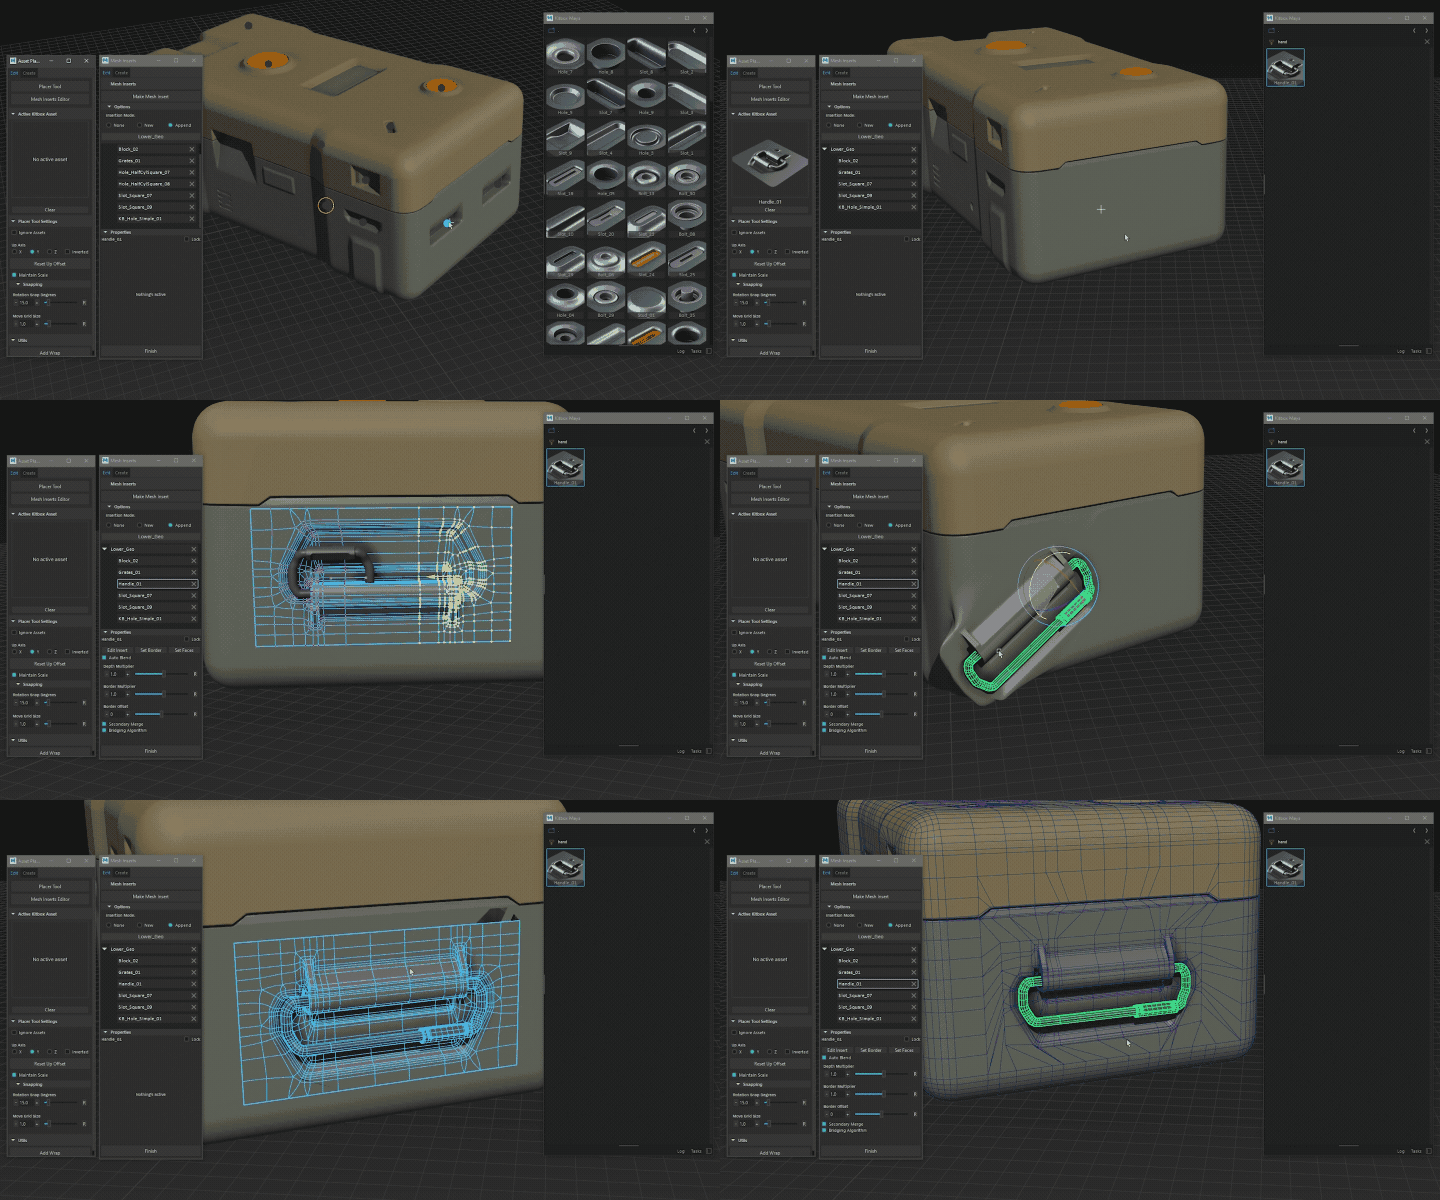
Mesh Inserts allow you to rapidly and non-destructively blend-in assets to surrounding surfaces encouraging experimentation with surface details.
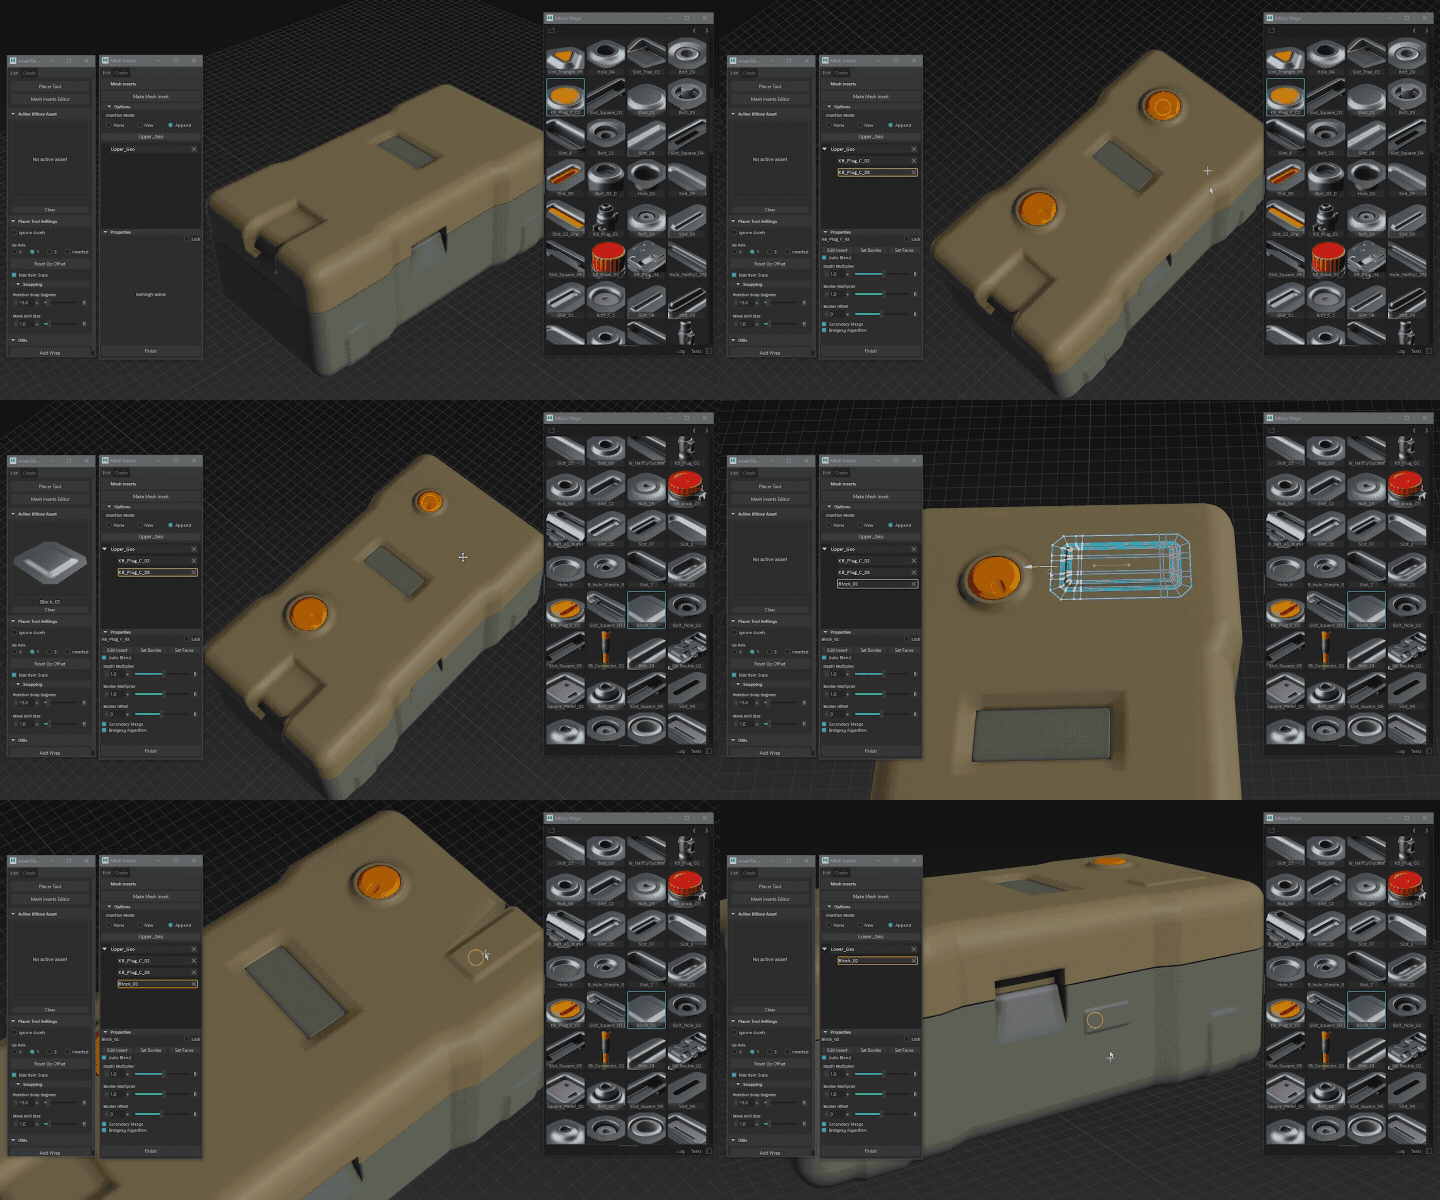
And, unlike booleans, Mesh Inserts are primarily designed to work with a subd workflow in mind.
User Interface
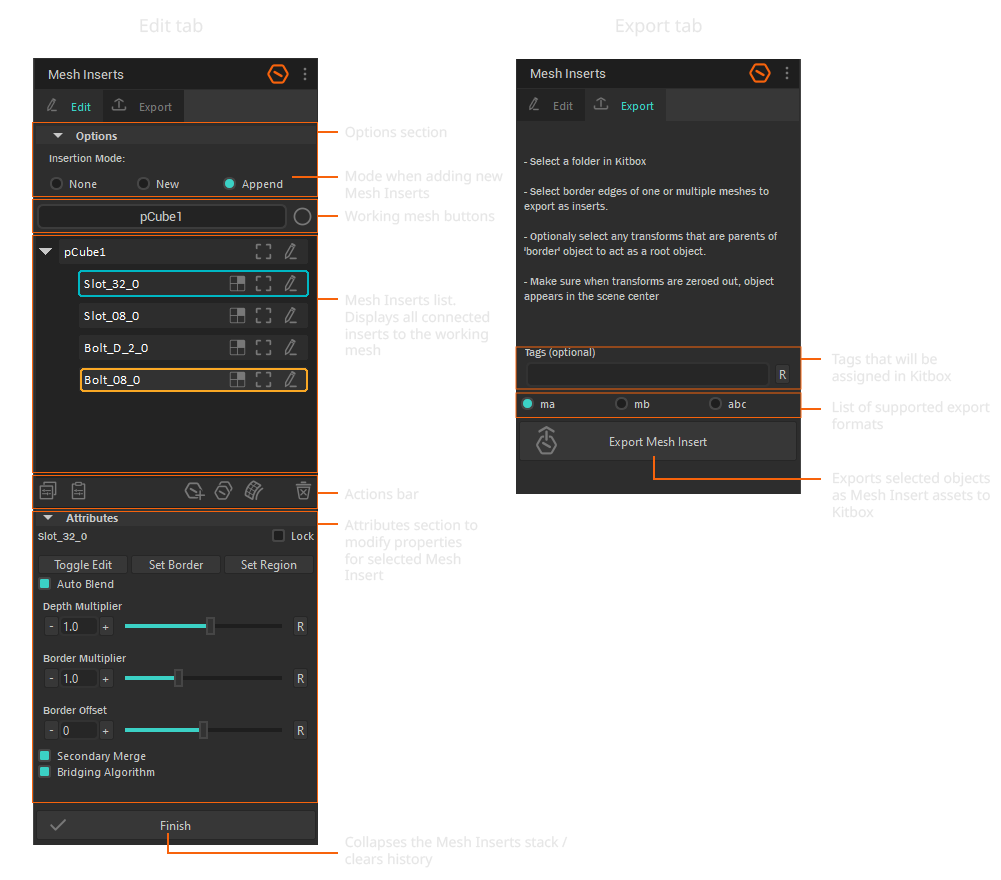
Mesh Inserts List
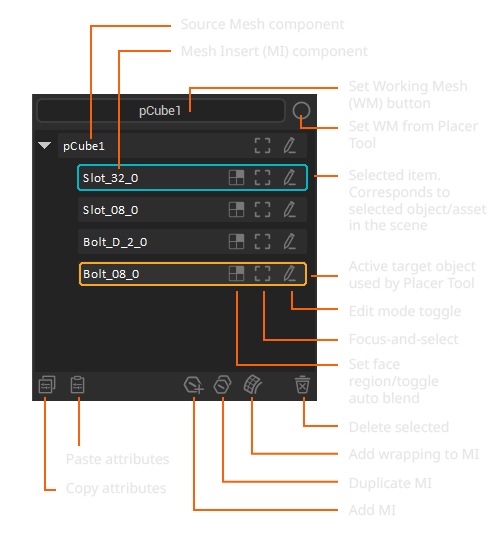
Displays the stack of MIs attached to the source object and contains various actions for working with MI components.
Select any mesh object and click Set working mesh to make it a target for Mesh Insert operations and list out its MI stack if there is any.
Selecting an item exposes attributes for the selected MI or Source Mesh components. Double-clicking a MI component will prepare the MI for manipulation with the Placer Tool (becomes indicated with an orange outline).
📘 Deleting layers is only supported from the top down.
Mesh Insert Attributes
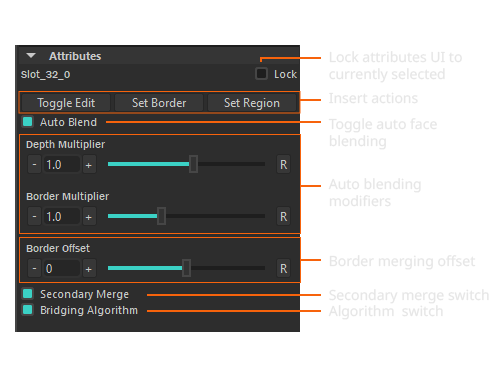
Exposes actions and properties for tweaking and editing the behavior of individual MIs.
| Action/Property | Description | Preview |
|---|---|---|
| Toggle Edit | Exposes the underlying border mesh | |
| Set Border | Sets the selected edges as blending border. See tutorial | |
| Set Region | Sets the region on source mesh as blending region. See tutorial | |
| Auto Blend | Enables/disables automatic border blending with the source object | |
| Depth Multiplier | Tells how deeply look for faces. | 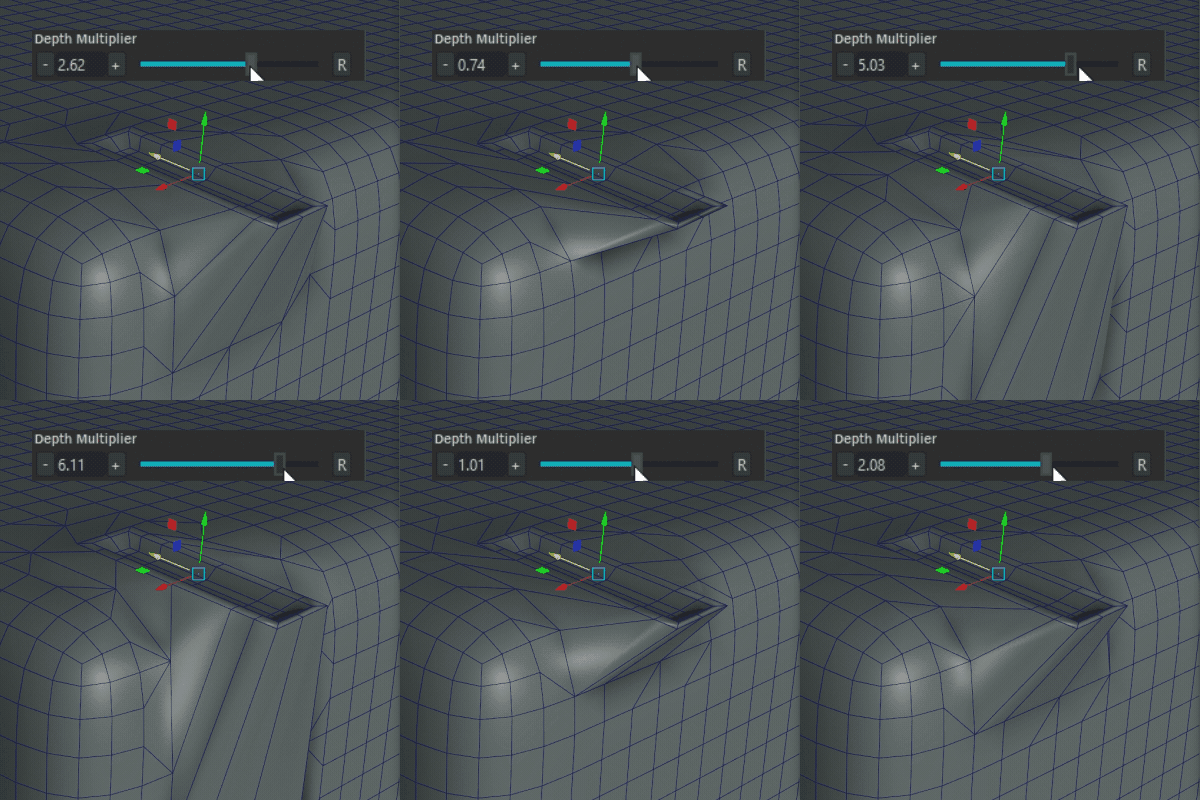 |
| Border Multiplier | Expands/contracts border search radius. | 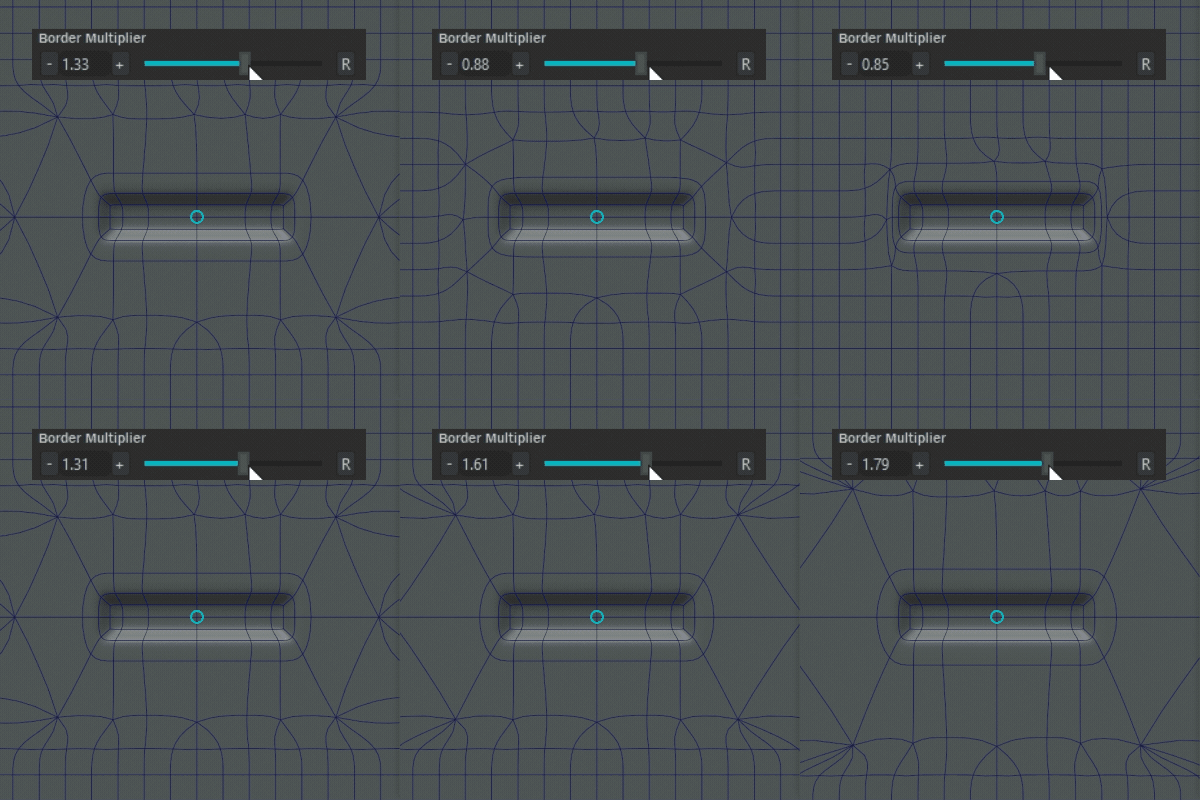 |
| Border Offset | Offsets the topology of the border edges. | 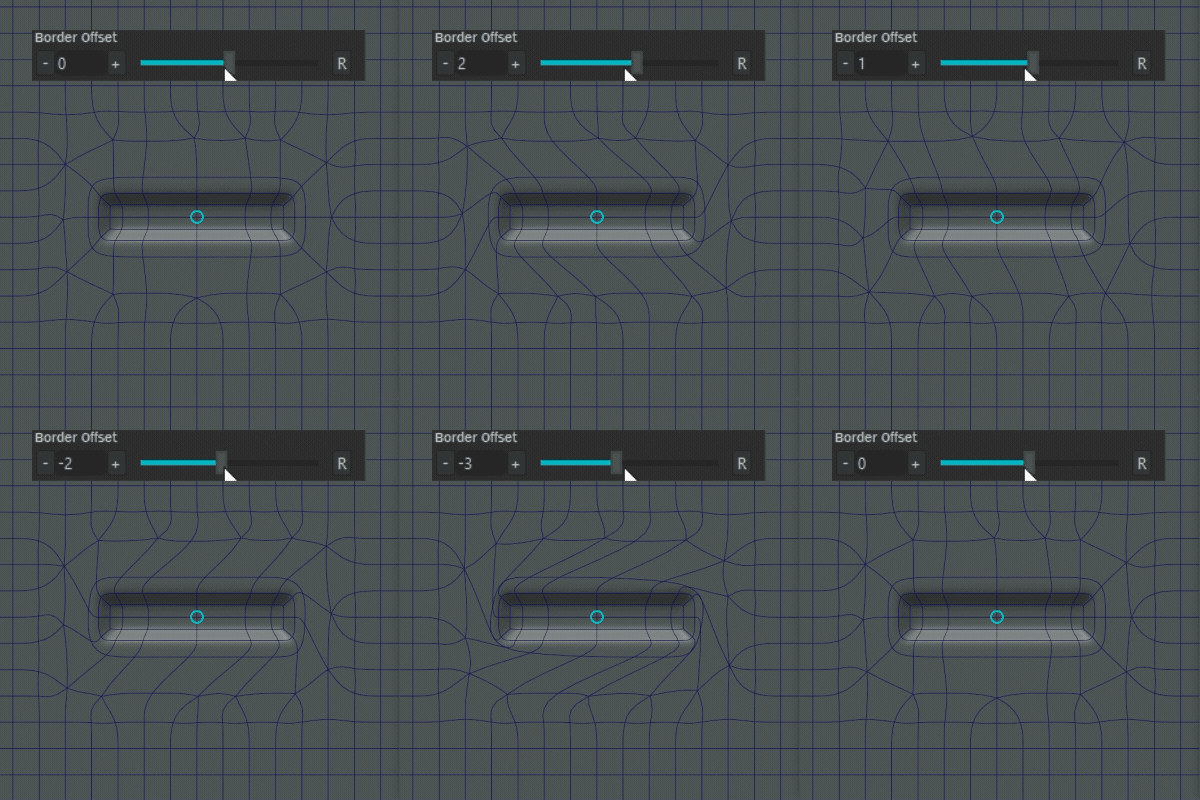 |
| Secondary Merge | Won't merge verts that didn't find their counterpart on source border (happens when vert count differs between borders). | |
| Bridging Algorithm | Switches between bridging and simplified blending algorithms. Use whichever works best under specific conditions. |
Adding Inserts
There are a few ways of adding Mesh Inserts to your mesh. See the tutorial.
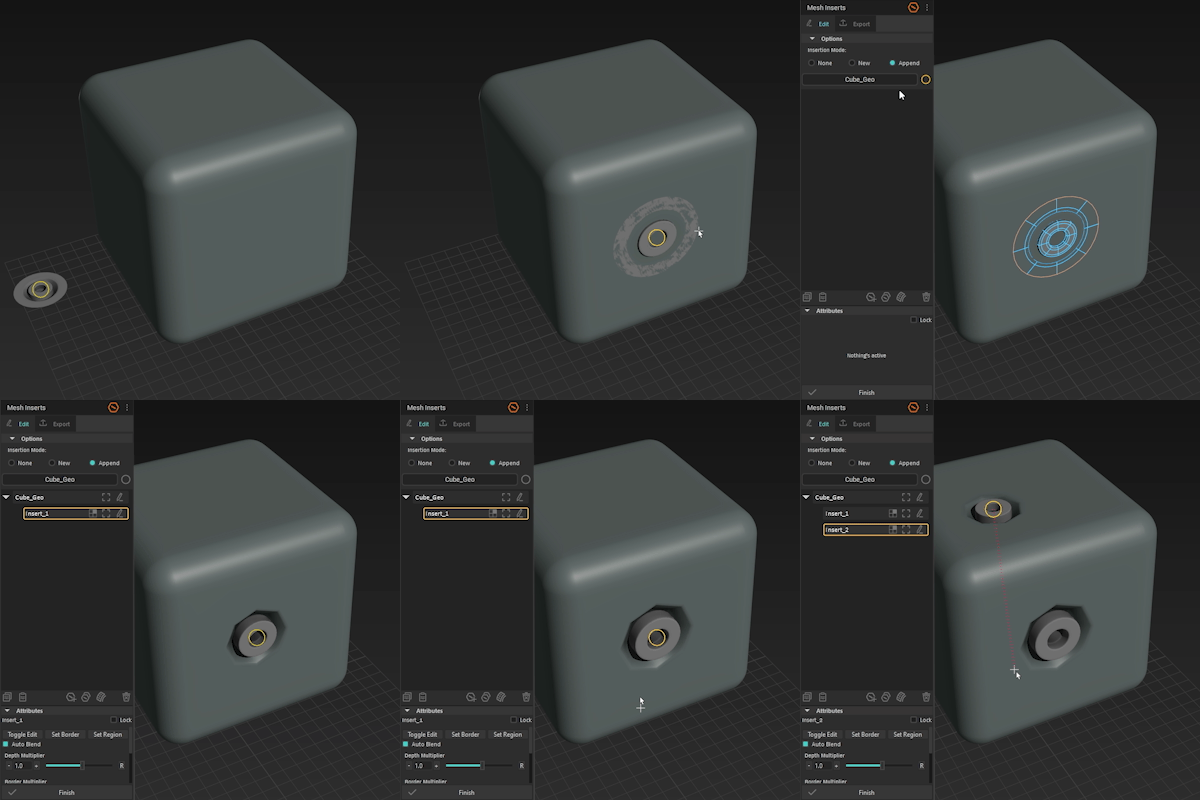
- By placing any mesh on your desired working mesh. Selecting the border edge and clicking Add Mesh Insert button.
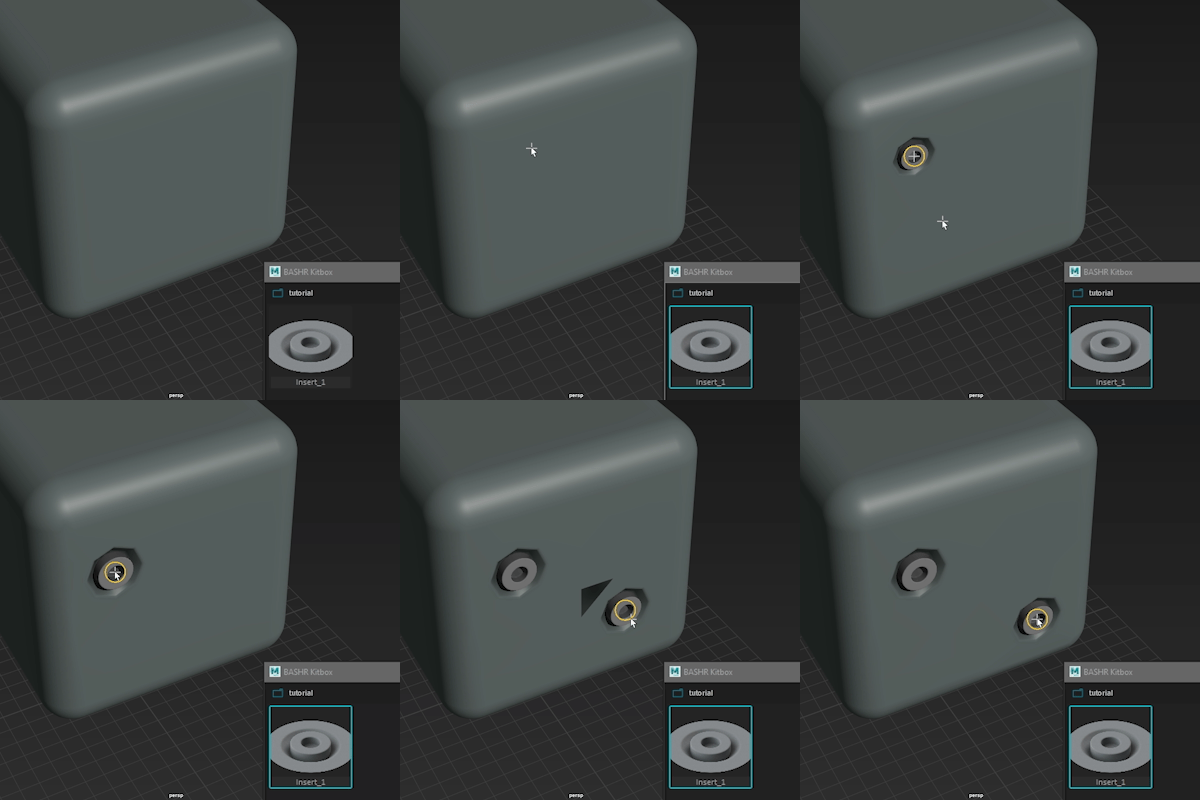
- By exporting a Mesh Insert asset and then placing it from Kitbox on any mesh in the scene.
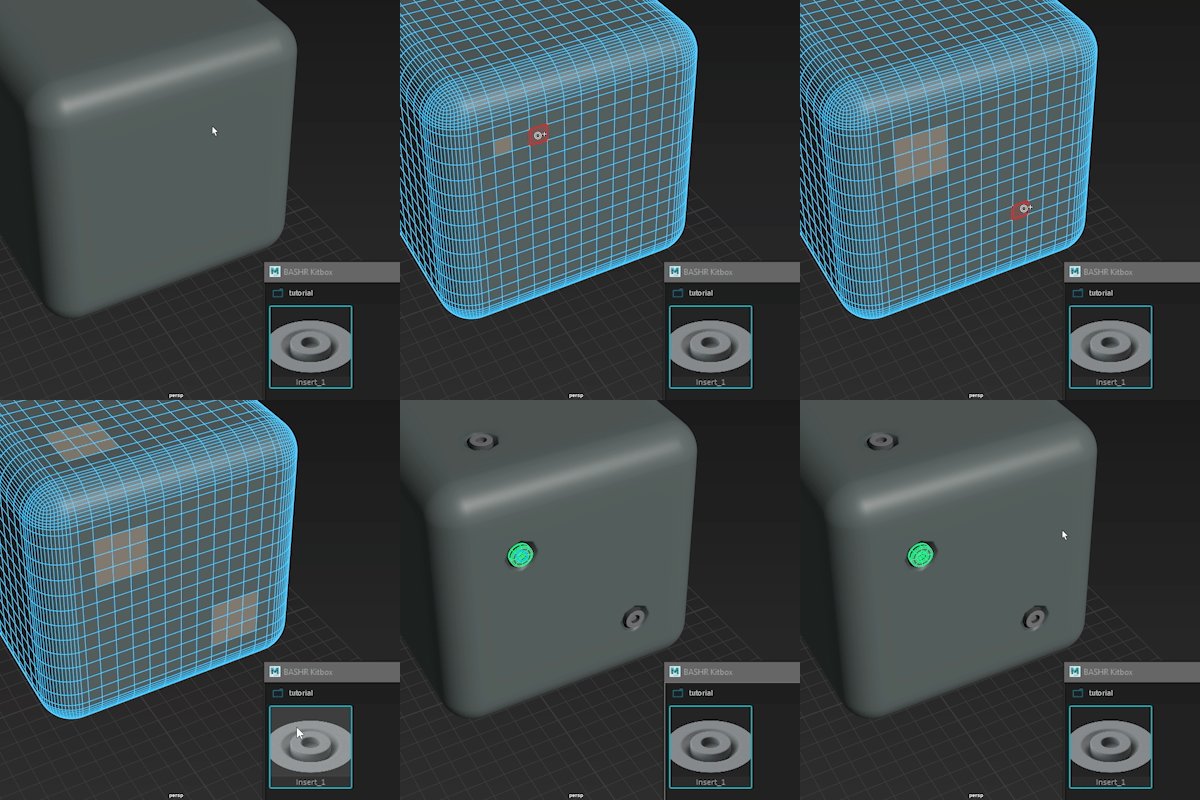
- By selecting face islands and double-clicking on your exported MI asset in Kitbox to place it on each individual face island. This also assigns each selected face island as blending region to their respective MIs.
💡 Mesh Inserts work best with similar topology density between source and insert objects.
Insertion Modes
The Insertion Mode controls how new Mesh Insert objects will be inserted when executing Add Mesh Insert action or placing them from Kitbox.
| Mode | Description | Preview |
|---|---|---|
| None | Places as a basic asset without blending i.e. floater | 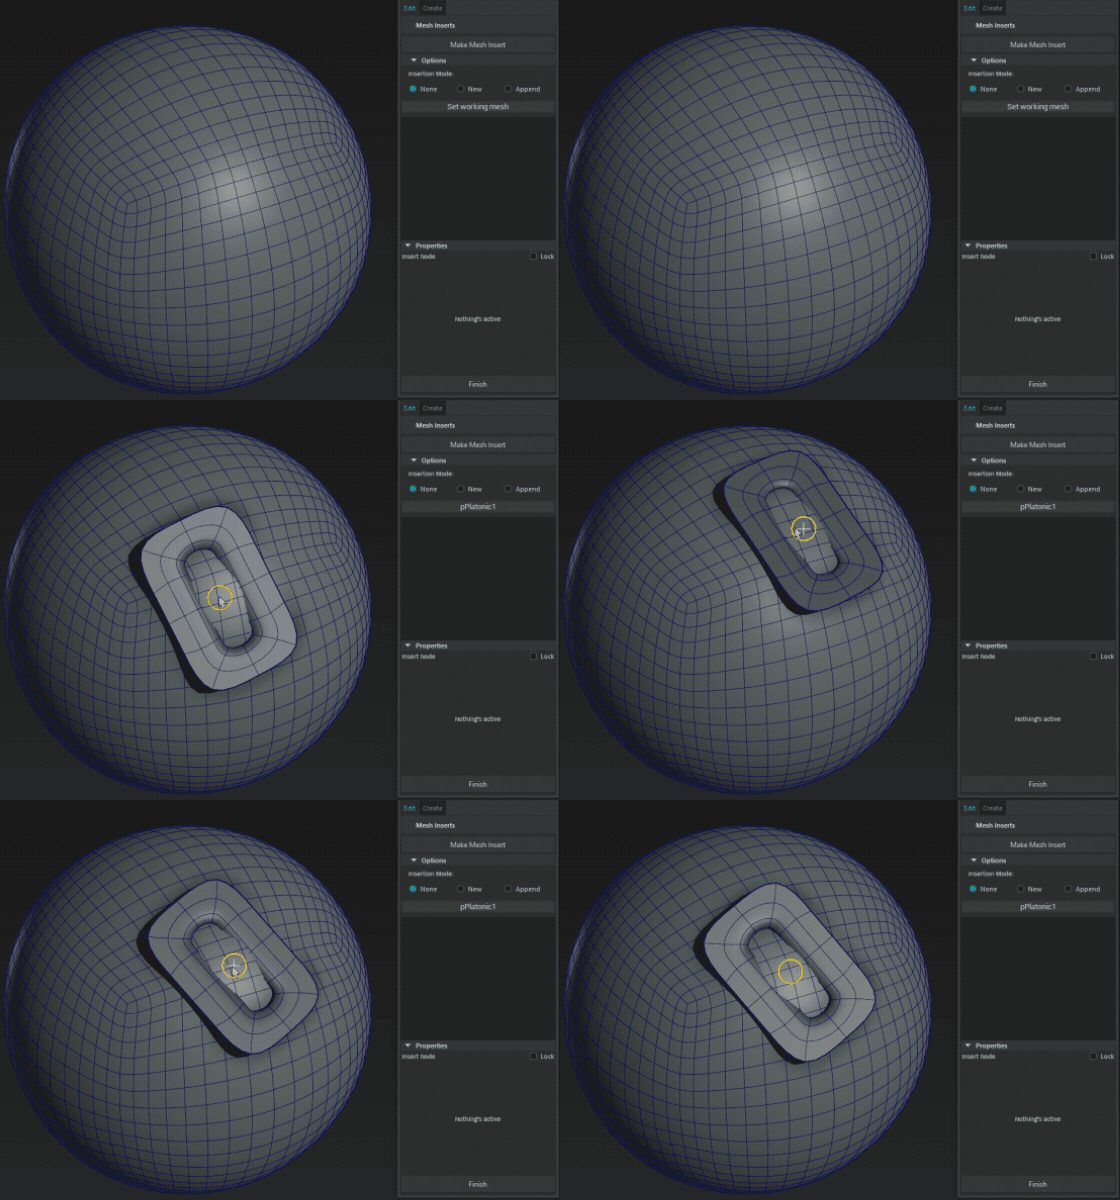 |
| New | Will insert under a new layer, this way you can stack Mesh Inserts over each other. However, performance might suffer if you need to modify inserts in the layers below. | 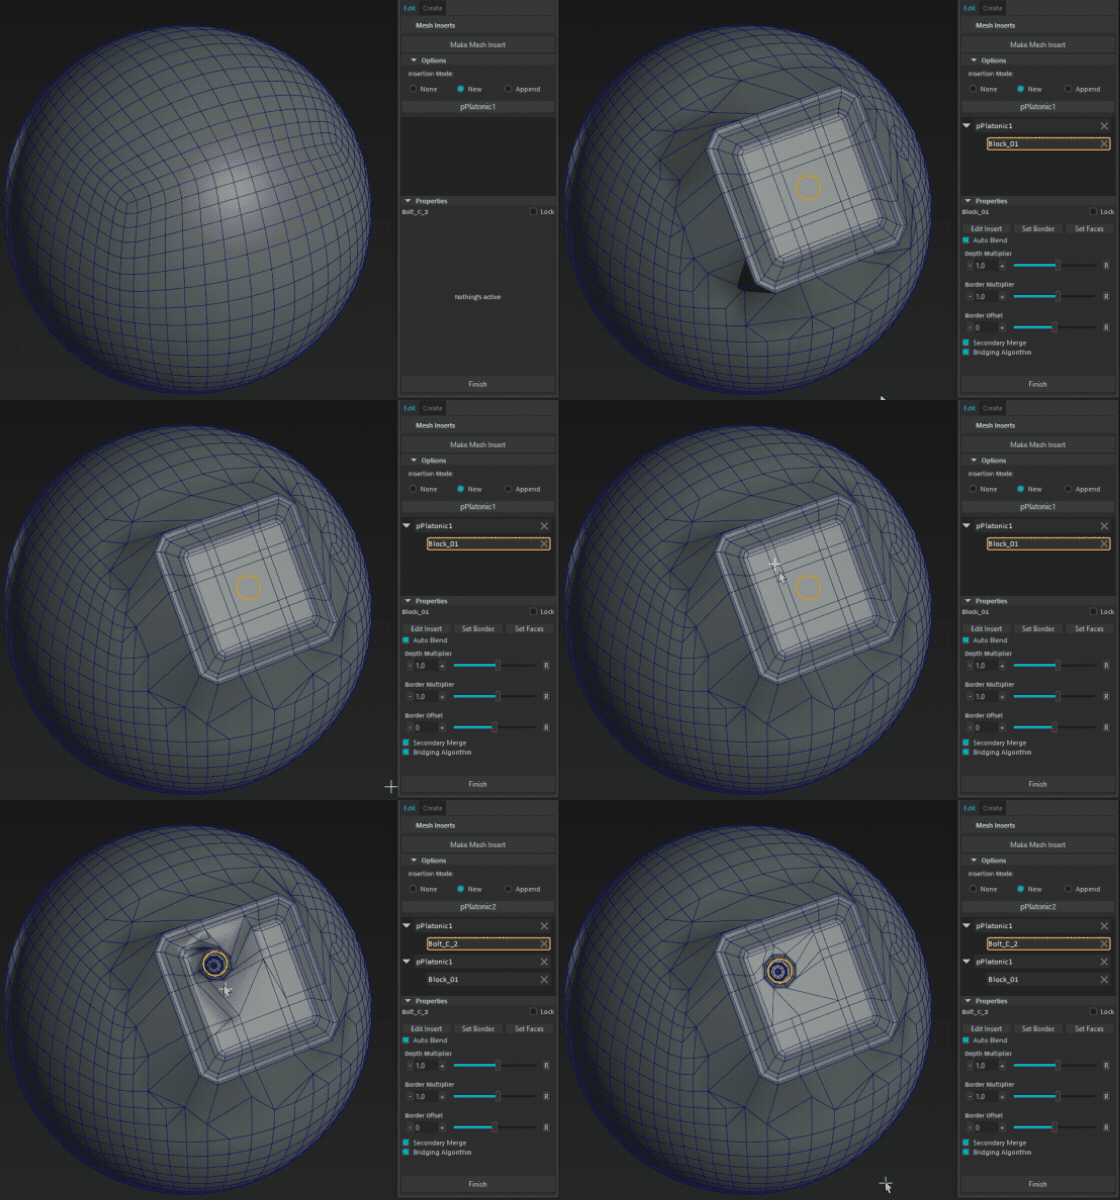 |
| Append | Adds Mesh Insert to the same (topmost) layer. Use this whenever possible as it is the more performant mode with the caveat that inserts need to maintain some geometry separation for they do not compete for the same faces. | 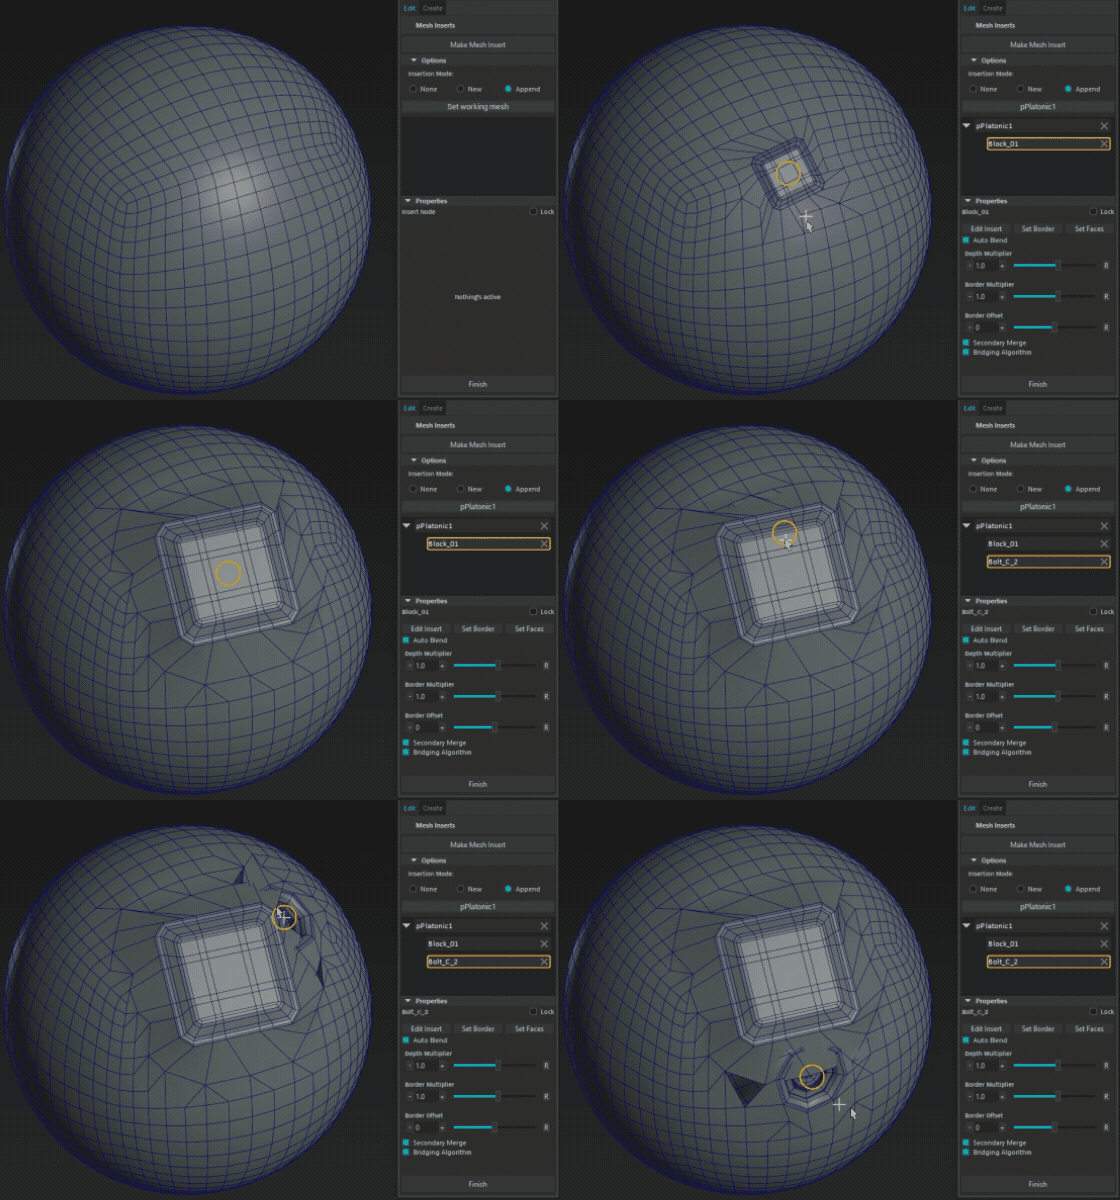 |
Editing
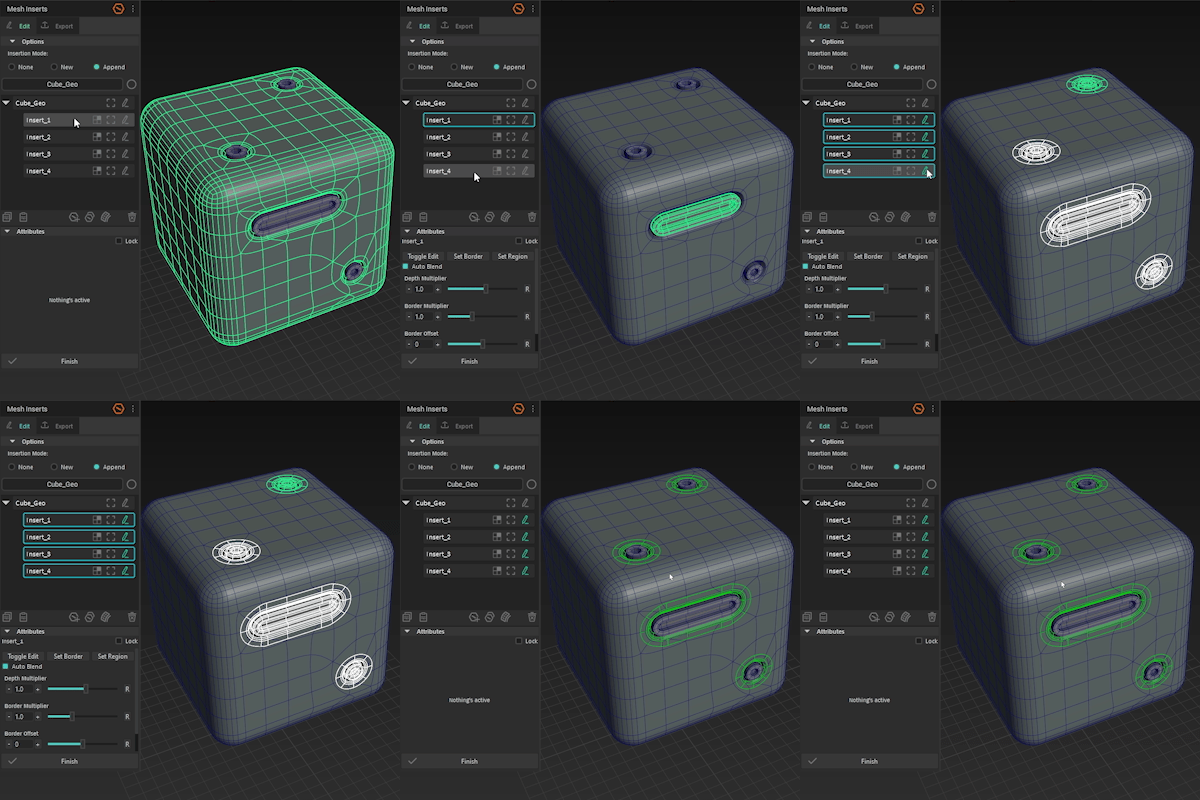
You can expose and edit the underlying Mesh Insert or Source Object by clicking the edit icon in the Mesh Inserts list or by clicking Toggle Edit in the attributes section. See tutorial.
⚠️ Refrain from editing the actual working mesh with an active MI stack! This will cause unwanted geometry behavior if you decide to edit its MIs afterward. It's recommended to finalize first.
Duplicating
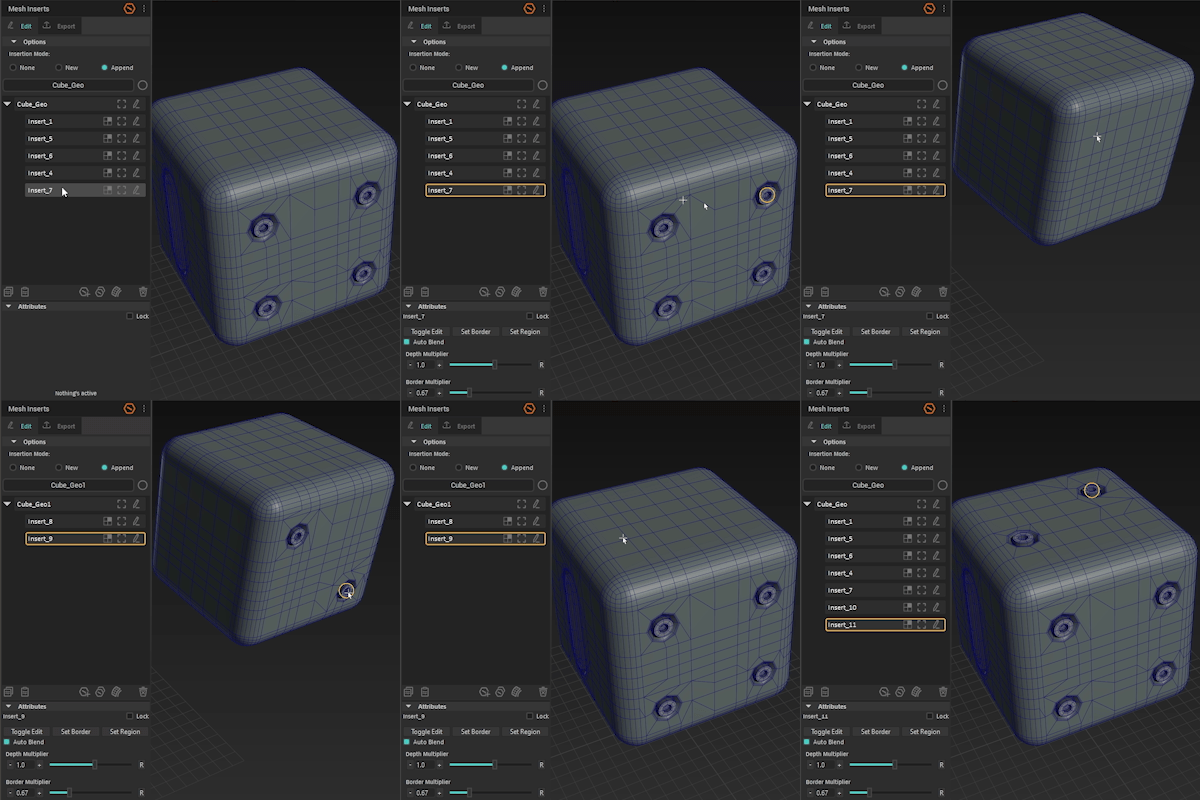
While in Placer Tool you can rapidly duplicate the active MI by pointing to any mesh in the scene and Shift + LMB.
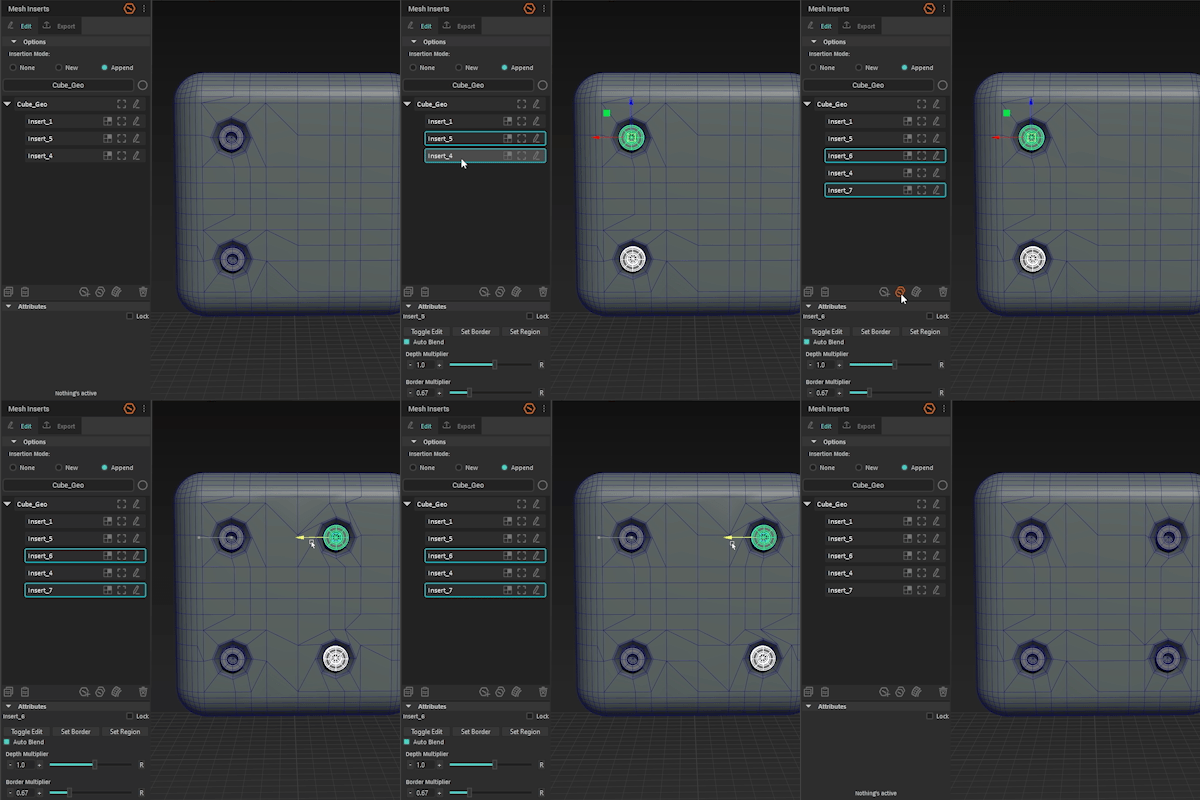
Alternatively, select components in the MI list and click Duplicate selected button in the actions bar. This will duplicate MI on the same mesh.
Manipulating Root Object
You're not allowed to directly move/rotate/scale the source object mesh (the one you place your inserts on) while working with MI. Therefore use the _Mover group to move the source mesh with all of its inserts.
Finalizing
Once you're done working with inserts press Finish to clean up and flatten the history stack.
Exporting Mesh Insert Assets
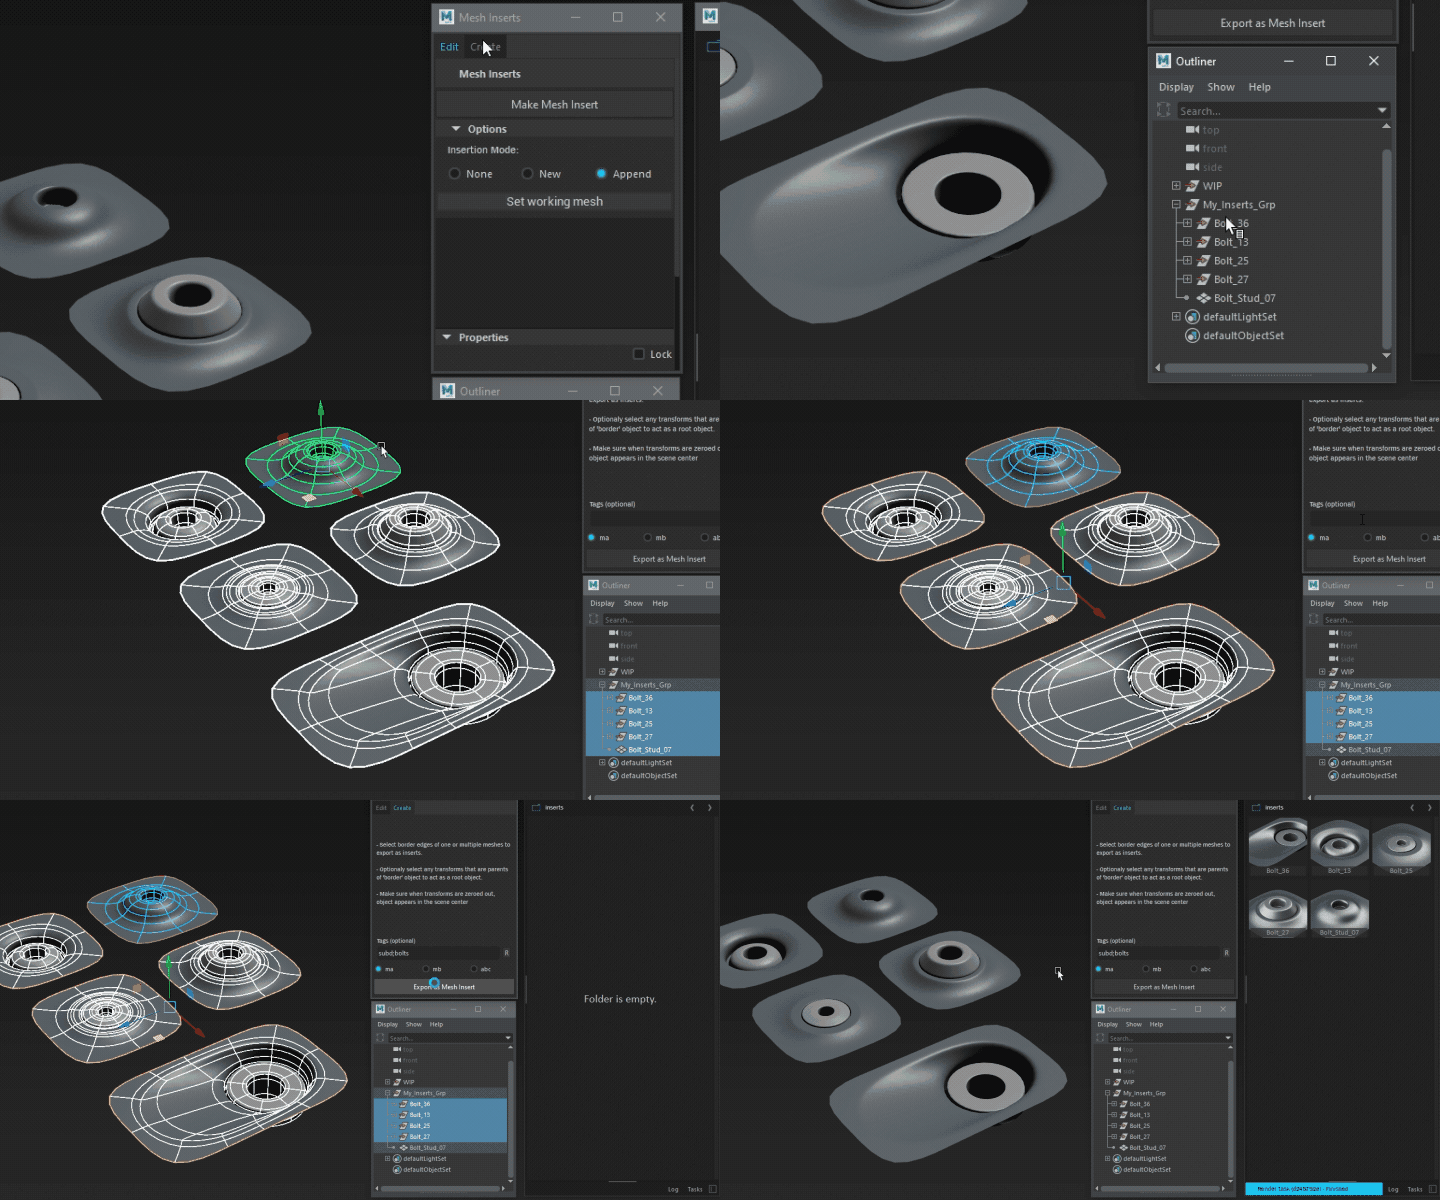
Navigate to Export tab, select border edges of any mesh, and click Export Mesh Insert, the mesh of the selected border will be designated as a border object AND as a root object.
If your mesh insert consists of multiple objects e.g. a bolt in a hole or you'd like to have a separate root for your asset e.g. with a different pivot, group them under a single group which will act as the asset's root, select it and then shift-select the border edges of the border mesh.
You can export multiple Mesh Insert assets at once this way too.
📘 Border object must be a child of the root.
📘 At this time you can't export mesh inserts directly from source objects.
📘 Make sure that root objects when zeroed out have their pivots at the scene origin (0, 0, 0).
Placer Tool

In this section:
Overview
👉 Access it via menu BASHR->Placer Tool
A universal manipulator for placing, rotating, and scaling objects on mesh surfaces.
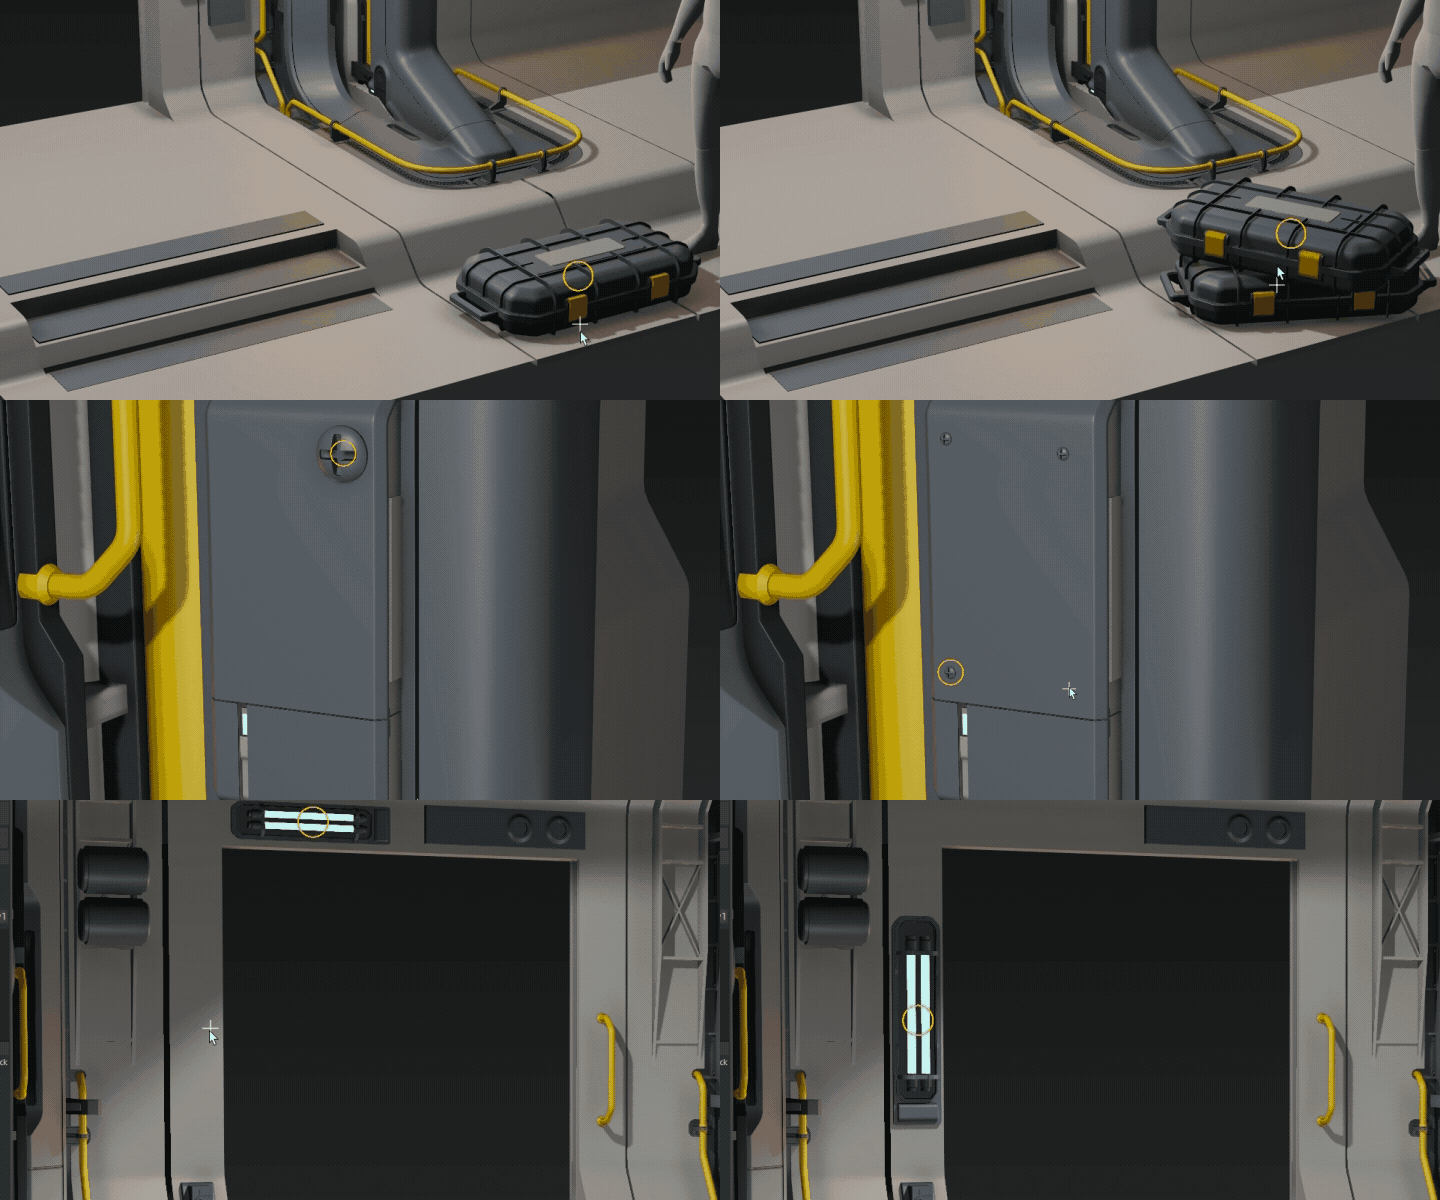
If you'd like to create a shortcut or a shelf button, use the python script below to invoke the tool:
import bashr.maya.api as bashr_api
bashr_api.tools.placer_tool_ctx()
📘 The above command launches the tool in a 'vanilla' context. Some functionality e.g. object duplication is only available while Objects Toolbox or Mesh Inserts window is active.
User Interface
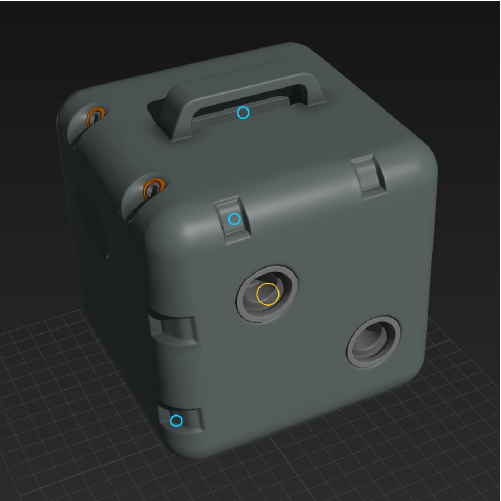
Whenever you select an object and invoke the tool, the selected object turns into the target object for placement and will be indicated with an orange circle at its pivot point
Any other selected objects in the scene will be indicated with a blue circle.
Actions
📘 The sequence in which you press keys matters!
Key Stroke | Action | Preview |
|---|---|---|
| Left Mouse | Move/place the object. If click-dragged on a mesh it will align it to the surface. | 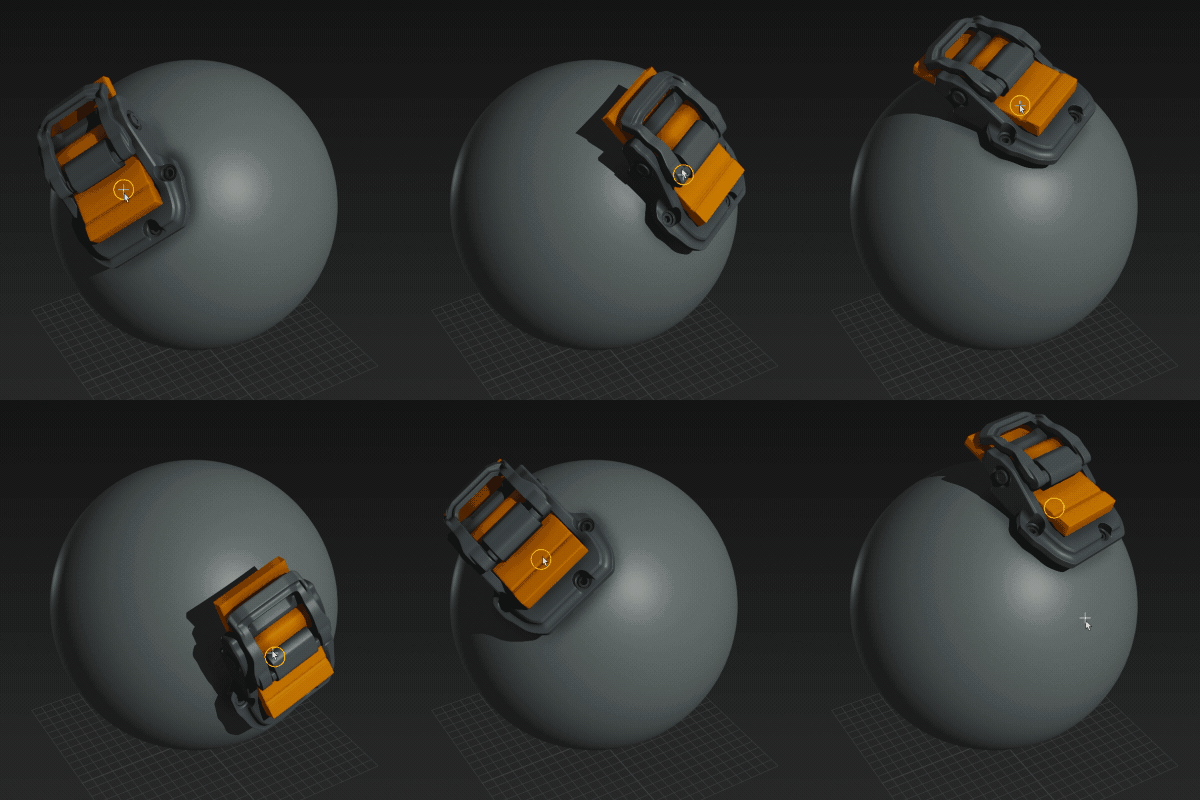 |
| Left Mouse + Shift | Enables grid snapping in world space. Grid size can be adjusted under Snapping. | 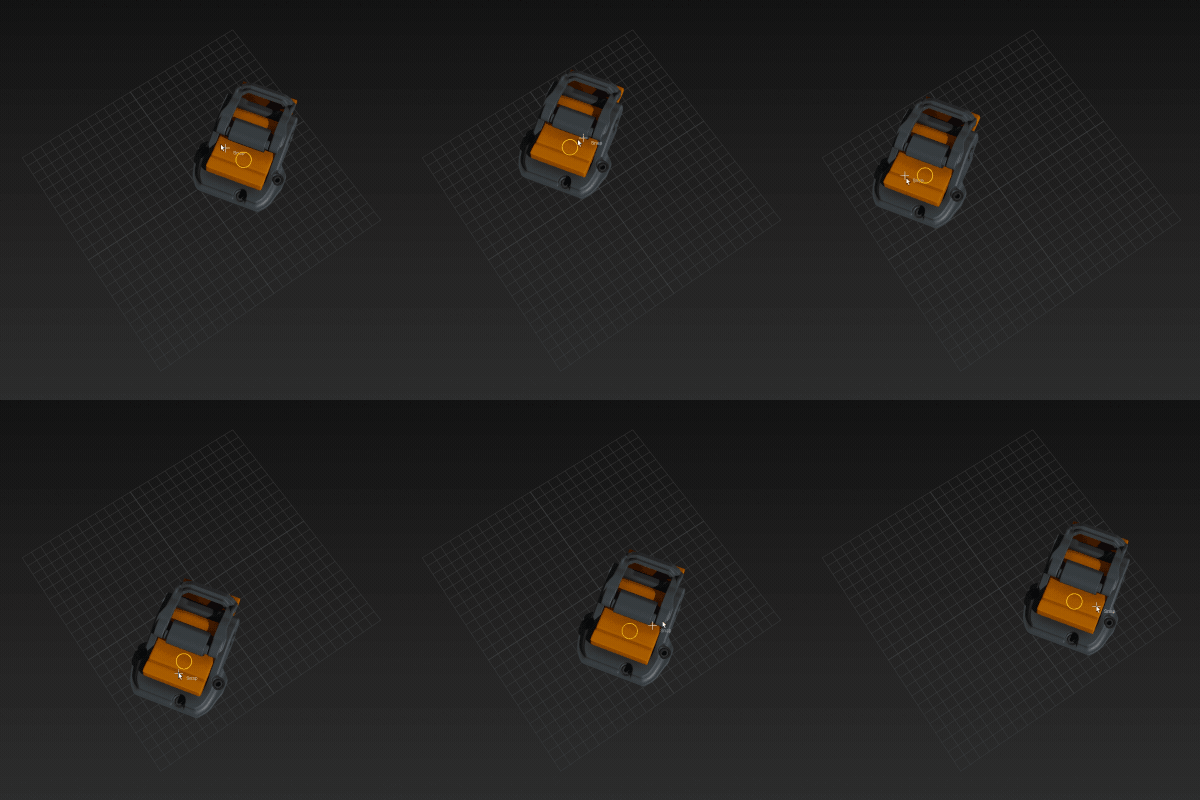 |
| Left Mouse + Shift + Ctrl | Enables grid snapping in relative space. | 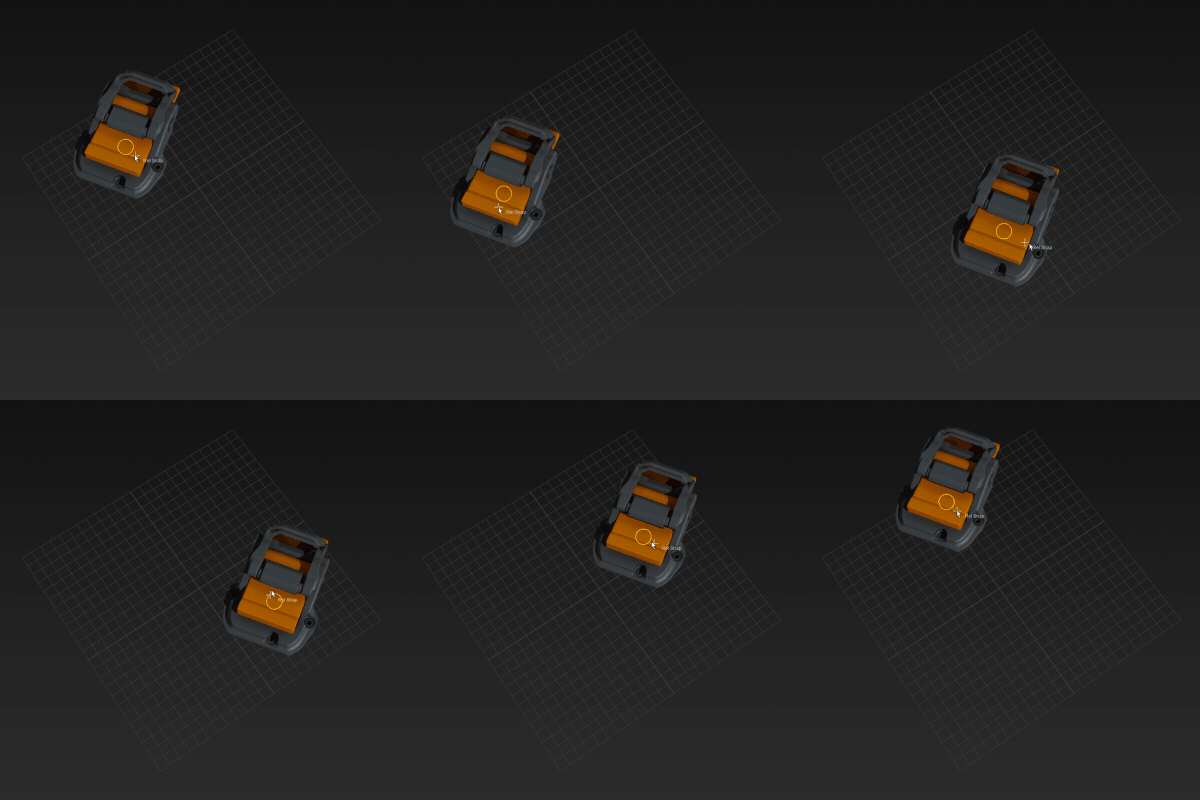 |
| Ctrl + Left Mouse | Rotate object. | 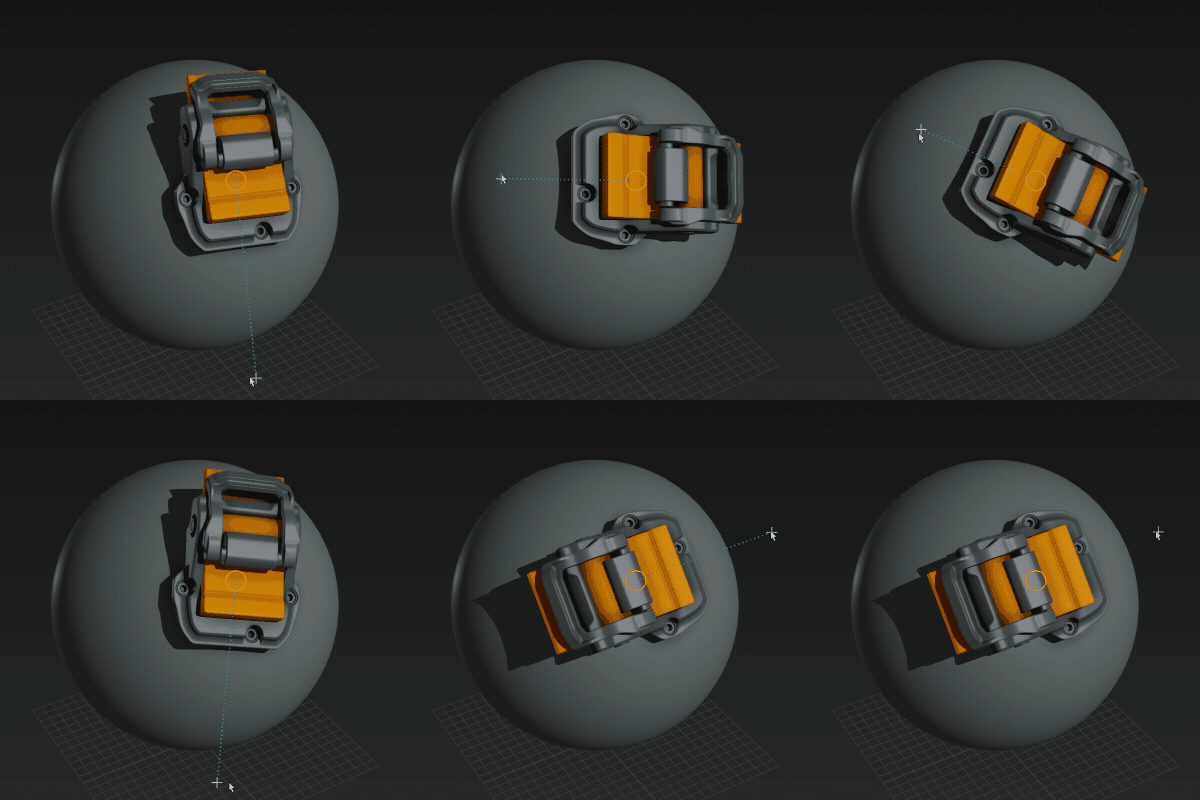 |
| Ctrl + Left Mouse + Shift | Enables rotation snapping in relative space. | 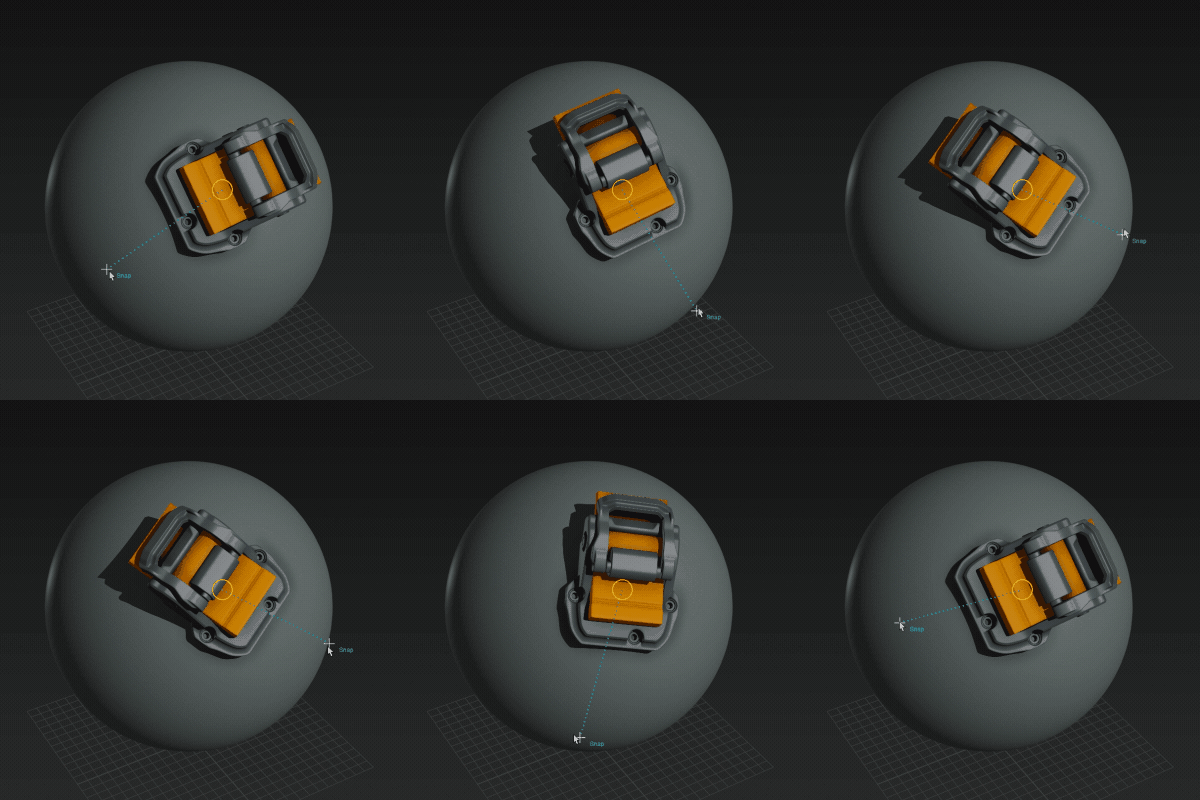 |
| Middle Mouse | Scale object. | 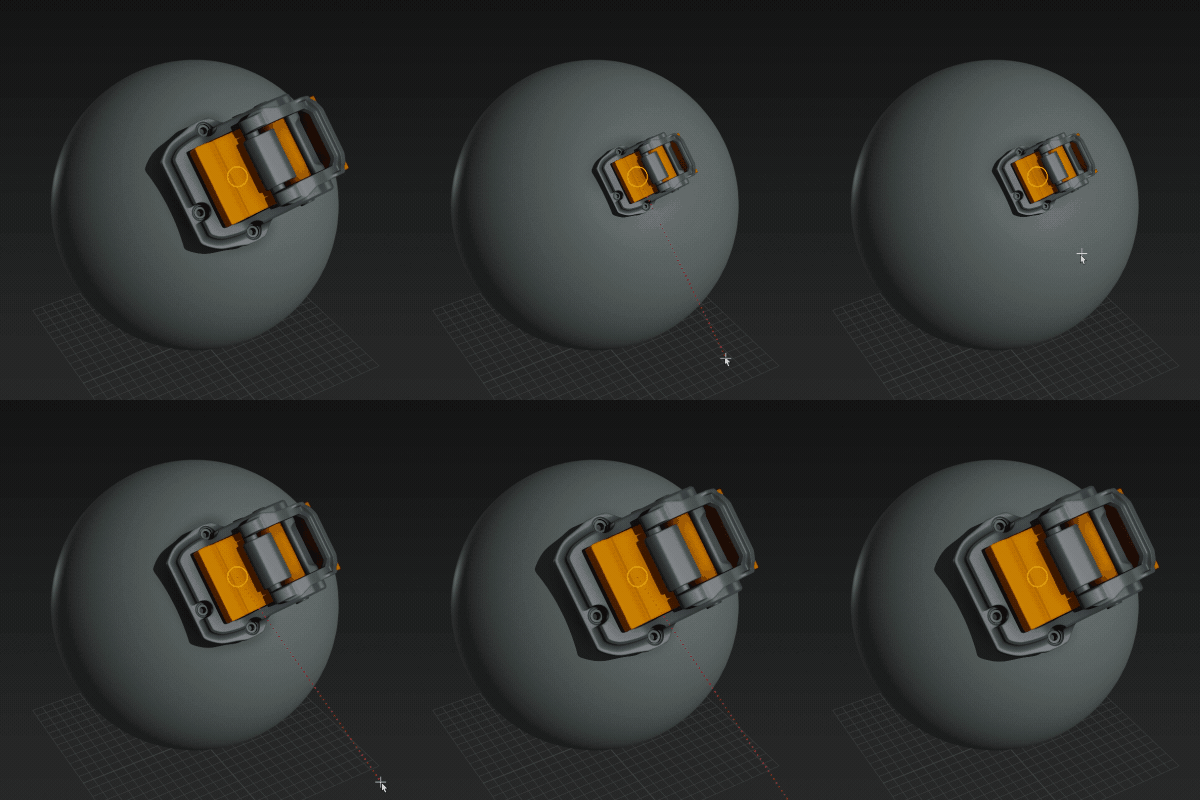 |
| Ctrl + Shift + Left Mouse | Offsets/insets object away from the surface. The offset is maintained while moving the object. You can reset the offset back to zero with the Reset Up Offset button in Objects Toolbox window. | 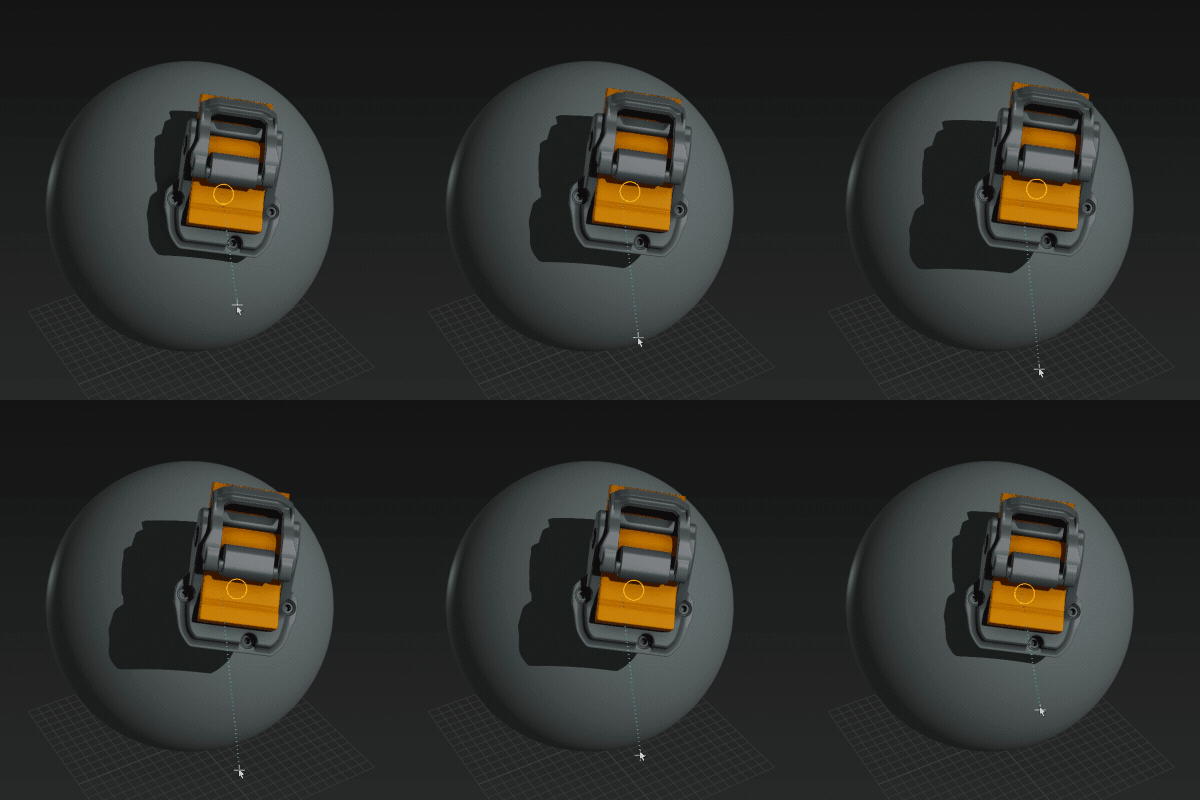 |
| Shift + Left Mouse | Duplicates the object. | 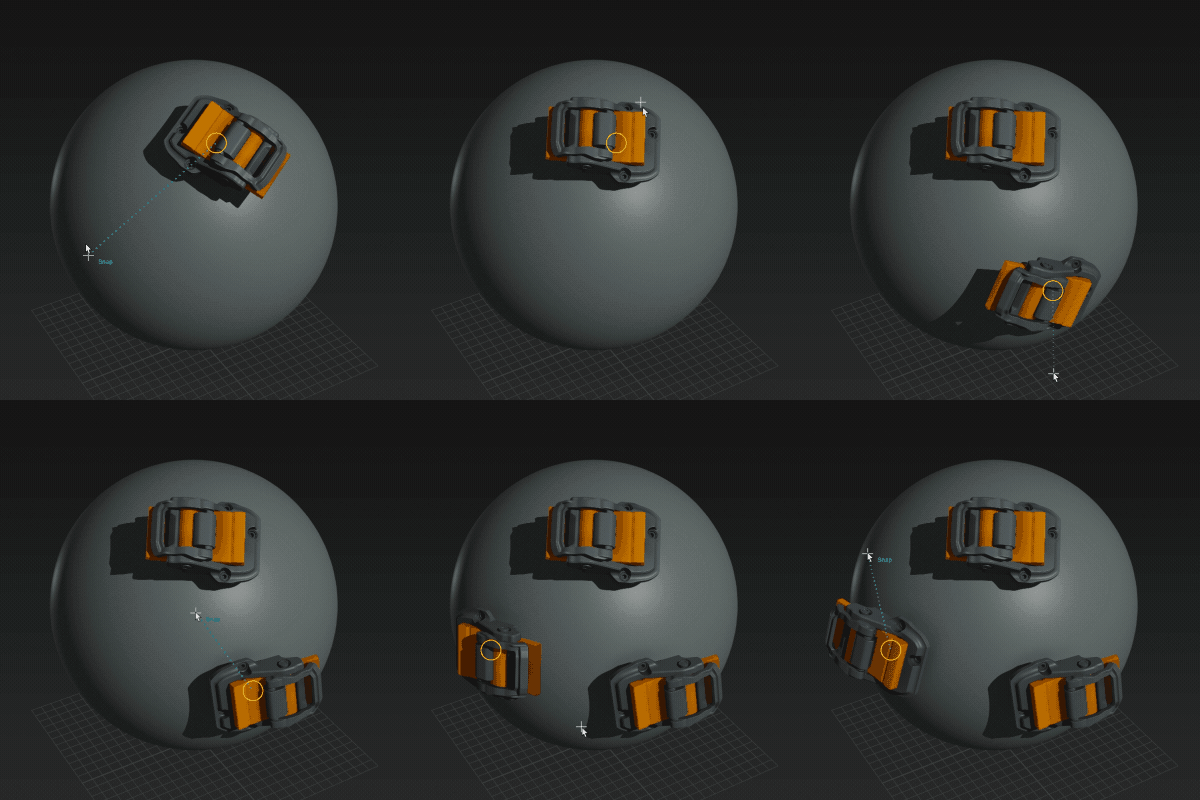 |
| Enter | Enters object selection context, press ESC to abort. | 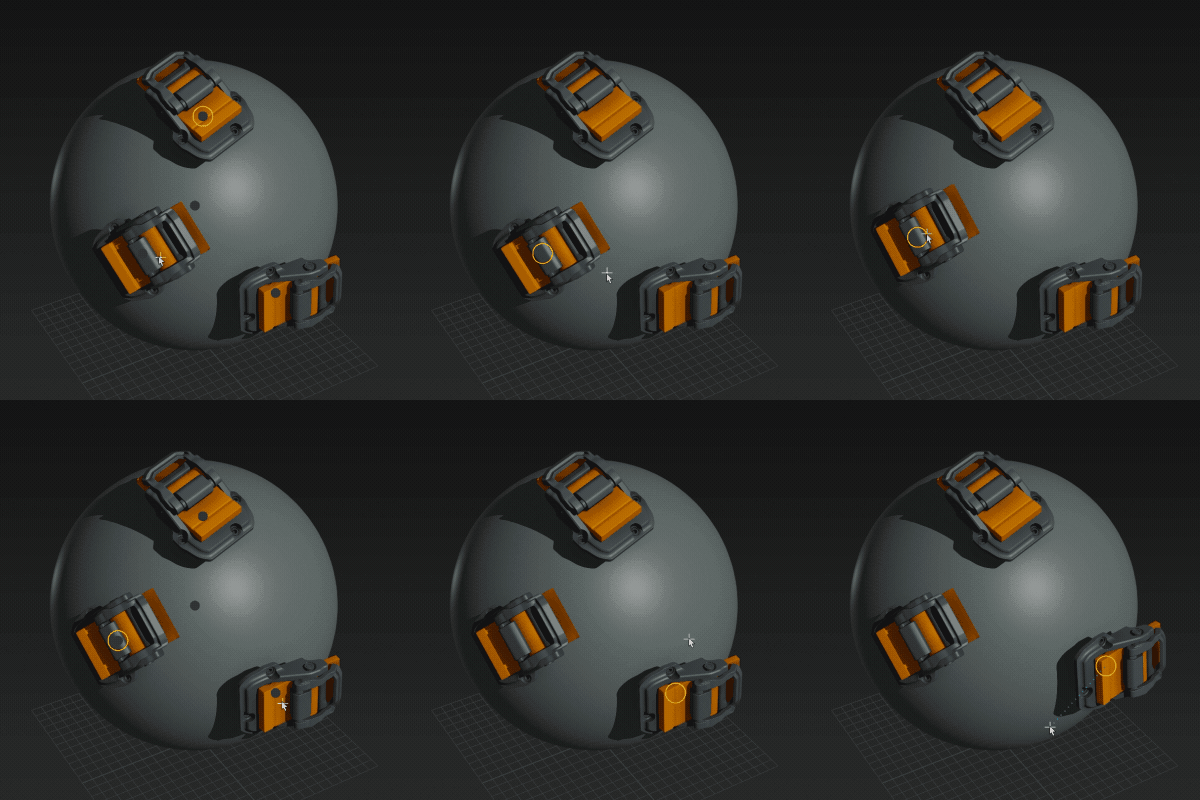 |
| Middle Mouse | Quick select object. | 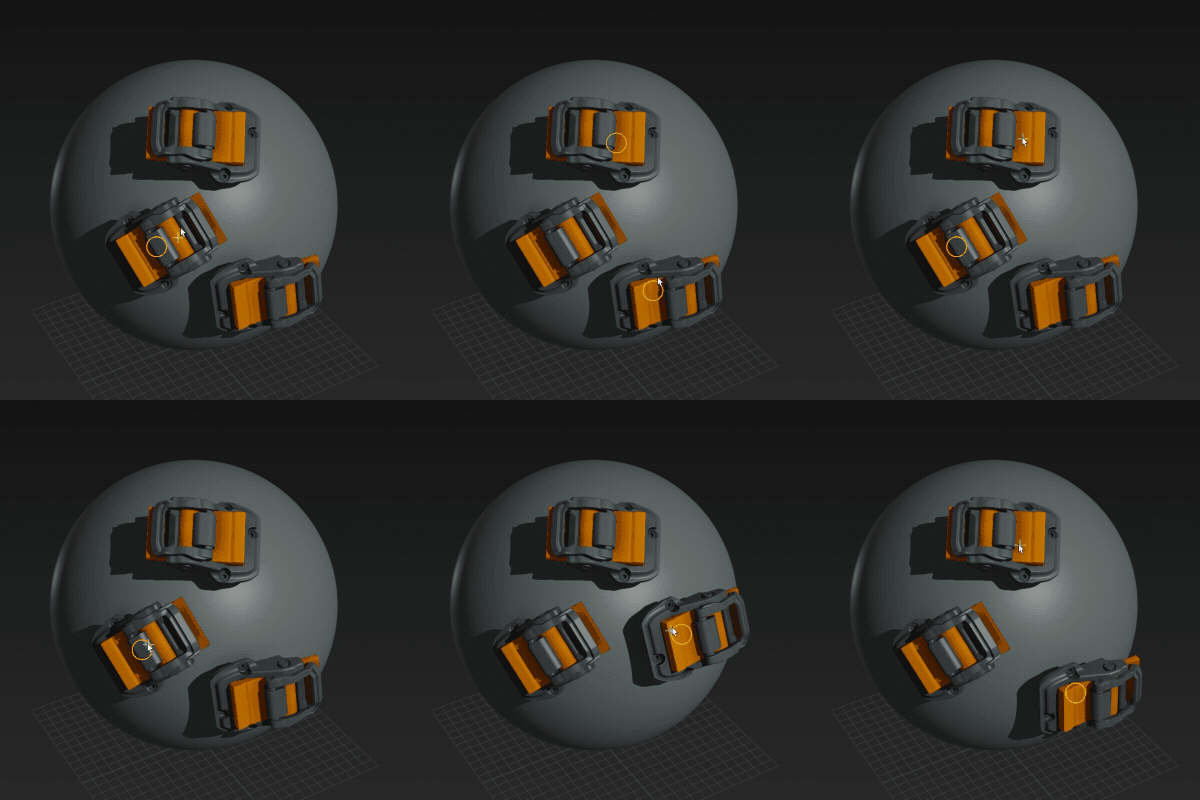 |
Settings
Settings can be found under Objects Toolbox's Placer Tool Settings section.
| Setting | Description |
|---|---|
| Ignore Assets | If enabled, actions like selection and duplication will only affect individual objects, otherwise any action on child objects belonging to an asset will be deferred to the whole asset. e.g. it would duplicate the entire asset or select its root object. |
| Up Axis | The up axis of an object (it only affects its orientation while placing) |
| Reset Up Offset | Resets the up offset back to zero |
| Maintain Scale | When placing assets from Kitbox, it will apply relative scale based on previously placed object instead of asset's original scale |
| Rotation Snap Degrees | Rotation step when in snapping mode. |
| Move Grid Size | The scale of placement grid in units when in world or relative snapping modes. Note: this doesn't correspond to Maya's own grid. |
Tutorials
Mesh Inserts
Adding Mesh Inserts
In this section:
Preparation
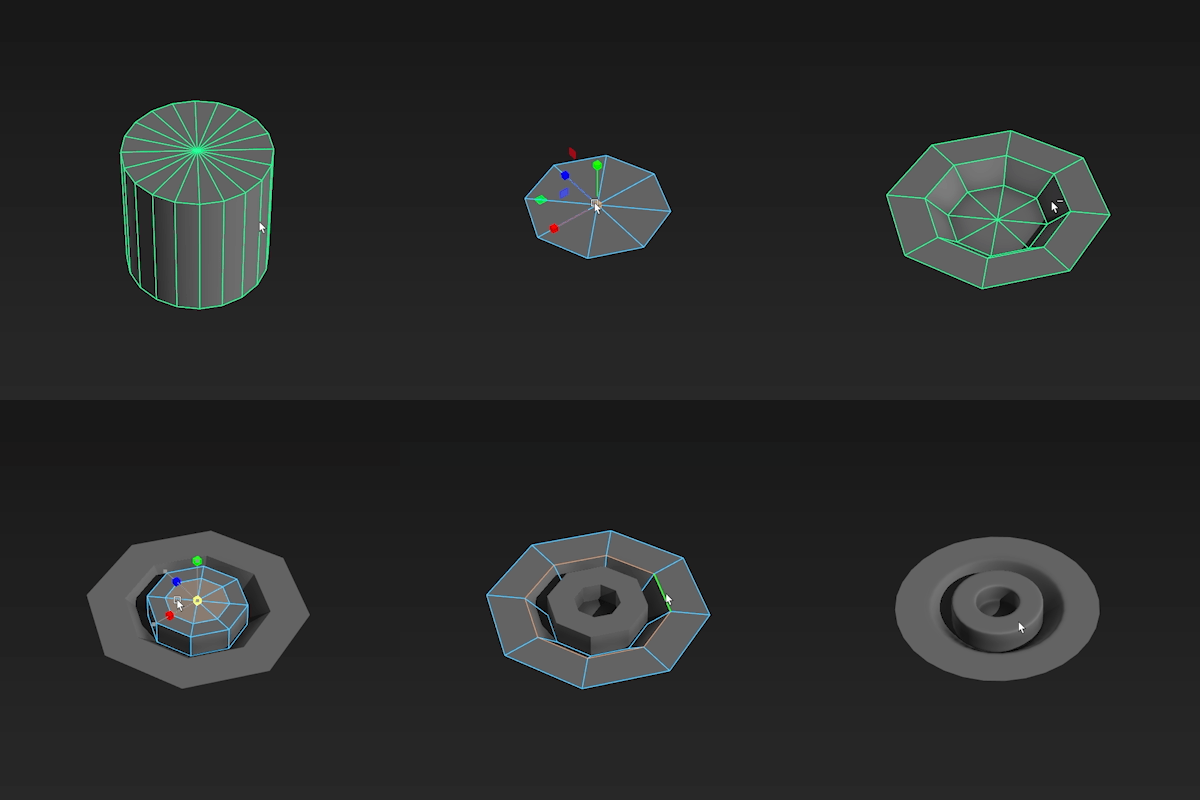
Create a model that you would like to use as a Mesh Insert.
From here you can add it from scene or add it from Kitbox
Adding From Scene
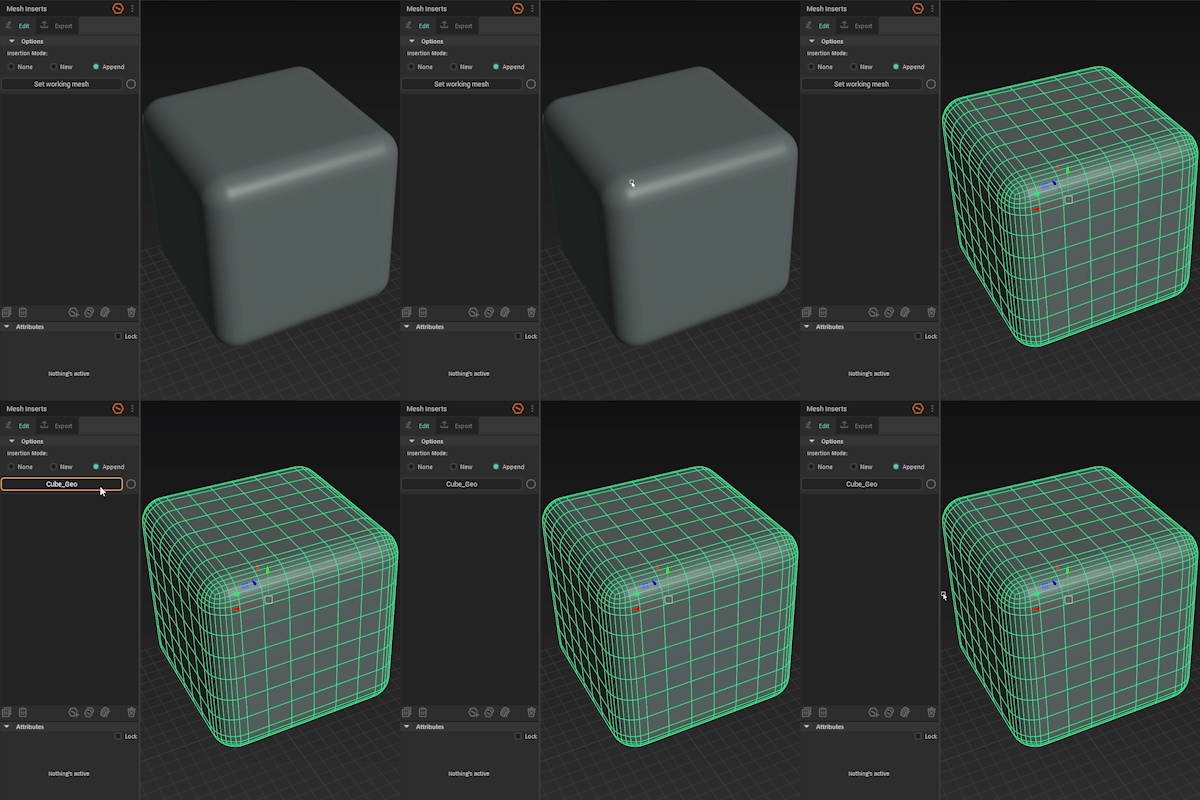
Select a mesh that you would like the insert to be added to and click Set Working Mesh button.

Now select your pre-made MI and place it roughly on the surface using Placer Tool.
Finally, click on Add Mesh Insert button in the actions bar.
💡 You can do this with multiple MIs by selecting all their border edges.
Adding From Kitbox
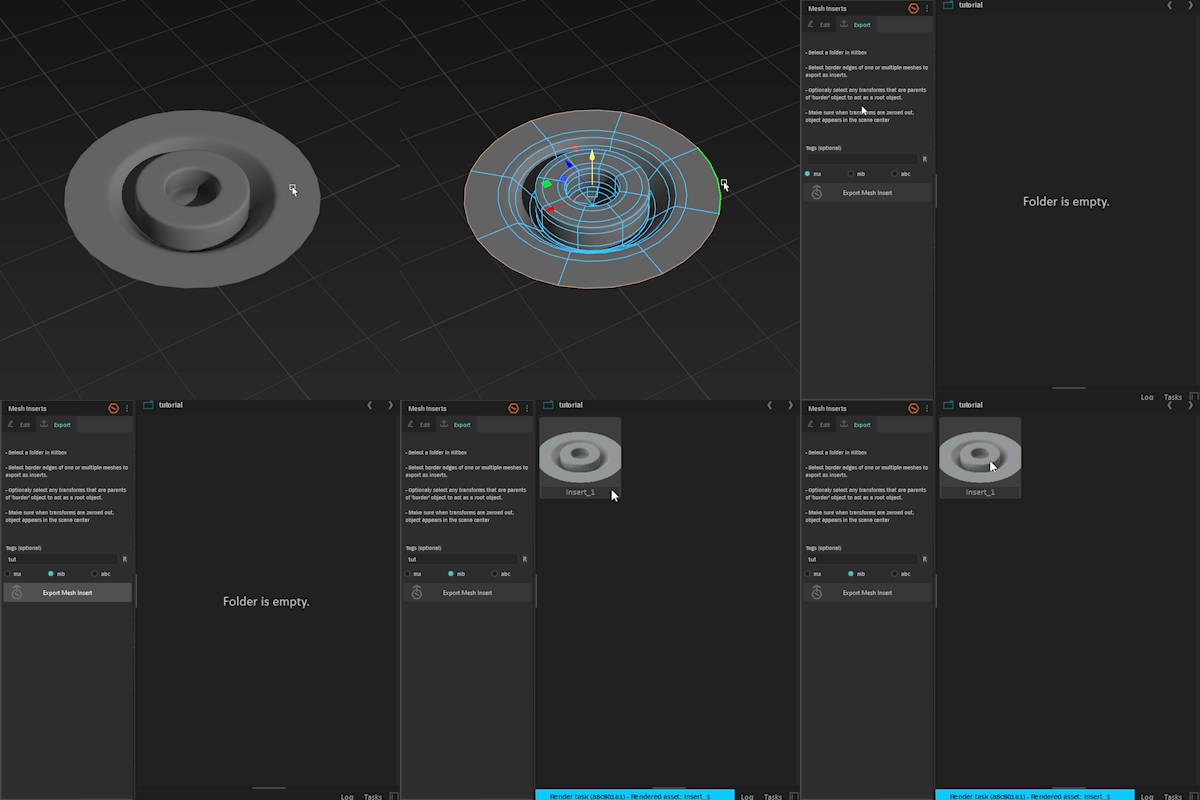
Select the edges of your pre-made MI mesh.
Select a folder in Kitbox.
Go to Export tab and click Export Mesh Insert.
Learn more about exporting MIs.

Select your newly exported MI, and simply click on any mesh in the scene to place it.

Alternatively, select face islands on your working mesh and double-click on your exported MI.
Editing Mesh Inserts
In this section:
Preparation
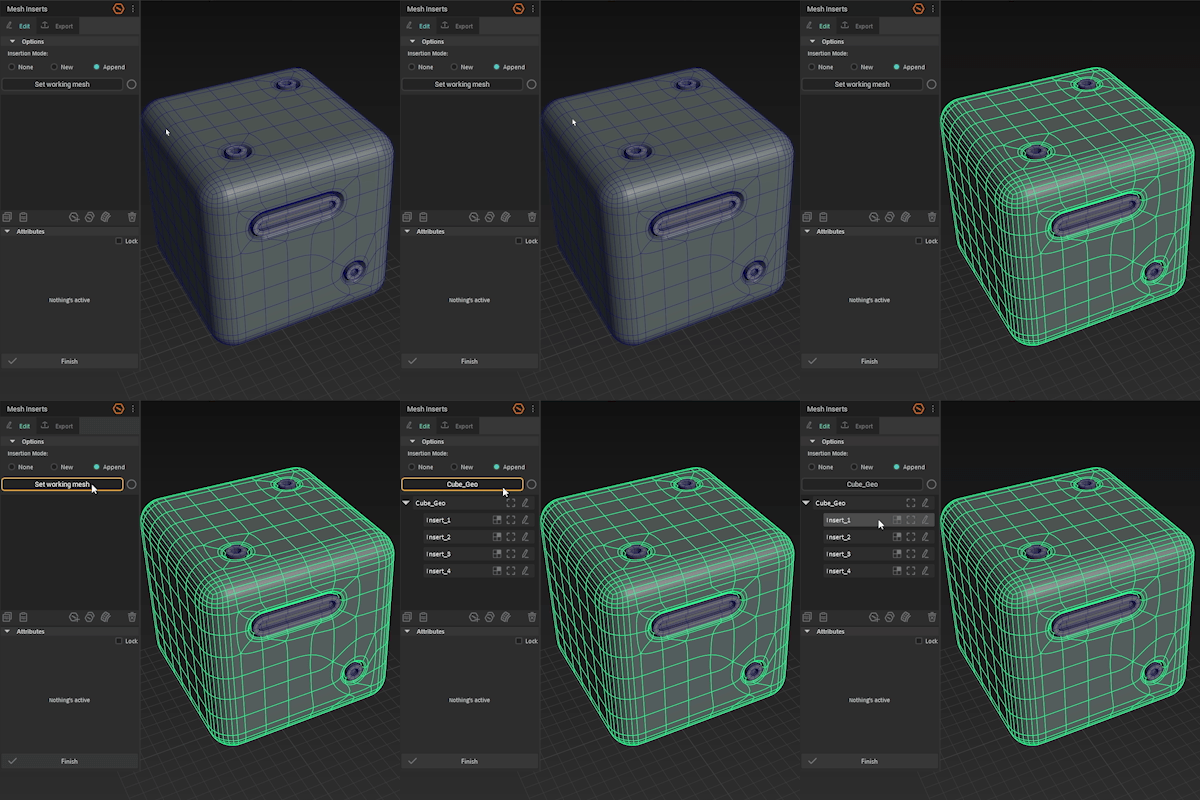
Select your working mesh to list its MI components.
Editing The Mesh Insert

Select one or more (hold down Shift or Ctrl) of the components. And click the edit icon in the list to expose the meshes of the MIs.
Do your modeling/editing on the exposed mesh.
Editing Border
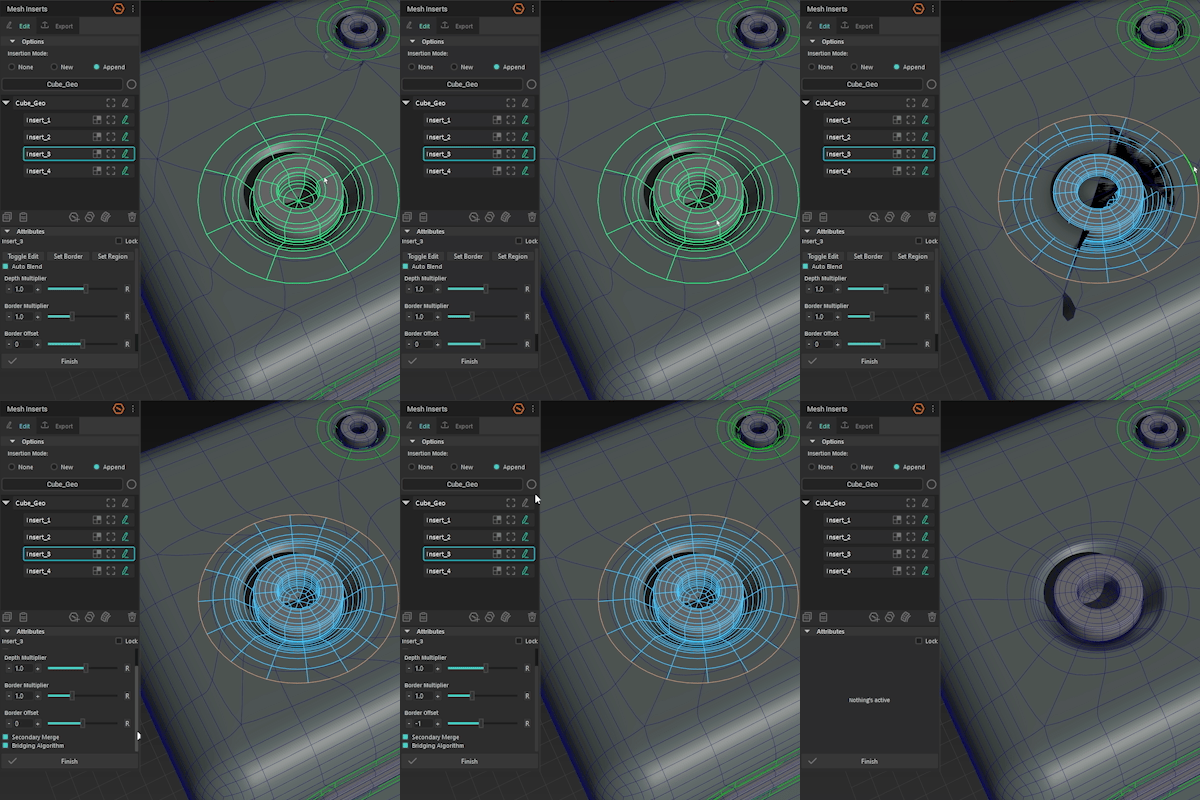
If you modified the MI mesh in a way that threw off the border topology, you can reassign it by selecting the border edge of the MI while in edit mode and click Set Border in the attributes section.
Editing Blend Region
Whenever you do not want the auto-blending to pick unwanted faces, you can assign a blending region to a particular MI.
Firstly, click on the edit icon of the Source Object component to expose it for editing.
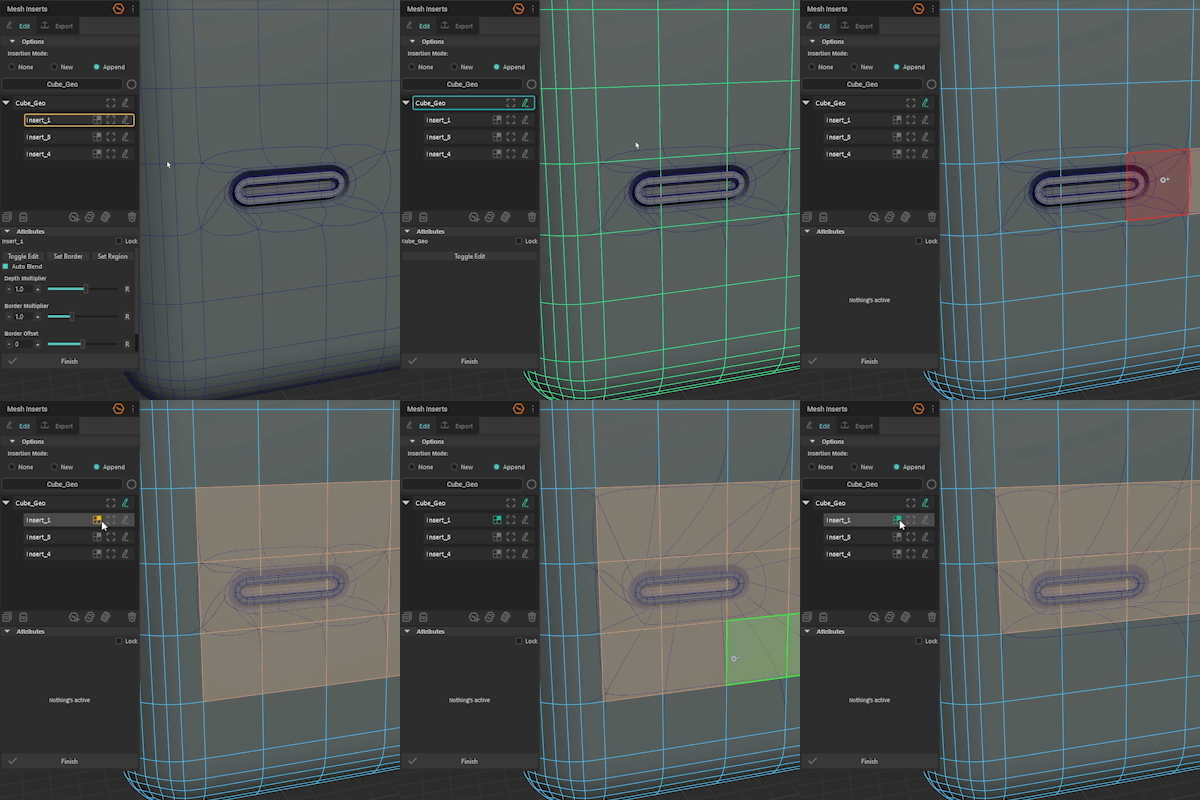
Method 1:
-
Select the faces you would wish to blend with the MI.
-
Click on the set region icon.
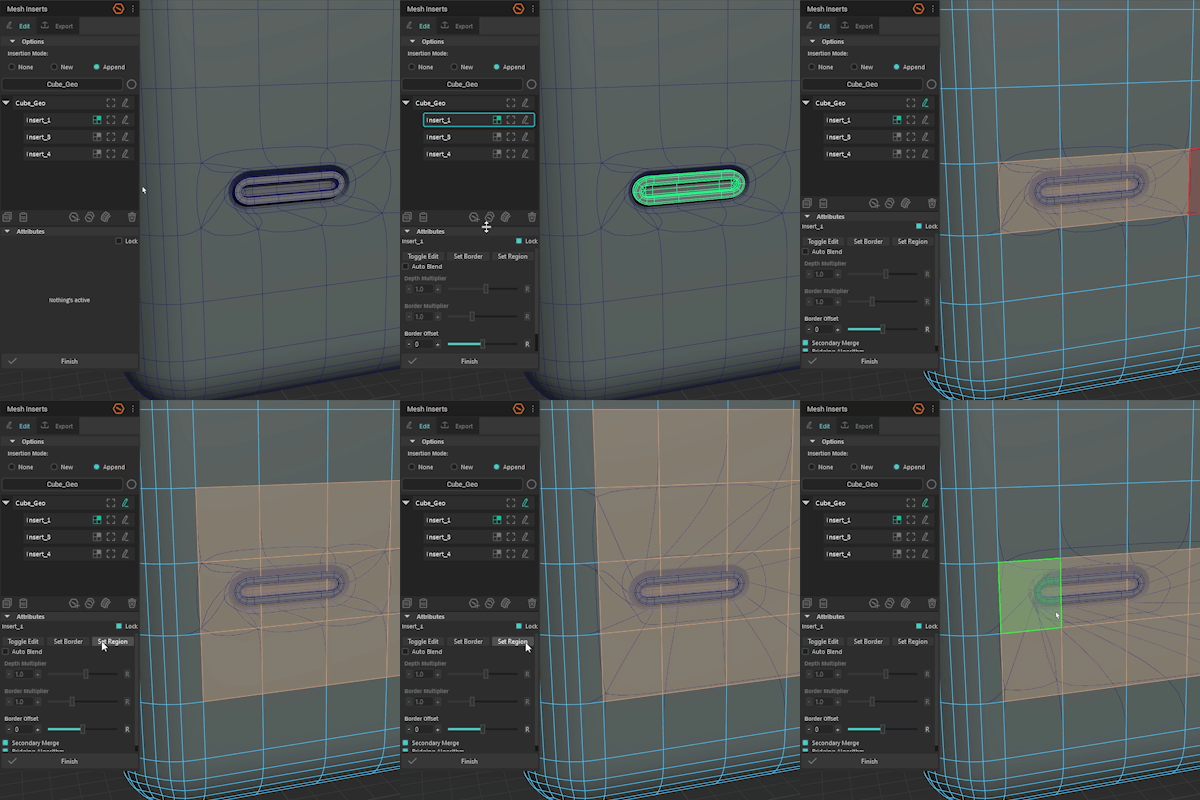
Method 2:
-
Select a MI component and click Lock checkbox in the attributes panel to keep the UI locked.
-
Disable the auto-blend.
-
Select the faces on the Source Object and click Set Region button in the attributes section to assign the faces. Adjust and repeat as many times as necessary.
Editing Source Object
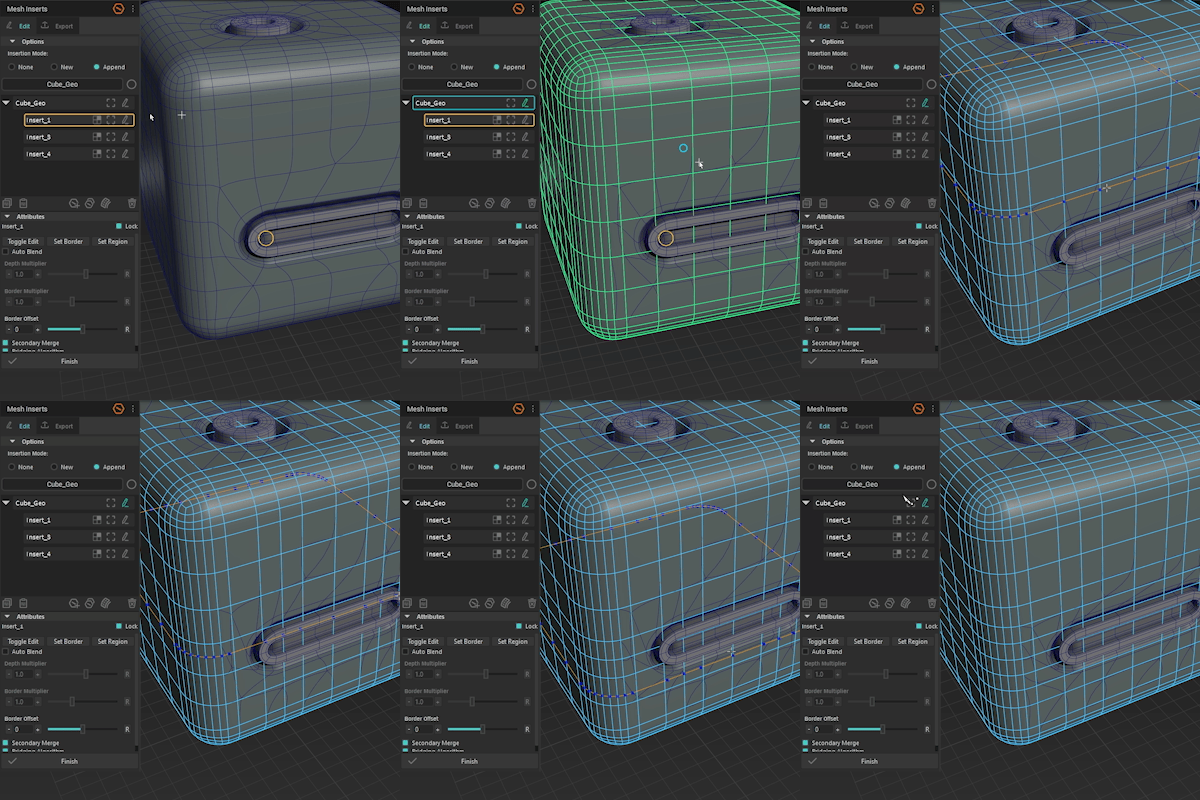
Click on the edit mode icon over any Source Object component of the working mesh to expose the underlying source mesh and adjust as necessary.
⚠️ Refrain from editing the actual working mesh with an active MI stack! This will cause unwanted geometry behavior if you decide to edit its MIs afterward. It is recommended to finalize first.
Kitbox

A minimalistic asset manager and a hub for your 3d kitbashing libraries... or any 3d assets for that matter. Heavily focused on shortcut-based workflow it gives you powerful ways to categorize, navigate, and keep your assets at your fingertips.
It can be launched as a standalone app or from within a DCC app like Maya where it integrates with other tools.
Supported DCC apps
Kitbox DCC integration only supports Maya 2020-2023 on Windows at this time.
Quick start topics:
User Interface
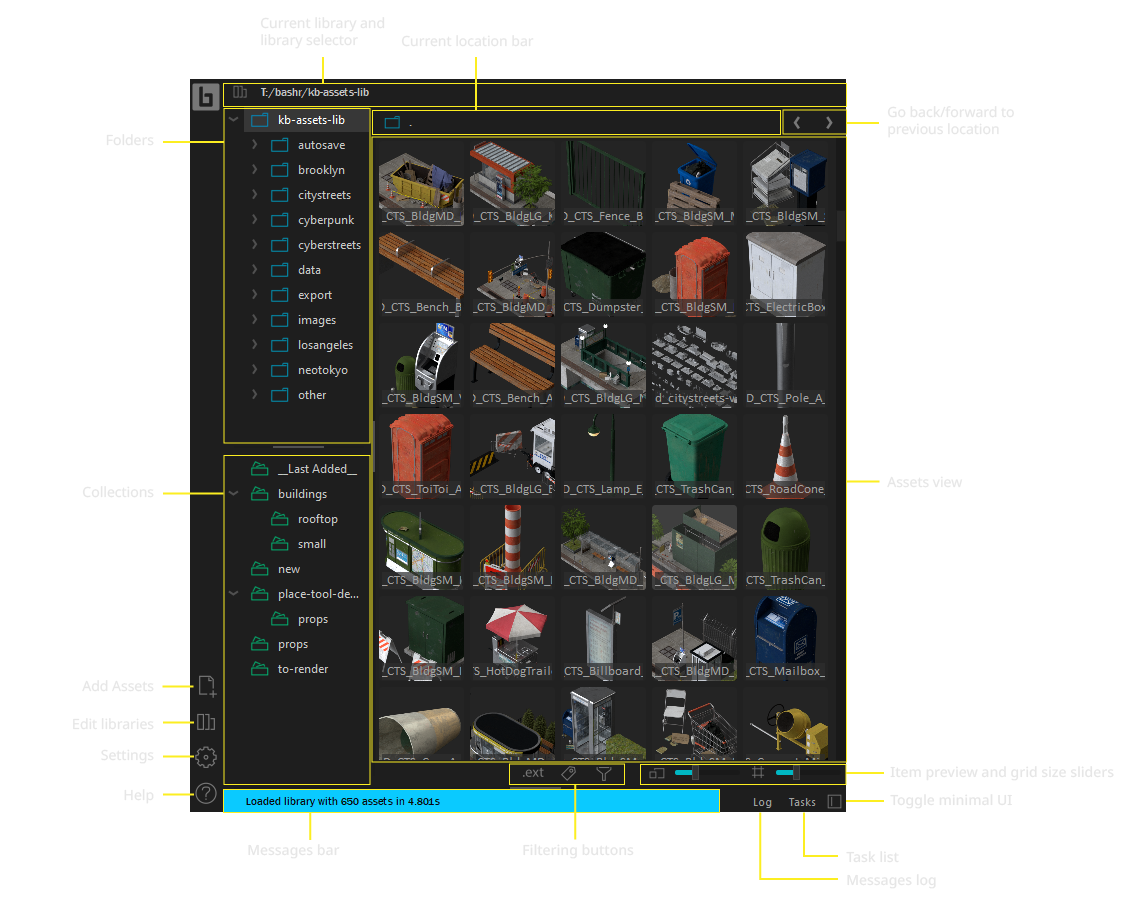
Managing Assets
Kitbox provides a few ways to structure and keep track of your assets:
Libraries
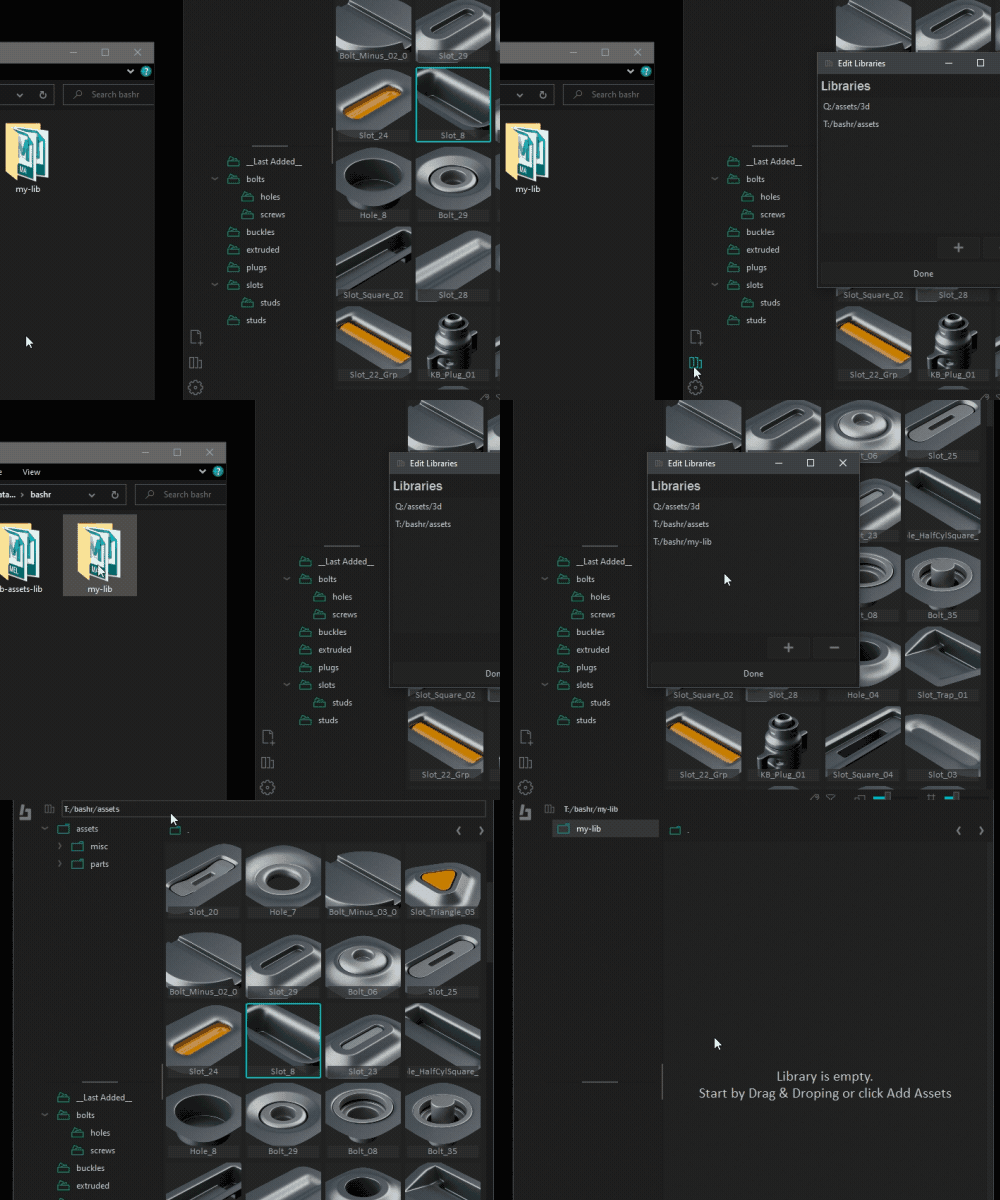
Libraries are the central repositories for your assets, Kitbox loads all your assets that are within the library directory structure. You can have as many libraries as you wish e.g. have a library per project. They can be added by clicking the Edit Libraries icon in the sidebar. Switch between libs in the libraries drop-down menu.
📘 By default an empty library is created in:
C:\Users\<user-name>\Documents\Bashr\Assets_Library
Folders
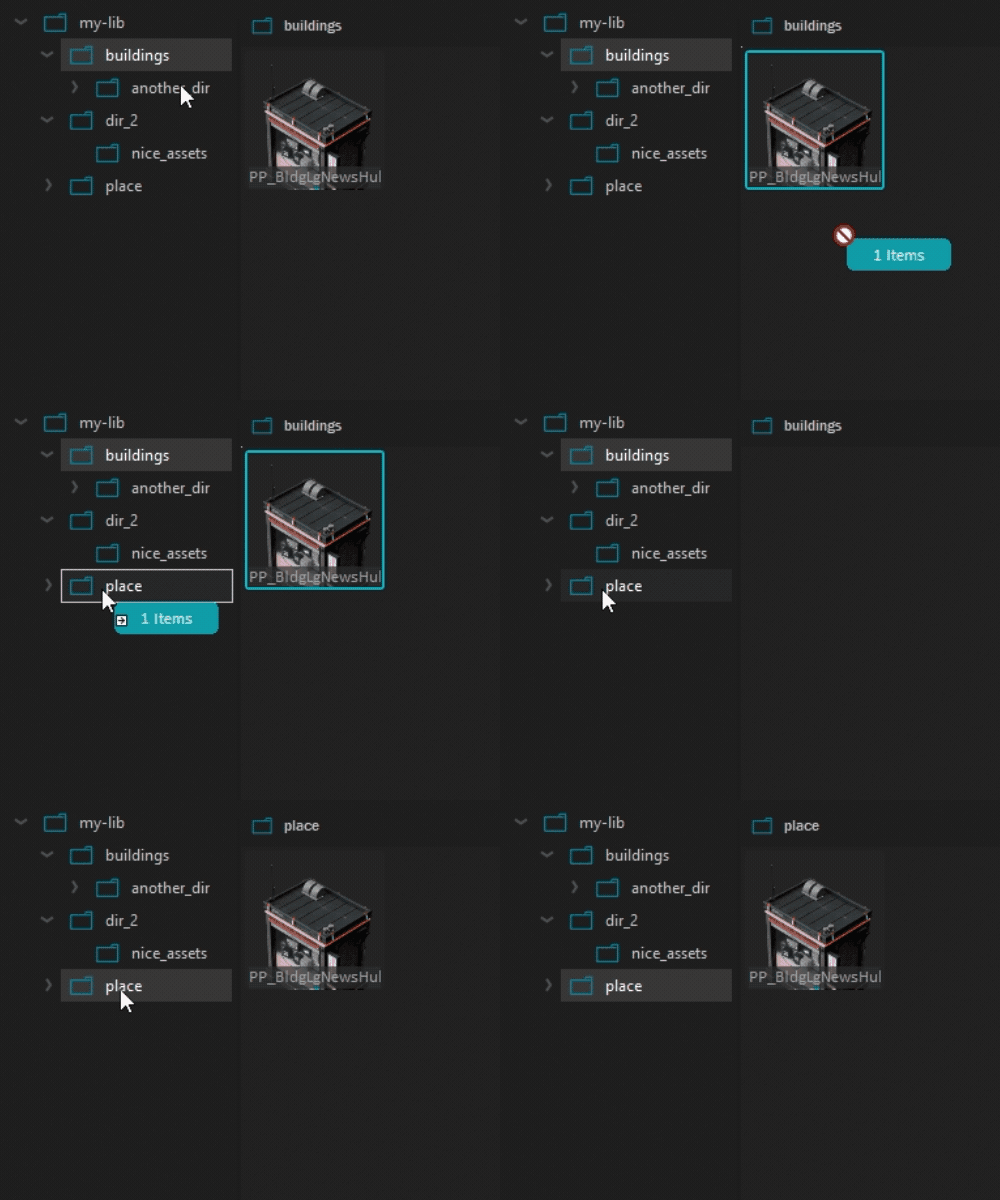
Folders are the physical locations in your storage and are represented by Kitbox as-is on your file system.
In this section:
Adding folders
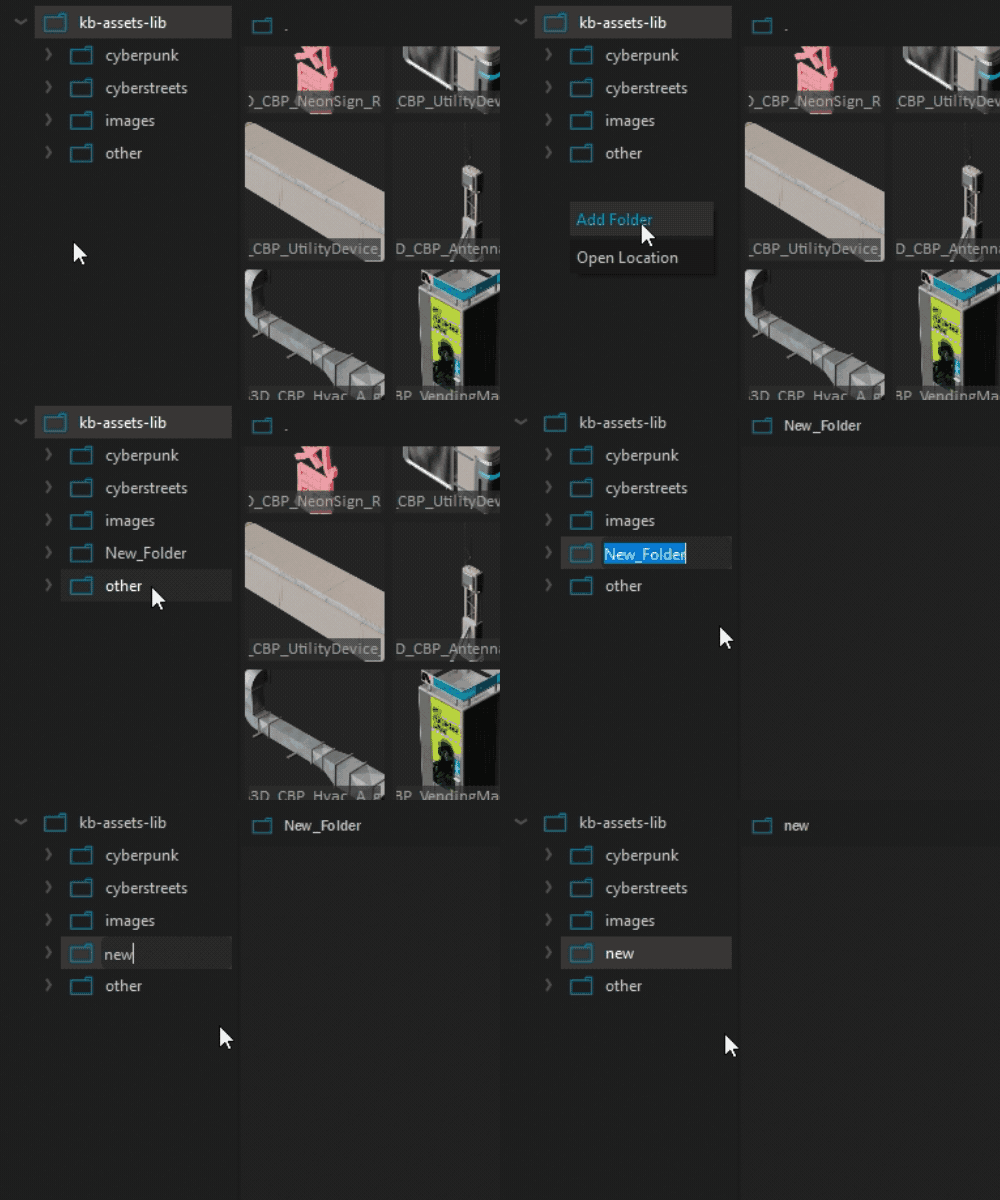
Add folders by right-click menu and pressing Add Folder in the directory navigation side panel or by selecting a folder to add a subfolder.
Navigating
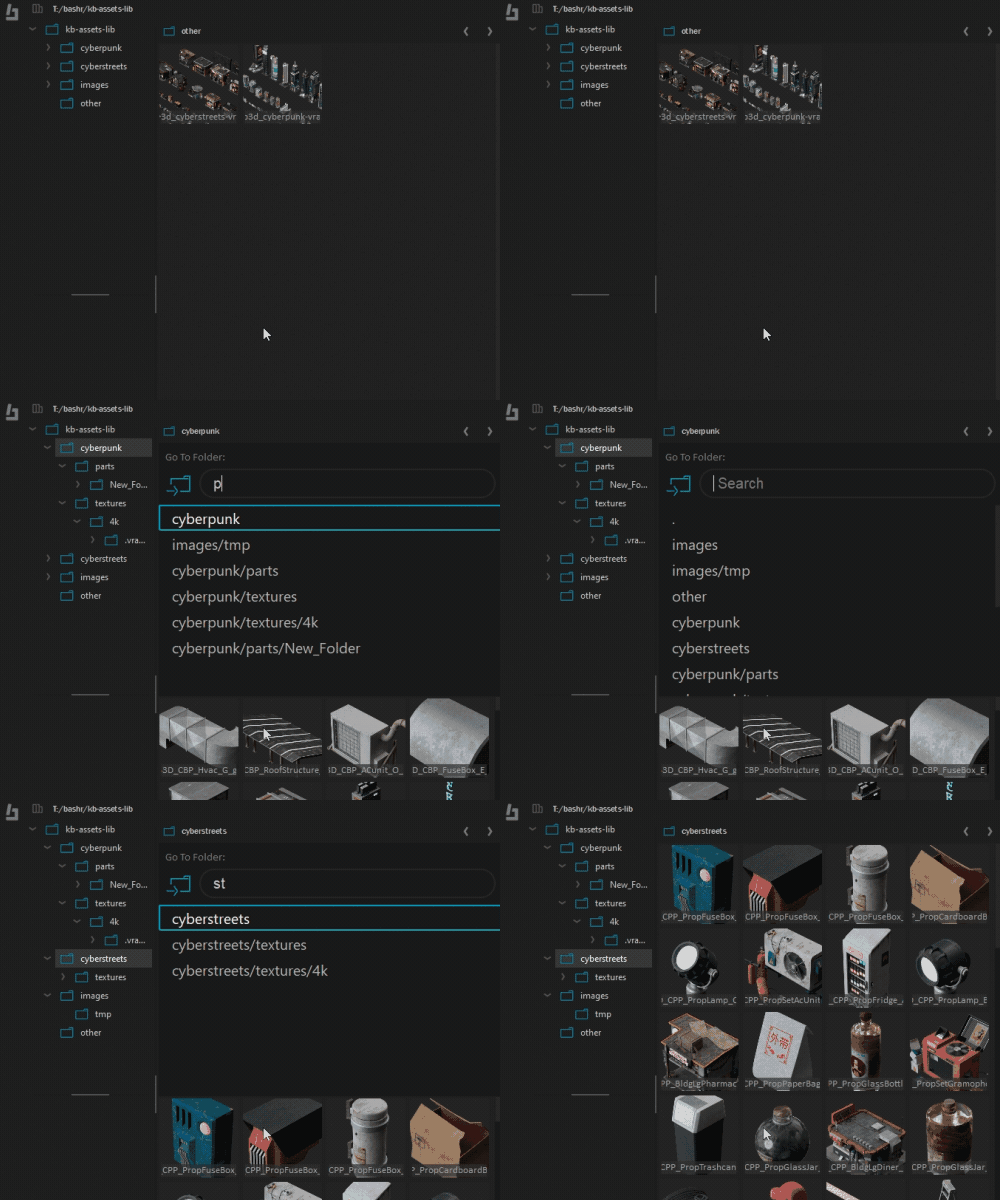
Use either the side panel or the shortcut CTRL+SHIFT+F to swiftly switch between folders within the lib.
📘 Selecting the root library folder will show all assets within the lib.
💡 You can quickly navigate to the library root by typing "." in the Go to Folder search bar.
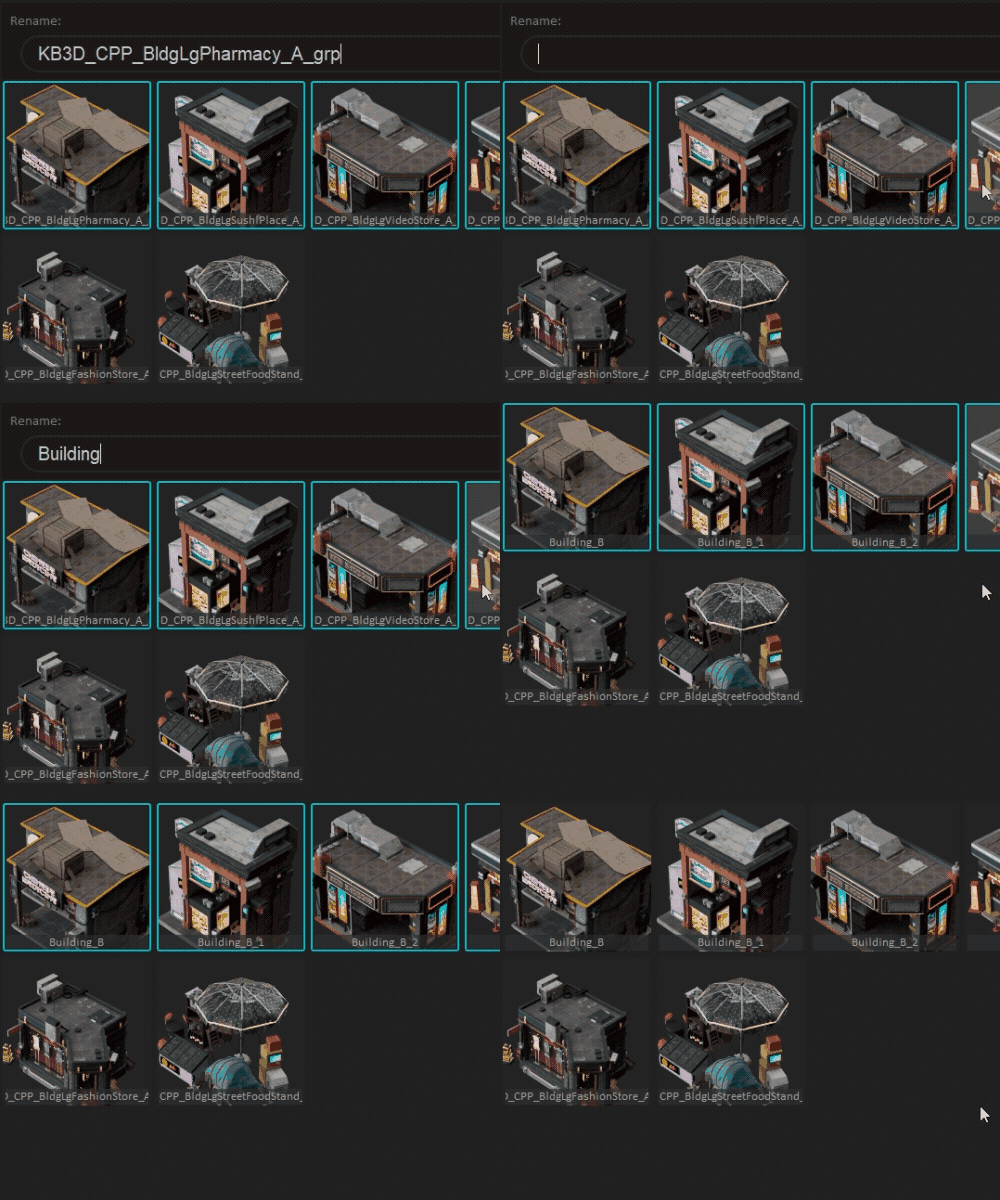
Renaming
Select a folder and then right-click menu Rename.
⚠️ If you renamed folders with your OS file explorer, make sure you reload the library.
Deleting
Currently deleting a folder cannot be performed with Kitbox.
Collections
It is the primary sorting mechanism for your assets, this way allows you to categorize your library into multiple branches without relying on their physical location within the library. Items can belong to any number of collections and subcollections.
In this section:
Adding items
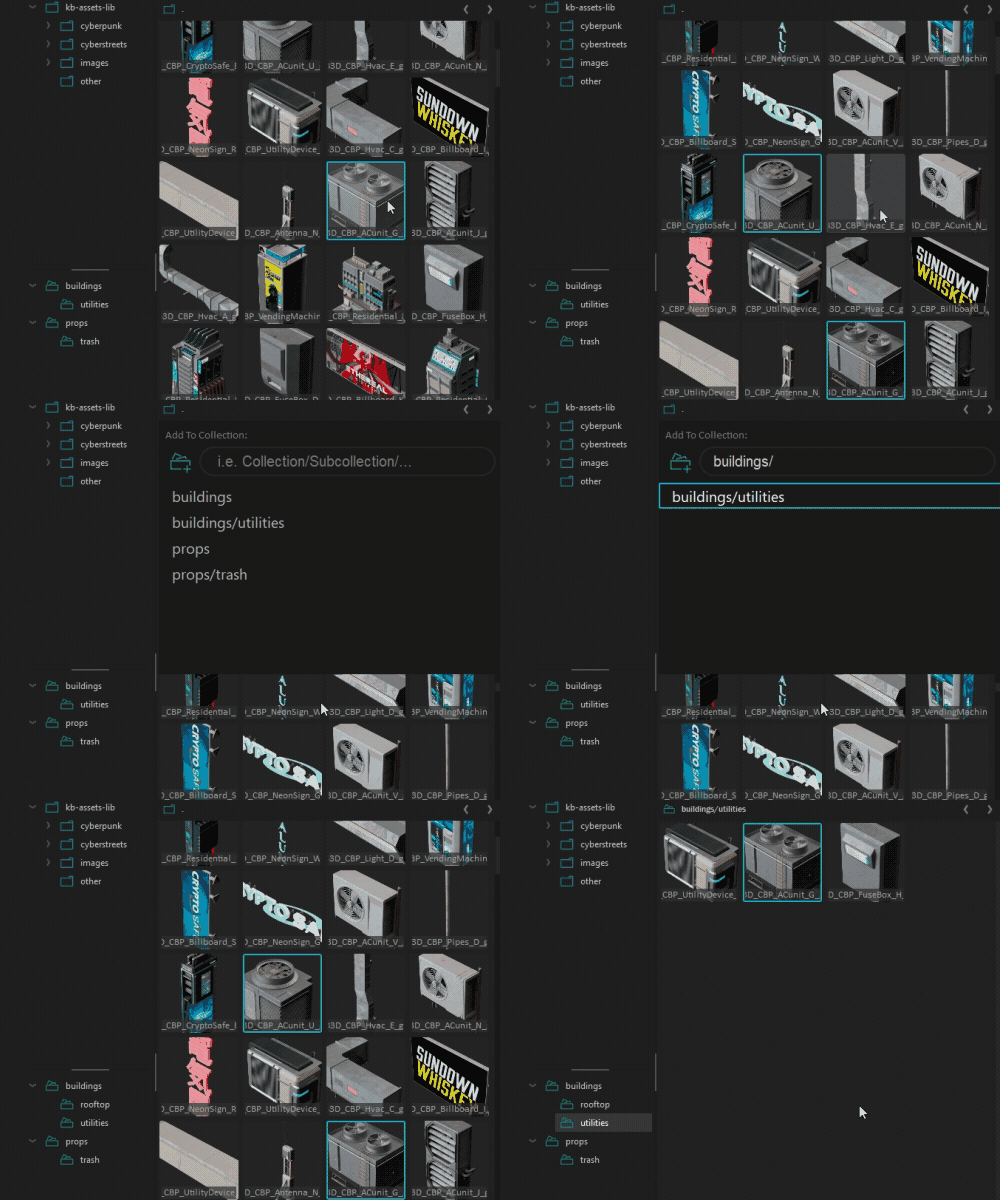
Assets can be added to a collection by selecting some items and using shortcut CTRL+SHIFT+A or by clicking Add To in the right-click popup menu. Then type in a path in the quick-menu with categories and subcategories separated by a forward-slash "/" e.g. Bolts/Round
📘 Items belonging to child branches will appear in the parent collections as well i.e. Bolts/Round and Bolts/Square will both appear under the Bolts collection.
💡 You can also add items to existing collections by dragging and dropping items over a collection.
Navigating
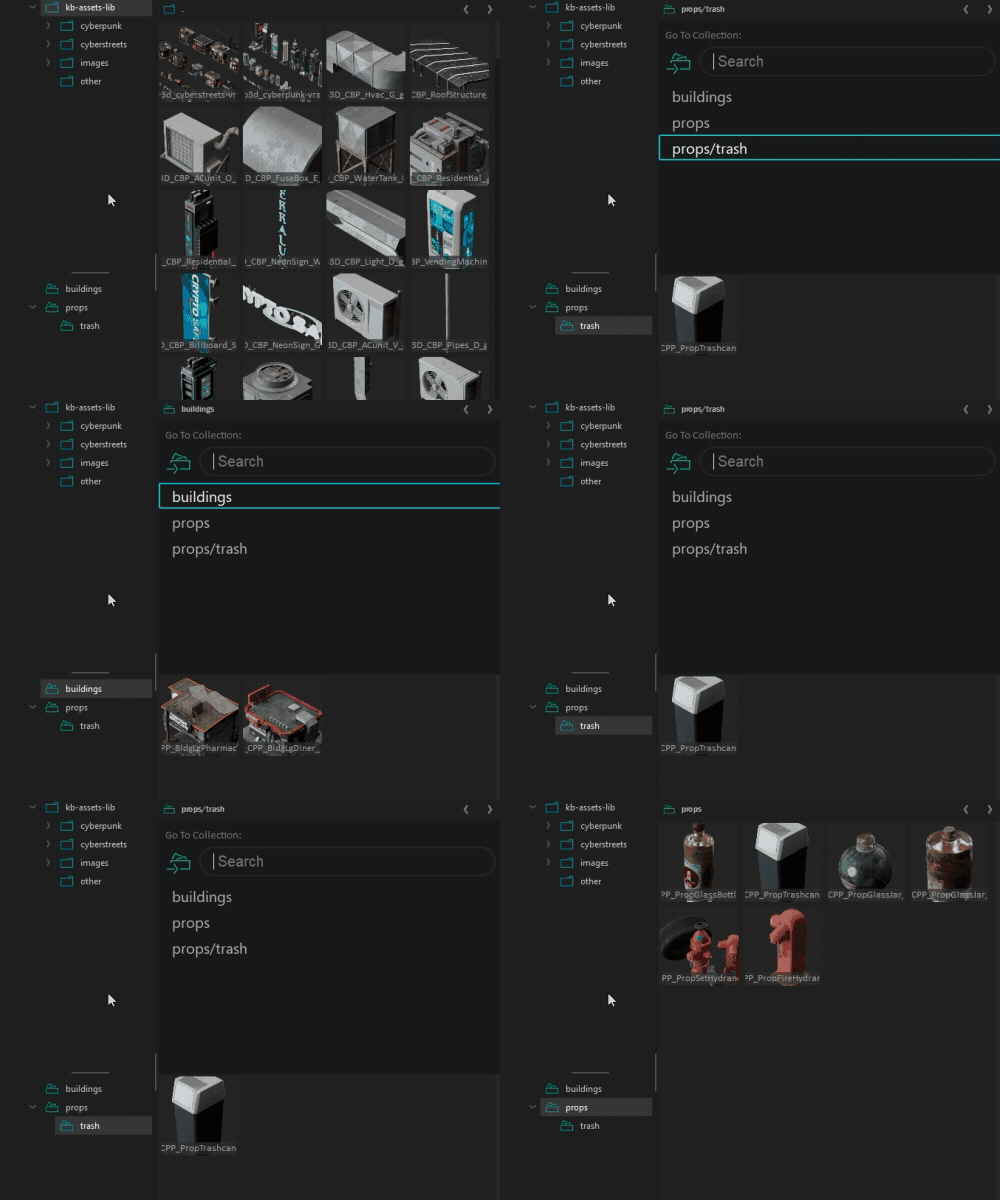
You can quickly access collections through the quick-menu with a shortcut CTRL+SHIFT+C or by using the side panel.
Deleting
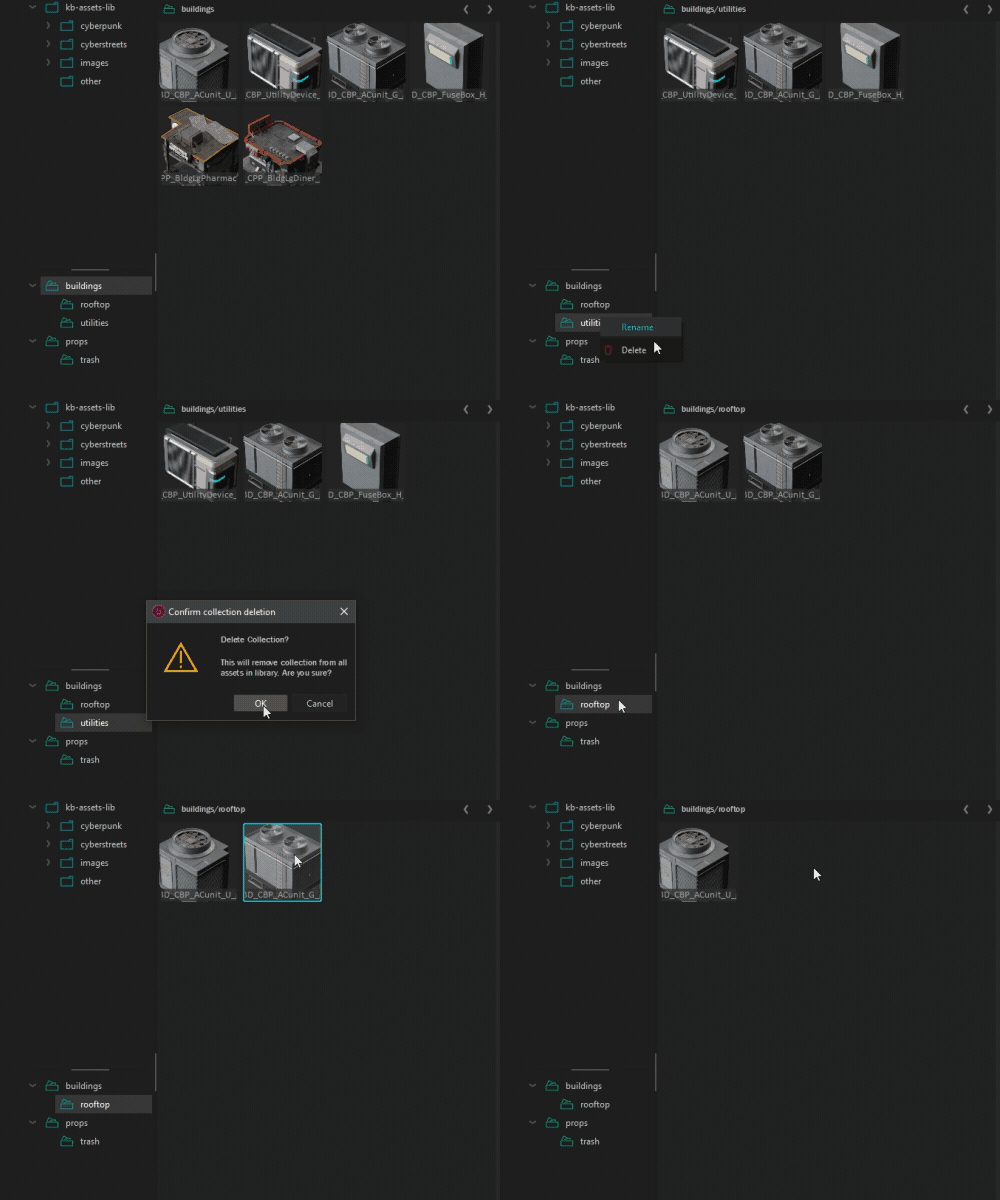
Delete an entire collection by selecting a collection in the side panel and clicking Delete in right-click context menu.
To remove collections per item - select some items and right-click the menu Edit->Collections. Alternatively switch to any collection, select items you'd like to remove, and right-click Remove.
Tags
Tags help you do extra filtering when collections aren't enough e.g. you have assets that are subd and non-subd, textured, etc.
In this section:
Adding
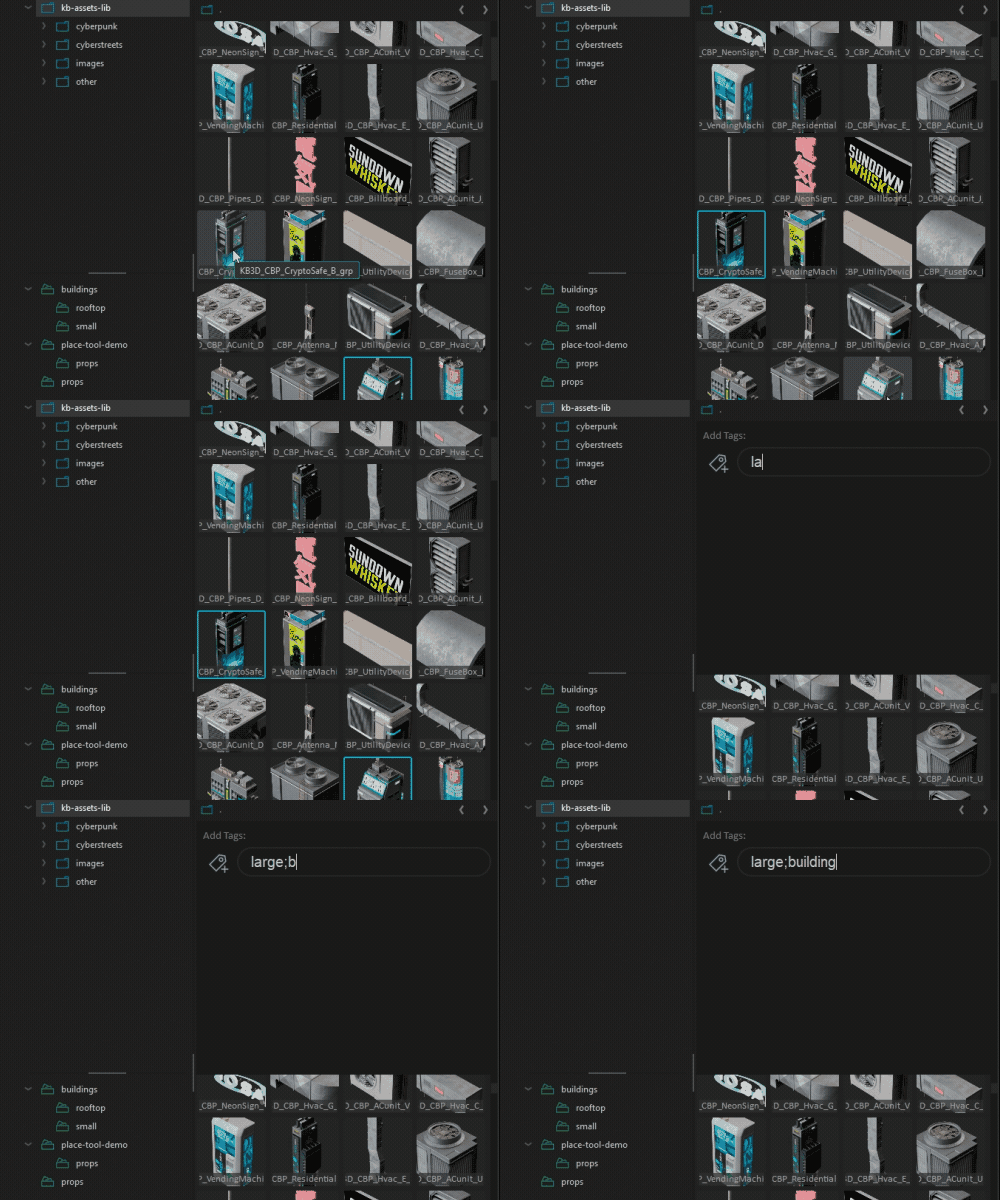
Tags can be added to items using CTRL+T or via right-click context menu after selecting items. To add multiple tags separate your labels using the semicolon ";".
Filtering
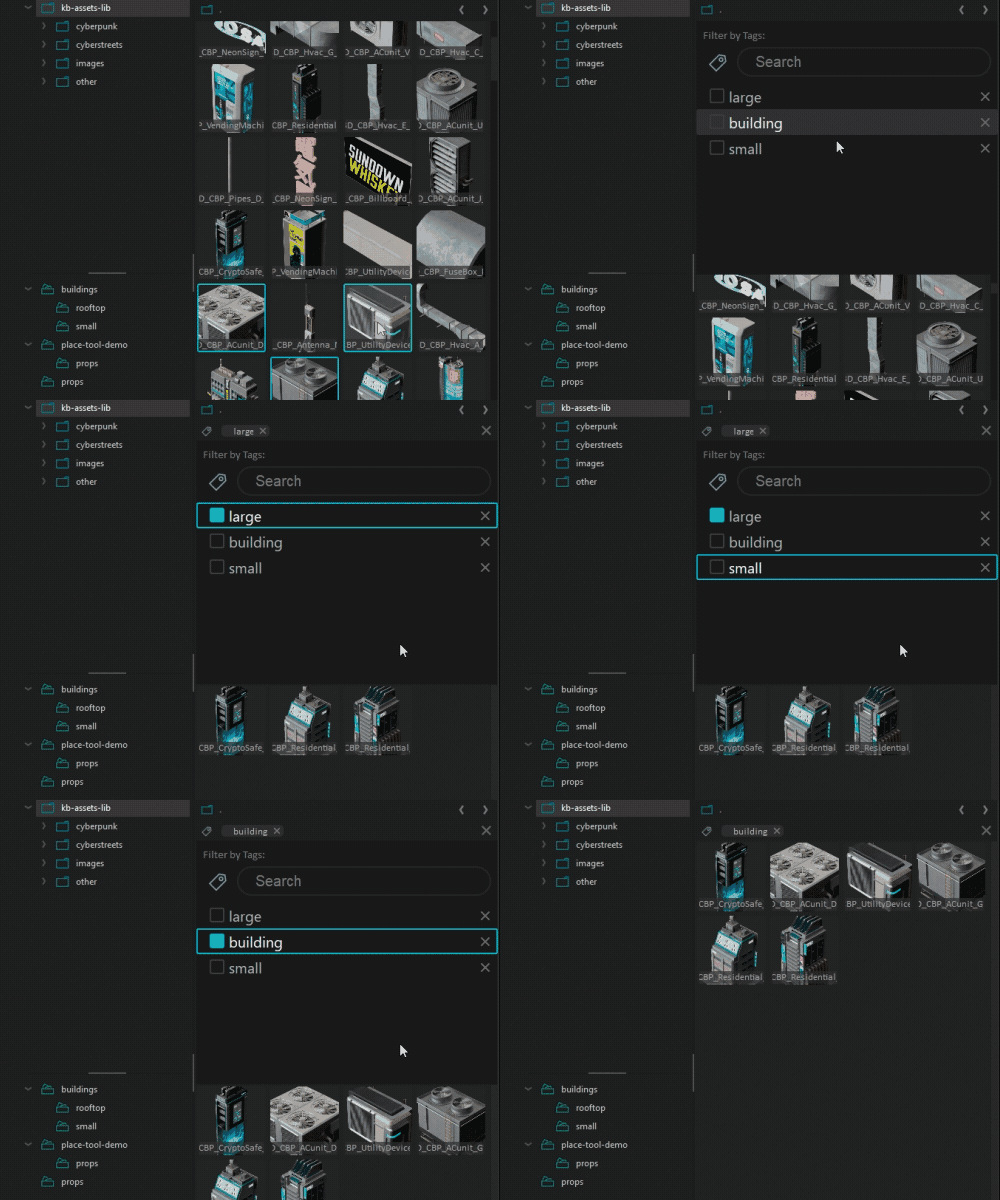
Use shortcut CTRL+R to select tags for filtering or click  .
.
You can navigate the dropdown using arrow keys, activate a tag with left-click, or Enter. Active tags will appear in the tag bar where you can clear the filter or tags individually.
Deleting
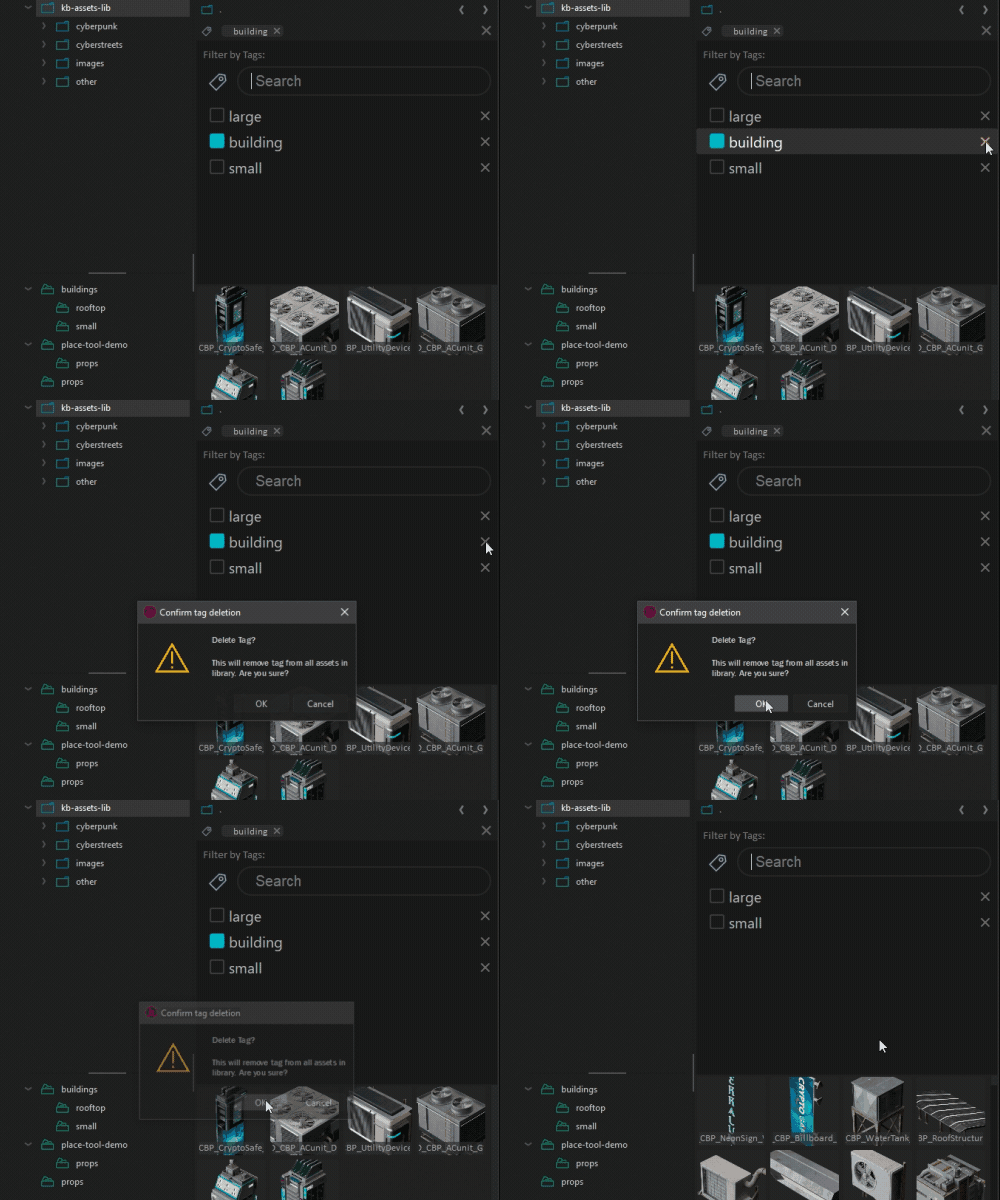
You can delete a tag by popping up the tags filtering menu CTRL+R and clicking the cross button.
To remove a tag from items - select the items and right-click Edit->Tags then click the cross button for the desired tag.
Other Filters
In this section:
Filter by name
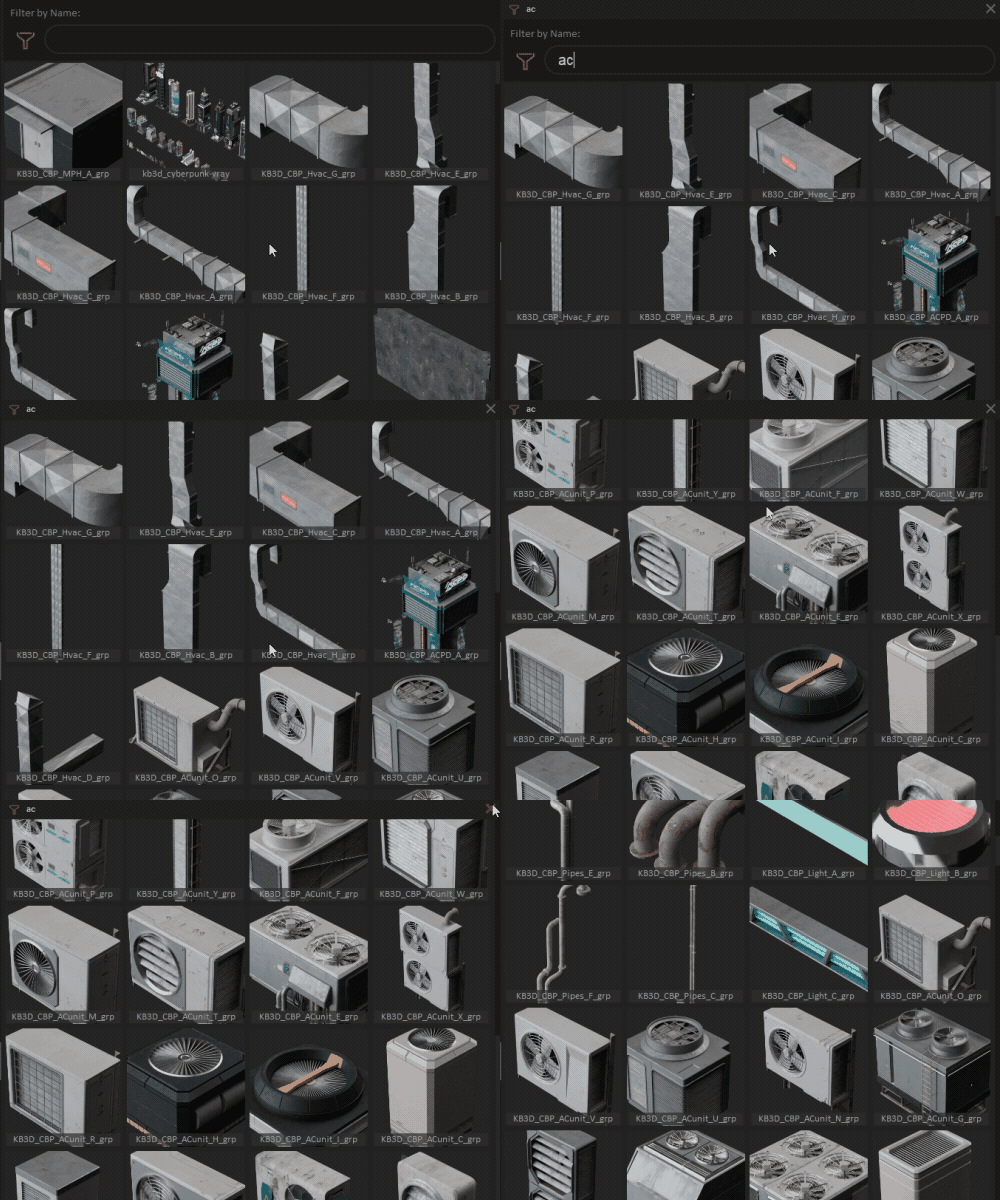
To filter by name use CTRL+F. or click on  icon in the filter toolbar.
The active name filter will appear in the name filter bar, where you can clear it by pressing X.
Filter by file type
To filter by file type click on icon  in the filters toolbar and select the file extensions in the dropdown.
